15AH, San Francisco

California, United States.

Send Your Mail At:

tianyingkejishe@sina.cn

Working Hours

Mon-Sat: 9.30am To 7.00pm

作者标题

Autem vel eum iriure dolor in hendrerit in vulputate velit esse molestie consequat, vel illum dolore eu feugiat nulla facilisis at vero eros et dolore feugait.

Author Archive by recologypower

【IMG】创建和修改镜像内容

一、创建新镜像文件

1、创建镜像文件

使用dd命令创建一个空的镜像文件rootfs.img,每次读取和写入的字节数是1M,大小为1M*2048;大小可根据自己需要保存文件的多少自定义。

$ dd if=/dev/zero of=rootfs.img bs=1M count=2048

2、格式化镜像文件

格式化镜像文件rootfs.img为ext4格式,具体格式化的类型还有ext3、ntfs、fat等格式可自定义。

$ mkfs.ext4 -c rootfs.img  

3、挂载镜像文件

挂载镜像文件rootfs.img到/mnt目录中。具体挂载的目录可以自定义。

$ sudo mount -t ext4 -o loop rootfs.img /mnt

4、拷贝文件到镜像

拷贝需要打包到镜像中的文件到挂载的目录中,此处表示拷贝rootfs/下的所有文件到/mnt目录中(即镜像文件中)。
$ sudo cp -rfp rootfs/* /mnt

5、取消挂载

取消镜像文件的挂载。取消挂载后就表示镜像文件制作完成。

$ sudo umount /mnt

二、修改镜像文件

1、查看镜像分区

fdisk *.img
xiaobao@Newu:~/hdd/tmp$ fdisk AB-small-S-lvm-A03-other-armbian-1.1.100.57.9.img

Welcome to fdisk (util-linux 2.34).
Changes will remain in memory only, until you decide to write them.
Be careful before using the write command.


Command (m for help): p
Disk AB-small-S-lvm-A03-other-armbian-1.1.100.57.9.img: 2.77 GiB, 2956984320 bytes, 5775360 sectors
Units: sectors of 1 * 512 = 512 bytes
Sector size (logical/physical): 512 bytes / 512 bytes
I/O size (minimum/optimal): 512 bytes / 512 bytes
Disklabel type: dos
Disk identifier: 0x00000000

Device                                             Boot  Start     End Sectors  Size Id Type
AB-small-S-lvm-A03-other-armbian-1.1.100.57.9.img1        8192  530431  522240  255M  c W95 FAT32 (LBA)
AB-small-S-lvm-A03-other-armbian-1.1.100.57.9.img2      532480 5775359 5242880  2.5G 83 Linux

2、挂载分区

sudo mount -o loop,offset=4194304 AB-small-S-lvm-A03-other-armbian-1.1.100.57.9.img /mnt/tmp/

可以看到img文件中有两个分区,第一个分区是从8192开始的,这里需要特别注意,需要转换一下:8192*512=4194304B

3、替换内容

$ sudo cp -rfp rootfs/* /mnt/tmp/

三、硬盘导出镜像工具

[f1c100s/f1c200s]uboot编译 sh: 1: python: not found ,cripts/dtc/pylibfdt/_libfdt.so’ failed解决

1、问题分析

根据报错打印提示可以很容易定位python not found,也就是说找不到python软件或者库。用下面指令查看下到底是不是python安装问题:

ls -l /usr/bin/python*

-rwxr-xr-x 1 root root 3637096 Nov  7 18:07 /usr/bin/python2.7
lrwxrwxrwx 1 root root       9 Oct 25  2018 /usr/bin/python3 -> python3.6
-rwxr-xr-x 2 root root 4526456 Nov  7 18:44 /usr/bin/python3.6
lrwxrwxrwx 1 root root      33 Nov  7 18:44 /usr/bin/python3.6-config -> x86_64-linux-gnu-python3.6-config
-rwxr-xr-x 2 root root 4526456 Nov  7 18:44 /usr/bin/python3.6m
lrwxrwxrwx 1 root root      34 Nov  7 18:44 /usr/bin/python3.6m-config -> x86_64-linux-gnu-python3.6m-config
lrwxrwxrwx 1 root root      16 Oct 25  2018 /usr/bin/python3-config -> python3.6-config
-rwxr-xr-x 1 root root    1018 Oct 29  2017 /usr/bin/python3-jsondiff
-rwxr-xr-x 1 root root    3661 Oct 29  2017 /usr/bin/python3-jsonpatch
-rwxr-xr-x 1 root root    1342 May  2  2016 /usr/bin/python3-jsonpointer
-rwxr-xr-x 1 root root     398 Nov 16  2017 /usr/bin/python3-jsonschema
lrwxrwxrwx 1 root root      10 Oct 25  2018 /usr/bin/python3m -> python3.6m
lrwxrwxrwx 1 root root      17 Oct 25  2018 /usr/bin/python3m-config -> python3.6m-config

这也太奇怪了,明明是安装了python,并且是python2和python3都安装了,大家有没有注意到提示名字的不带数字,那可能是连接名字问题。

2、解决方式

sudo ln -s /usr/bin/python2.7 /usr/bin/python

修改wordpress文件上传大小限制

一、修改PHP文件上传大小限制

找到php的配置文件php.ini
我的配置文件所在位置为:/etc/php5/fpm/,请自行查找配置文件存放位置,可通过find命令快速查找存放位置

find / -name php.ini

修改相关配置
把下列参数修改后,在网络所允许的正常情况下,就可以上传大体积文件了
max_execution_time = 600 ;每个PHP页面运行的最大时间值(秒),默认30秒
max_input_time = 600 ;每个PHP页面接收数据所需的最大时间,默认60秒
memory_limit = 8m ;每个PHP页面所吃掉的最大内存,默认8M
file_uploads = on 是否允许通过HTTP上传文件的开关。默认为ON即是开
upload_tmp_dir = /tmp 临时上传目录
upload_max_filesize = 32m 最大上传文件大小
post_max_size = 32m 最大post数据限制
配置的好了后再使用终端
service php5-fpm restart 重启php服务
二、修改Nginx文件上传大小限制

添加client_max_body_size 20M, 必须要放在server下的server_name下,而不是放在localhost /web的大括号里

listen 80 default_server;
        listen [::]:80 default_server ipv6only=on;

        root /var/www;
        index index.html index.htm index.php;

        # Make site accessible from http://localhost/
        server_name localhost;
        client_max_body_size 20m;

        location / {
                # First attempt to serve request as file, then
                # as directory, then fall back to displaying a 404.
                try_files $uri $uri/ =404;
                # Uncomment to enable naxsi on this location
                # include /etc/nginx/naxsi.rules
        }

nginx -s reload

wordpress修改端口号不能访问

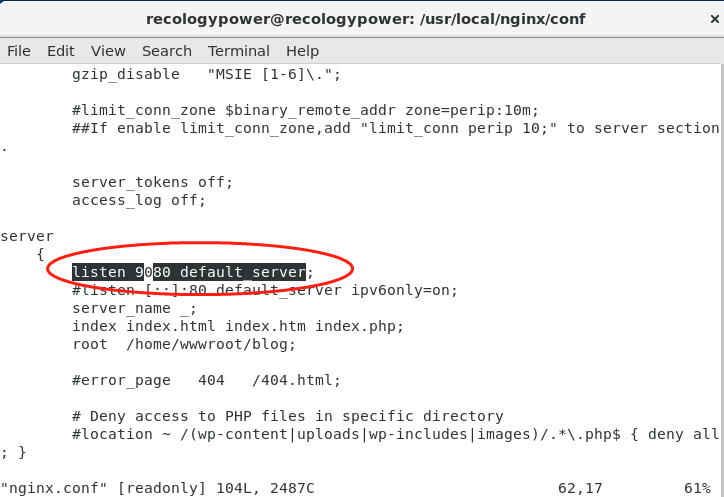
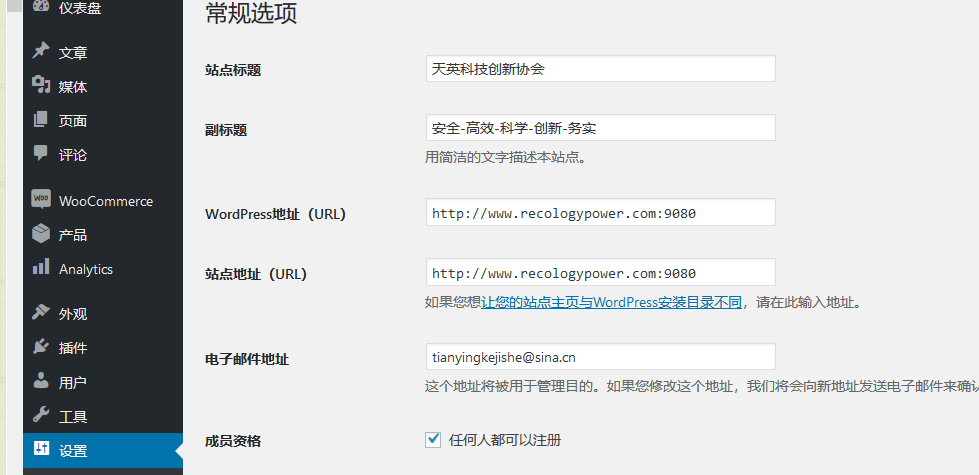
按照网上各种百度搜索,对于word press修改网址端口号后不能访问的问题都归宗于word press设置问题,但是都没有成功,后来一想不对啊,word press本身又不监听端口号,他怎么处理的呢,后来才想到nginx是对端口监听,简单修改后确实给.需要以下两点同时修改,才能生效。

python import引入不同路径下的模块

python 包含子目录中的模块方法比较简单,关键是能够在sys.path里面找到通向模块文件的路径。
下面将具体介绍几种常用情况:
(1)主程序与模块程序在同一目录下:
如下面程序结构:
`– src
|– mod1.py
`– test1.py
若在程序test1.py中导入模块mod1, 则直接使用 import mod1或from mod1 import *;

(2)主程序所在目录是模块所在目录的父(或祖辈)目录
如下面程序结构:
`– src
|– mod1.py
|– mod2
| `– mod2.py
`– test1.py
若在程序test1.py中导入模块mod2, 需要在mod2文件夹中建立空文件__init__.py文件(也可以在该文件中自定义输出模块接口); 然后使用 from mod2.mod2 import * 或import mod2.mod2.

(3)主程序导入上层目录中模块或其他目录(平级)下的模块
如下面程序结构:
`– src
|– mod1.py
|– mod2
| `– mod2.py
|– sub
| `– test2.py
`– test1.py
若在程序test2.py中导入模块mod1和mod2。首先需要在mod2下建立__init__.py文件(同(2)),src下不必建立该文件。然后调用方式如下:
下面程序执行方式均在程序文件所在目录下执行,如test2.py是在cd sub;之后执行python test2.py
而test1.py是在cd src;之后执行python test1.py; 不保证在src目录下执行python sub/test2.py成功。
import sys
sys.path.append(“..”)
import mod1
import mod2.mod2

(4)从(3)可以看出,导入模块关键是能够根据sys.path环境变量的值,找到具体模块的路径。这里仅介绍上面三种简单情况。

Python3异常-AttributeError: module ‘sys’ has no attribute ‘setdefaultencoding

基于python3.6.1版本,在一个.py文件中,加入这3行:
import requests, re, sys
reload(sys)
sys.setdefaultencoding(“utf-8”)
出现这样的错误:
sys.setdefaultencoding(“utf-8”)
AttributeError: module ‘sys’ has no attribute ‘setdefaultencoding’
原因分析:
Python3字符串默认编码unicode, 所以sys.setdefaultencoding也不存在了
解决:
去掉,sys.setdefaultencoding

PyQt5 AttributeError: ‘QGridLayout’ object has no attribute ‘setMargin’

PyQt4和PyQt5版本差异。

PyQt4采用:QVBoxLayout的setMargin方法

PyQt5采用:QVBoxLayout的setContentsMargins方法


错误提示: return QtGui.QApplication.translate(context, text, disambig)
AttributeError: module ‘PyQt5.QtGui’ has no attribute ‘QApplication’

修改:return QApplication.translate(context, text, disambig)

原因:PyQt4和PyQt5版本差异。


错误提示:NameError: name ‘unicode’ is not defined

修改:Python2 的unicode 函数在 Python3 中被命名为 str。在 Python3 中使用 ·str 来代替 Python2 中的 unicode.

原因:There is no such name in Python 3, no. You are trying to run Python 2 code in Python 3. In Python 3, unicode has been renamed to str.