电信通用的用户:telecomadmin
密码:nE7jA%5m
电信通用的用户:telecomadmin
密码:nE7jA%5m
一:在uboot下的defconfig 打开如下配置
CONFIG_DM=y
CONFIG_DM_GPIO=y
CONFIG_DWAPB_GPIO=y
CONFIG_CMD_GPIO=y
二:重新编译u-boot后会生成cmd:gpio
(板子上电时连续按回车键)进入到板端uboot cmdline下执行” gpio status -a ” 查看板端对应的gpio numbe
三:利用 uboot gpio 命令操作GPIO 做测试
四:gpio 操作demo
直接以下demo code添加到uboot/cmd路径下,再在uboot/cmd/Makefile中添加编译选项,编译完成后可以直接操作gpio
#include <command.h>
#include <linux/string.h>
#include <linux/kernel.h>
#include <linux/delay.h>
#include <asm/gpio.h>

int do_gpio_test(struct cmd_tbl *cmdtp, int flag, int argc, char * const argv[])
{
    if (argc < 2) {
        printf("usage: gpio_test [requ/out/on/off]\n");
        return 0;
    }

    if (strcmp("requ", argv[1]) == 0) {
        gpio_request(126, "ir_a");
        gpio_request(127, "ir_b");
        mdelay(10);
    } else if (strcmp("out", argv[1]) == 0) {
        gpio_direction_output(126, 1);
        gpio_direction_output(127, 1);
        mdelay(10);
    } else if (strcmp("on", argv[1]) == 0) {
        gpio_set_value(126, 0);
        gpio_set_value(127, 1);
        mdelay(100);
        gpio_set_value(126, 1);
        gpio_set_value(127, 1);
    } else if (strcmp("off", argv[1]) == 0) {
        gpio_set_value(126, 1);
        gpio_set_value(127, 0);
        mdelay(100);
        gpio_set_value(126, 1);
        gpio_set_value(127, 1);
    }

    return 0;
}

U_BOOT_CMD(
    gpio_test, 4, 1, do_gpio_test,
    "u-boot gpio cmd test",
    "gpio - just for test\n"
);
五、测试
编译完成升级后,进入到uboot会有gpio_test命令
gpio_test requ
初始化gpio
gpio_test out
设置gpio direction
gpio_test on
设置 ir_cur (的两根PIN) 状态常用图像像素格式 RGB 和 YUV
近期由于项目需要,开始接触图像像素格式,因此在这里做一个小结。
像素格式描述了像素数据存储所用的格式,定义了像素在内存中的编码方式。RGB 和 YUV 为两种经常使用的像素格式。
RGB 和 RGBA 格式
RGB 图像具有三个通道 R、G、B,分别对应红、绿、蓝三个分量,由三个分量的值决定颜色,一般也叫做 RGB24;
RGBA 是 RGB 图像加一个通道 alpha,即透明度,于是共有四个分量共同控制颜色,一般也叫做 RGB32。
YUV 格式
YUV 图像是指将亮度参量 Y 和色度参量 U/V 分开表示的像素格式,主要用于优化彩色视频信号的传输。
YUV 像素格式来源于 RGB 像素格式,通过公式运算,YUV 三分量可以还原出 RGB,YUV 转 RGB 的公式如下:
    R = Y + 1.403V
    G = Y - 0.344U - 0.714V
    B = Y + 1.770U
一般,将 RGB 和 YUV 的范围均限制在 [0, 255] 间,则有如下转换公式:
R = Y + 1.403(V - 128)
G = Y - 0.344(U - 128) - 0.714(V - 128)
B = Y + 1.770(U - 128)
鉴于 RGB 格式已经见得见多,本文主要总结 YUV 常见的几种像素格式。
YUV 采样
YUV 相比于 RGB 格式最大的好处是可以做到在保持图像质量降低不明显的前提下,减小文件大小。YUV 格式之所以能够做到,是因为进行了采样操作。
YUV 码流的存储格式与其采样方式密切相关,主流的采样方式有三种:YUV 4:4:4(YUV444),YUV 4:2:2(YUV422),YUV 4:2:0(YUV420)。
若以以黑点表示采样该像素点的 Y 分量,以空心圆圈表示采用该像素点的 UV 分量,则这三种采样方式如下:
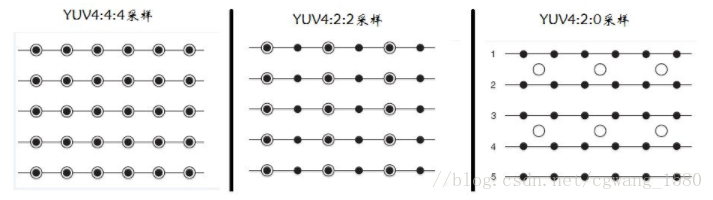
即:
YUV 4:4:4 采样,每一个 Y 对应一组 UV 分量。
YUV 4:2:2 采样,每两个 Y 共用一组 UV 分量。
YUV 4:2:0 采样,每四个 Y 共用一组 UV 分量。
YUV 存储格式
YUV 存储可以分为两种:packed(打包)和 planar(平面);
packed:Y、U、V 分量穿插着排列,三个分量存在一个 Byte 型数组里;
planar:Y、U、V 分量分别存在三个 Byte 型数组中;
常见的像素格式
YUV422:YUYV、YVYU、UYVY、VYUY
这四种格式每一种又可以分为 2 类(packed和planar),以 YUYV 为例,一个 6*4 的图像的存储方式如下:
	Y Y Y Y Y Y
	Y Y Y Y Y Y
	Y Y Y Y Y Y
	Y Y Y Y Y Y
	U U U U U U                  Y U Y V Y U Y V Y U Y V
	U U U U U U                  Y U Y V Y U Y V Y U Y V
        V V V V V V                  Y U Y V Y U Y V Y U Y V
	V V V V V V                  Y U Y V Y U Y V Y U Y V
	- Planar -                          - Packed -
同样,对于一个6*4的图像,这四种像素格式的存储方式如下:
	Y Y Y Y Y Y      Y Y Y Y Y Y      Y Y Y Y Y Y      Y Y Y Y Y Y
	Y Y Y Y Y Y      Y Y Y Y Y Y      Y Y Y Y Y Y      Y Y Y Y Y Y
	Y Y Y Y Y Y      Y Y Y Y Y Y      Y Y Y Y Y Y      Y Y Y Y Y Y
	Y Y Y Y Y Y      Y Y Y Y Y Y      Y Y Y Y Y Y      Y Y Y Y Y Y
	U U U U U U      V V V V V V      U V U V U V      V U V U V U
	V V V V V V      U U U U U U      U V U V U V      V U V U V U
     - I420 -          - YV12 -         - NV12 -         - NV21 -

1、获取字符串长度
abc="huihuiuhiihu"
echo ${#abc}
利用#号实现字符串长度统计
2、截取字符串内容
${hui:5}利用:加数字的形式截取固定长度字符串内容
3、实现固定长度字符串拼接
hui="sssdsdsdsjkdhskhdksd"
abc="12346"
kji=${abc}${hui:${#abc}}

echo $kji
1、报错内容
openwrt mkimage: error while loading shared libraries: libssl.so.1.0.0: cannot open shared object file: No such file or directory2、解决方案
点击下载:http://security.ubuntu.com/ubuntu/pool/main/o/openssl1.0/
一、启动分析
uboot启动后会通过检测lx2160ardb_boot.scr配置文件,实现默认启动引导。此系列芯片引导方式一样。
打开./configs/board/lx2160ardb_rev2/manifest文件分析
vim ./configs/board/lx2160ardb_rev2/manifestdistroboot=\
'env exists dtb || setenv dtb fsl-lx2160a-rdb.dtb;'\
'env exists kernel_image || setenv kernel_image Image;'\
'env exists devpart_boot || setenv devpart_boot 2;'\
'env exists devpart_root || setenv devpart_root 4;'\
'part uuid $devtype $devnum:$devpart_root partuuidr;'\
'setenv bootargs console=ttyAMA0,115200 earlycon=pl011,mmio32,0x21c0000 root=PARTUUID=$partuuidr rw rootwait pci=pcie_bus_perf $othbootargs;'\
'load $devtype $devnum:$devpart_boot $kernel_addr_r $kernel_image;'\
'load $devtype $devnum:$devpart_boot $fdt_addr_r $dtb;'\
'env exists secureboot && echo validating secureboot && run secureboot_validate;'\
'booti $kernel_addr_r - $fdt_addr_r'
distroboot_ima=\
'env exists dtb || setenv dtb fsl-lx2160a-rdb.dtb;'\
'env exists kernel_image || setenv kernel_image Image;'\
'env exists devpart_boot || setenv devpart_boot 2;'\
'env exists devpart_root || setenv devpart_root 4;'\
'part uuid $devtype $devnum:$devpart_root partuuidr;'\
'load $devtype $devnum:$devpart_boot $kernel_addr_r $kernel_image;'\
'load $devtype $devnum:$devpart_boot $fdt_addr_r $dtb;'\
'setenv initramfs_addr_r 0xb0000000; setenv initramfsheader_addr_r 0x80300000;'\
'load $devtype $devnum:$devpart_boot $initramfs_addr_r initramfs.img;'\
'env exists secureboot && echo validating secureboot && run secureboot_validate;'\
'setenv bootargs console=ttyAMA0,115200 earlycon=pl011,mmio32,0x21c0000 root=PARTUUID=$partuuidr rw rootwait pci=pcie_bus_perf $othbootargs;'\
'booti $kernel_addr_r $initramfs_addr_r $fdt_addr_r'
通过分析配置文件,发现Linux和rootfs的引导取决于devpart_boot和devpart_root两个变量,所以通过修改这两个变量值,便可动态实现,分区引导切换。
二、手动引导切换
进入uboot命令行
setenv devpart_boot  2
setenv devpart_root  4
saveenv
2和4代表分区号
三、动态引导切换
如实现动态引导切换需要通过fw_env工具实现。请参照《fw-env开启文件系统设置uboot环境变量》http://www.recologypower.com:9080/?p=1247
四、分区处理
flex-installer -i pf -p 6P=200M:1536M:128M:13G:1536M:-1 -d /dev/sdx五、烧录程序
usermod -a -G sudo xxxxx1、进入uboot修改源码
vim include/configs/lx2160a_common.h最后增加
/*Begin:add by zhaobaoxing for env*/
#define CONFIG_SYS_MMC_ENV_DEV          0
#define CONFIG_ENV_SIZE                 0x2000          /* 8KB */
#define CONFIG_ENV_SECT_SIZE            0x20000
#define CONFIG_ENV_OFFSET               0x500000
#define CONFIG_ENV_ADDR                 (CONFIG_SYS_FLASH_BASE + CONFIG_ENV_OFFSET)
/*End:add by zhaobaoxing for env*/
2、修改fw_env.config文件
# Configuration file for fw_(printenv/setenv) utility.
# Up to two entries are valid, in this case the redundant
# environment sector is assumed present.
# Notice, that the "Number of sectors" is not required on NOR and SPI-dataflash.
# Futhermore, if the Flash sector size is omitted, this value is assumed to
# be the same as the Environment size, which is valid for NOR and SPI-dataflash
# Device offset must be prefixed with 0x to be parsed as a hexadecimal value.

# NOR example
# MTD device name       Device offset   Env. size       Flash sector size       Number of sectors
#/dev/mtd1              0x0000          0x4000          0x4000
#/dev/mtd2              0x0000          0x4000          0x4000

# MTD SPI-dataflash example
# MTD device name       Device offset   Env. size       Flash sector size       Number of sectors
#/dev/mtd5              0x4200          0x4200
#/dev/mtd6              0x4200          0x4200

# NAND example
#/dev/mtd0              0x4000          0x4000          0x20000                 2

# On a block device a negative offset is treated as a backwards offset from the
# end of the device/partition, rather than a forwards offset from the start.

# Block device example
/dev/mmcblk0            0x500000                0x2000
#/dev/mmcblk0           -0x20000        0x20000

# VFAT example
#/boot/uboot.env        0x0000          0x4000

# UBI volume
#/dev/ubi0_0            0x0             0x1f000         0x1f000
#/dev/ubi0_1            0x0             0x1f000         0x1f000

# UBI volume by name
#/dev/ubi0:env          0x0             0x1f000         0x1f000
#/dev/ubi0:env-redund   0x0             0x1f000         0x1f000
~
sudo mkdir -p /etc/docker
sudo tee /etc/docker/daemon.json <<-'EOF'
{
  "registry-mirrors": ["https://yxzrazem.mirror.aliyuncs.com"]
}
EOF
sudo systemctl daemon-reload
sudo systemctl restart docker