
usermod -a -G sudo xxxxxusermod -a -G sudo xxxxx1、进入uboot修改源码
vim include/configs/lx2160a_common.h最后增加
/*Begin:add by zhaobaoxing for env*/
#define CONFIG_SYS_MMC_ENV_DEV          0
#define CONFIG_ENV_SIZE                 0x2000          /* 8KB */
#define CONFIG_ENV_SECT_SIZE            0x20000
#define CONFIG_ENV_OFFSET               0x500000
#define CONFIG_ENV_ADDR                 (CONFIG_SYS_FLASH_BASE + CONFIG_ENV_OFFSET)
/*End:add by zhaobaoxing for env*/
2、修改fw_env.config文件
# Configuration file for fw_(printenv/setenv) utility.
# Up to two entries are valid, in this case the redundant
# environment sector is assumed present.
# Notice, that the "Number of sectors" is not required on NOR and SPI-dataflash.
# Futhermore, if the Flash sector size is omitted, this value is assumed to
# be the same as the Environment size, which is valid for NOR and SPI-dataflash
# Device offset must be prefixed with 0x to be parsed as a hexadecimal value.

# NOR example
# MTD device name       Device offset   Env. size       Flash sector size       Number of sectors
#/dev/mtd1              0x0000          0x4000          0x4000
#/dev/mtd2              0x0000          0x4000          0x4000

# MTD SPI-dataflash example
# MTD device name       Device offset   Env. size       Flash sector size       Number of sectors
#/dev/mtd5              0x4200          0x4200
#/dev/mtd6              0x4200          0x4200

# NAND example
#/dev/mtd0              0x4000          0x4000          0x20000                 2

# On a block device a negative offset is treated as a backwards offset from the
# end of the device/partition, rather than a forwards offset from the start.

# Block device example
/dev/mmcblk0            0x500000                0x2000
#/dev/mmcblk0           -0x20000        0x20000

# VFAT example
#/boot/uboot.env        0x0000          0x4000

# UBI volume
#/dev/ubi0_0            0x0             0x1f000         0x1f000
#/dev/ubi0_1            0x0             0x1f000         0x1f000

# UBI volume by name
#/dev/ubi0:env          0x0             0x1f000         0x1f000
#/dev/ubi0:env-redund   0x0             0x1f000         0x1f000
~
sudo mkdir -p /etc/docker
sudo tee /etc/docker/daemon.json <<-'EOF'
{
  "registry-mirrors": ["https://yxzrazem.mirror.aliyuncs.com"]
}
EOF
sudo systemctl daemon-reload
sudo systemctl restart dockerCC = arm-linux-gnueabihf-gcc#这里使用你板子编译的gcc最好指定有路径的更明确
LVGL_DIR ?= $(shell pwd)/..#创建lvgl的根目录
LVGL_DIR_NAME ?= lvgl
CFLAGS ?= -O3 -g0 -I$(LVGL_DIR)/
LDFLAGS ?= -lm -lpthread
BIN = bbu_base_func
MAINSRC = ../main.c ../tcp_server.c ../lx2160_fan.c ../lx2160_tmp.c ../lxspi_gd32.c ../clk_sync.c
include $(LVGL_DIR)/lvgl/lvgl.mk
include $(LVGL_DIR)/lv_drivers/lv_drivers.mk
OBJEXT ?= .o
AOBJS = $(ASRCS:.S=$(OBJEXT))
COBJS = $(CSRCS:.c=$(OBJEXT))
MAINOBJ = $(MAINSRC:.c=$(OBJEXT))
SRCS = $(ASRCS) $(CSRCS) $(MAINSRC)
OBJS = $(AOBJS) $(COBJS)
all: default
%.o: %.c
@$(CC) $(CFLAGS) -c $(INCLUDES) $< -o $@
@echo "CC $<"
default: $(AOBJS) $(COBJS) $(MAINOBJ)
$(CC) -static -o $(BIN) $(MAINOBJ) $(AOBJS) $(COBJS) $(LDFLAGS)
cp $(BIN) ../
clean:
rm -f $(BIN) $(AOBJS) $(COBJS) $(MAINOBJ)
1、查看磁盘使用大小:
df -h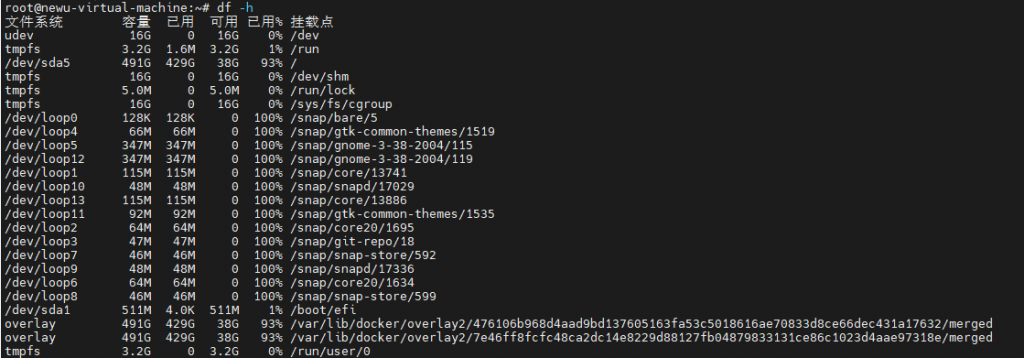
2、查看目录占用大小
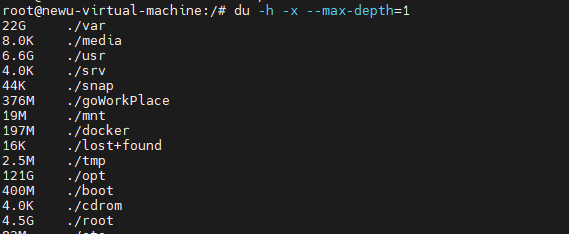
cat /proc/kallsyms grep fib4 rule default
1、下载源文件
http://ftp.gnu.org/pub/gnu/ncurses/
Tags · mirror/ncurses (github.com)
Ncurses project files : Ncurses (launchpad.net)
2、加压并配置
./configure --prefix=/usr/aarch64-linux-gnu --host=aarch64-linux CC=aarch64-linux-gnu-gcc --without-cxx --without-cxx-binding --without-ada --without-manpages --enable-overwrite --without-debug --without-tests --with-shared --without-tests --without-progs
3、编译并安装
make&&make installmake cfg all tgt=rom ARCH=mips CROSS_COMPILE=mipsel-linux- DEBUG=-g第一部分:ARCH=mips CROSS_COMPILE=mipsel-linux- DEBUG=-g
ARCH=mips 设置了平台是mips平台
CROSS_COMPILE=mipsel-linux-  设置交叉编译器前缀,在编译时会替换成mipsel-linux-,之所以设置环境变量,一个是方便在这儿不用输入绝对路径,当找不到交叉编译器的时候,需要输入交叉编译器的绝对路径
DEBUG=-g 设置调试信息
第二部分:make cfg all tgt=rom
make cfg 是配置
make all
make tgt=rom 在Makefile.inc里可以看到,是生成的二进制文件1、原因
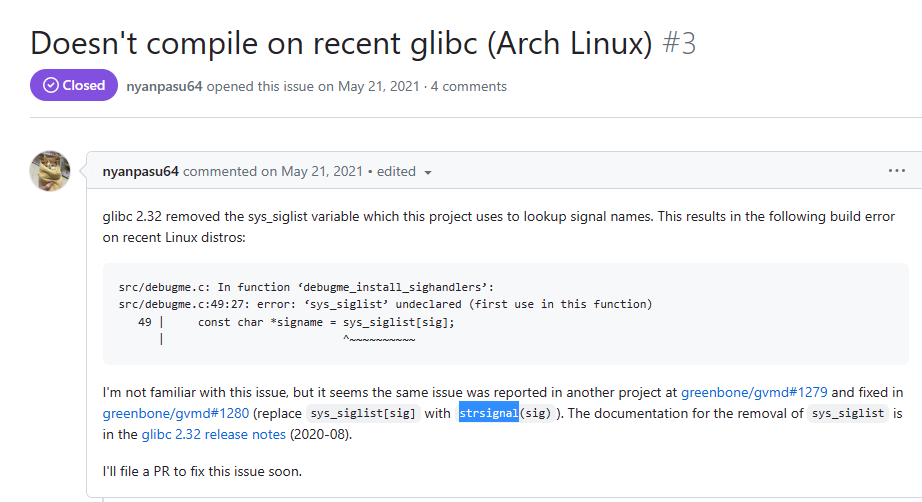
2、解决方法
意思是新的glibc库已经不支持sys_siglist[],使用strsignal()。
重点方括号变成了圆括号,就是由数组变成了函数。
1、下载并解压
https://github.com/mongodb/mongo-c-driver/releases/download/1.23.4/mongo-c-driver-1.23.4.tar.gz编译环境:Ubuntu 20.04
2、环境配置
 sudo apt-get install cmake libssl-dev libsasl2-dev

tar xzf mongo-c-driver-1.23.4.tar.gz
cd mongo-c-driver-1.23.4
mkdir cmake-build
cd cmake-build
cmake -DENABLE_AUTOMATIC_INIT_AND_CLEANUP=OFF -DCMAKE_C_COMPILER=/usr/bin/aarch64-linux-gnu-gcc -DCMAKE_CXX_COMPILER=/usr/bin/aarch64-linux-gnu-g++ -DOPENSSL_INCLUDE_DIR=/usr/aarch64-linux-gnu/include/openssl/ -DCMAKE_PREFIX_PATH=/usr/lib/aarch64-linux-gnu/ -DCMAKE_INSTALL_PREFIX:PATH=/usr/aarch64-linux-gnu ..
CMAKE_INSTALL_PREFIX:安装目录
OPENSSL_INCLUDE_DIR:openssl目录
CMAKE_PREFIX_PATH:指定查找目录
CMAKE_CXX_COMPILER:C++编译器目录
CMAKE_C_COMPILER:C编译器目录3、编译安装
cmake --build .
sudo cmake --build . --target install
4、修改配置文件
vim ./src/libmongoc/CMakeLists.txt
target_link_libraries (${test}
         PRIVATE
            $<$<C_COMPILER_ID:MSVC>:DbgHelp.dll>
            $<$<PLATFORM_ID:Windows>:shlwapi>
            $<$<BOOL:${use_shared}>:mongoc_shared>
            $<$<NOT:$<BOOL:${use_shared}>>:mongoc_static>
            ${LIBRARIES}
            ${RESOLV_LIBRARIES} -lrt
      )

target_link_libraries (mongoc_shared PRIVATE ${LIBRARIES} PUBLIC ${BSON_LIBRARIES} -lrt)