15AH, San Francisco

California, United States.

Send Your Mail At:

tianyingkejishe@sina.cn

Working Hours

Mon-Sat: 9.30am To 7.00pm

作者标题

Autem vel eum iriure dolor in hendrerit in vulputate velit esse molestie consequat, vel illum dolore eu feugiat nulla facilisis at vero eros et dolore feugait.
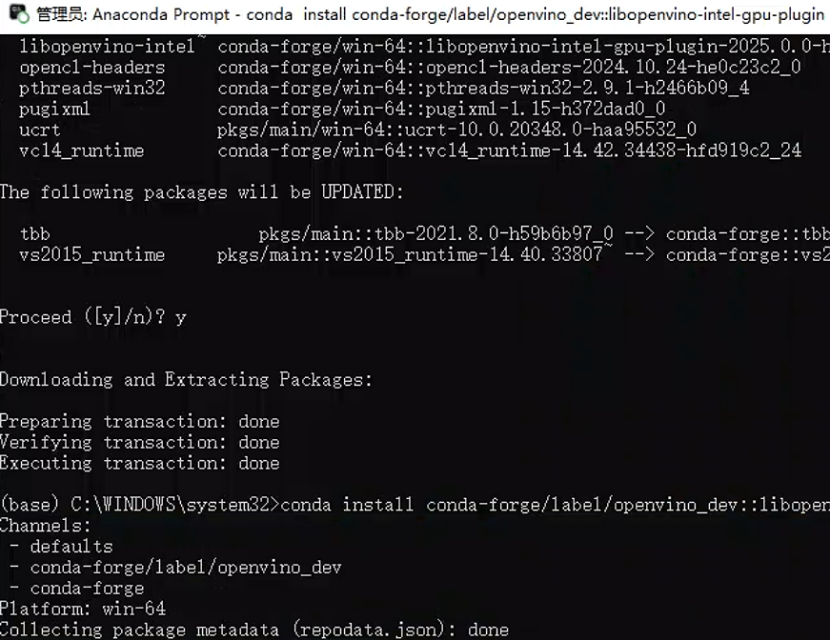
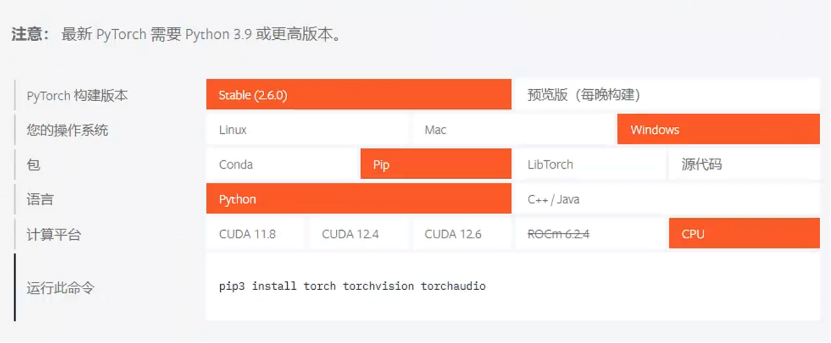
Author Archive by stormwind

【armbian】国内编译提高速度

一、更新dockers配置文件Dockerfile

修改文件:lib/functions/host/docker.sh

修改内容:修改容器内pip国内源

二、配置代码分支分支

修改文件:./config/boards/orangepizero2w.csc

修改内容:

三、修改代码源

修改文件:lib/functions/configuration/main-config.sh

修改内容:

四、编译配置参数

./compile.sh build BOARD=orangepizero2w BRANCH=current BUILD_DESKTOP=no BUILD_MINIMAL=no KERNEL_CONFIGURE=yes RELEASE=jammy UBOOT_MIRROR=gitee  DOWNLOAD_MIRROR=china REGIONAL_MIRROR=china MAINLINE_MIRROR=bfsu GHCR_MIRROR=dockerproxy GITHUB_MIRROR=ghproxy


五、内核配置快捷方式

 [ It still works, but please prefer the new way. First, run './compile.sh BOARD=orangepizero2w BRANCH=current kernel-config'; then commit your changes; then build the image as normal. This workflow ensures consistent hashing results. ]

六、内核定制

./compile.sh BOARD=orangepizero2w BRANCH=current kernel-config

七、uboot定制

./compile.sh BOARD=orangepizero2w BRANCH=current uboot-config

【vscode】vue3+vscode+element

1、安装node

下载nodejs,当前最新版本是 node 16.8

国外下载地址:https://nodejs.org/en

国内下载地址:http://nodejs.cn/download

下载完成之后双击文件【node-v16.8.0-x64.msi】安装。nodejs全局环境变量配置参考 https://www.cnblogs.com/yyee/p/15209612.html

检查nodejs是否安装:

node -v

如果未安装nodejs,照下步骤安装:

2、设置镜像,提高npm安装软件的速度。

pnpm get registry

pnpm config set registry https://registry.npmmirror.com/

pnpm config set registry https://registry.npmjs.org/

pnpm get registry

3、安装pnpm

npm install -g pnpm -registry=https://registry.npmmirror.com/

4、查看端口占用

npm run dev –port 端口号

【lx2160】How to dynamically adjust MC log level using restool

Prerequisites: The board should be running Linux and connected to terminal console.

Note: For log level debug support, the restool version should be LSDK-2003-RC1 or above and MC version should be 10.20.0 or above.

To check restool version:

$ root@localhost:~# restool -v
restool LSDK-20.04

To check MC version:

root@localhost:~# restool -m
MC firmware version: 10.24.0

For debugging, use the ls-debug script available in the LSDK rootfs. There is no need to create the debug object.

ls-debug -h 
-h, –helpls-debug help information
-ts, –timestamp=XEnable/Disable timestamp printing, X is ON or OFF
-c, –console=XEnable/Disable printing in UART console, X is ON or OFF
-l, –log=XEnable/Disable printing in DDR log, X is ON or OF
-u, –uart=XSet UART ID of the console, X = [0 – 4], 0 = OFF
-ll, –level=XSet logging level, X = [0 – 5]0: Global1: Debug2: Info3: Warning4: Error5: Critical
-m, mem, –memoryDump information about memory modules available
dpxy.zDump information about MC respective object

For example, to enable logging in console with log level INFO:

$ ls-debug --log=on --console=on --level=2              
dpdbg.0 created
DDR log printing ON
UART console printing ON
Log level set to 2
$ root@localhost:~# ls-debug --memory
Memory dumped information available in MC log/console
$ root@localhost:~# cat `find /dev/ -name "*mc_console"`
[I, RESMAN]  Handling command: dprc_get_obj for DPRC 1 on portal id 0
[I, RESMAN]  Handling command: dprc_get_obj for DPRC 1 on portal id 0
[I, RESMAN]  Handling command: dprc_get_obj for DPRC 1 on portal id 0
[I, RESMAN]  Handling command: dprc_get_obj for DPRC 1 on portal id 0
[I, RESMAN]  Handling command: dprc_get_obj for DPRC 1 on portal id 0
[I, RESMAN]  Handling command: dprc_get_obj for DPRC 1 on portal id 0
[I, RESMAN]  Handling command: dprc_get_obj for DPRC 1 on portal id 0
[I, RESMAN]  Handling command: dprc_get_obj for DPRC 1 on portal id 0
[I, RESMAN]  Handling command: dprc_get_obj for DPRC 1 on portal id 0
[I, RESMAN]  Handling command: dprc_get_obj for DPRC 1 on portal id 0
[I, RESMAN]  Handling command: dprc_get_obj for DPRC 1 on portal id 0
[I, RESMAN]  Handling command: dprc_get_obj for DPRC 1 on portal id 0
[I, RESMAN]  Handling command: dprc_get_obj for DPRC 1 on portal id 0
[I, RESMAN]  Handling command: dprc_get_obj for DPRC 1 on portal id 0
[I, RESMAN]  Handling command: dprc_get_obj for DPRC 1 on portal id 0
[I, RESMAN]  Handling command: dprc_get_obj for DPRC 1 on portal id 0
[I, RESMAN]  Handling command: dprc_get_obj for DPRC 1 on portal id 0
[I, RESMAN]  Handling command: dprc_get_obj for DPRC 1 on portal id 0
[I, RESMAN]  Handling command: dprc_get_obj for DPRC 1 on portal id 0
[I, RESMAN]  Handling command: dprc_get_obj for DPRC 1 on portal id 0
[I, RESMAN]  Handling command: dprc_get_obj for DPRC 1 on portal id 0
[I, RESMAN]  Handling command: dprc_get_obj for DPRC 1 on portal id 0
[I, RESMAN]  Handling command: dprc_get_obj for DPRC 1 on portal id 0
[I, RESMAN]  Handling command: dprc_get_obj for DPRC 1 on portal id 0
[I, RESMAN]  Handling command: dprc_get_obj for DPRC 1 on portal id 0
[I, RESMAN]  Handling command: dpdbg_open on DPDBG
[I, RESMAN]  Handling command: dpdbg_dump on DPDBG
[I, DPNI]  Memory info:
[I, DPNI]  MC DDR #1 cacheable memory
[I, DPNI]        Total: 134217728 bytes
[I, DPNI]        Used: 14802708 bytes
[I, DPNI]        Free: 119415020 bytes
[I, DPNI]  MC DDR #1 non-cacheable memory
[I, DPNI]        Total: 50331648 bytes
[I, DPNI]        Used: 27680 bytes
[I, DPNI]        Free: 50303968 bytes
[I, DPNI]  DMEM1 memory
[I, DPNI]        Total: 81920 bytes
[I, DPNI]        Used: 27168 bytes
[I, DPNI]        Free: 54752 bytes
[I, DPNI]  DMEM2 memory
[I, DPNI]        Total: 81920 bytes
[I, DPNI]        Used: 27168 bytes
[I, DPNI]        Free: 54752 bytes
[I, DPNI]  DDR #1 memory
[I, DPNI]        Total: 1610612736 bytes
[I, DPNI]        Used: 143163392 bytes
[I, DPNI]        Free: 1467449344 bytes
[I, DPNI]  PEB memory
[I, DPNI]        Total: 2097152 bytes
[I, DPNI]        Used: 524288 bytes
[I, DPNI]        Free: 1572864 bytes
[I, DPNI]  DP-DDR memory
[I, DPNI]        Total: 4294967296 bytes
[I, DPNI]        Used: 0 bytes
[I, DPNI]        Free: 4294967296 bytes
[I, RESMAN]  Handling command: dpdbg_close on DPDBG
[I, RESMAN]  Handling command: dprc_close for DPRC 1 on portal id 0
[I, RESMAN]  Handling command: dprc_set_irq_mask for DPRC 1 on portal id 0
[I, RESMAN]  Handling command: dprc_set_irq_enable for DPRC 1 on portal id 0
root@localhost:~#

【安凯】环境搭建

一、配置gcc工具

export PATH="${PATH}:/opt/arm-anykav500-linux-uclibcgnueabi/bin"
临时生效,必须使用绝对路径。

二、libmpfr.so.4: cannot open shared object file: No such file or directory

sudo ln -s /usr/lib/x86_64-linux-gnu/libmpfr.so.6 /usr/lib/x86_64-linux-gnu/libmpfr.so.4

三、yylloc符号错误

……
186
187 extern YYSTYPE yylval;
188 //extern YYLTYPE yylloc;
189 int yyparse (void);
……
1193 /* The lookahead symbol. / 1194 int yychar; 1195 1196 / The semantic value of the lookahead symbol. / 1197 YYSTYPE yylval; 1198 / Location data for the lookahead symbol. / 1199 static YYLTYPE yylloc 1200 # if defined YYLTYPE_IS_TRIVIAL && YYLTYPE_IS_TRIVIAL 1201 = { 1, 1, 1, 1 } 1202 # endif 1203 ; 1204 / Number of syntax errors so far. */
1205 int yynerrs;
1206
……

调整yylloc为局部符号.

【安凯】SDK编译时./mkfs.jffs2打包失败问题

一、报错

./mkfs.jffs2: error while loading shared libraries: liblzo2.so.2: cannot open shared object file: No such file or directory

二、解决方法

sudo apt-get update              //更新源,可以先执行第二步,不能安装则尝试更新源
sudo apt-get install liblzo2-dev:i386

【dockers】提高下载速度的方法【dockers】

一、国内镜像

阿里云个人镜像(速度最快,下边是中科大的公共镜像,个人镜像的获取方法见本文最后)

https://ustc-edu-cn.mirror.aliyuncs.com

网易镜像

https://hub-mirror.c.163.com

百度镜像

https://mirror.baidubce.com

docker官方国内镜像

https://registry.docker-cn.com

 中科大镜像(不要用这个,现在已无法外网访问,仅限学校内网使用)

https://docker.mirrors.ustc.edu.cn

二、配置方法

修改/etc/docker/daemon.json(如果没有则新建此文件)

内容如下:

{
  "registry-mirrors": ["https://ustc-edu-cn.mirror.aliyuncs.com"]
}

也可以配置多个地址:

{
  "registry-mirrors": ["https://ustc-edu-cn.mirror.aliyuncs.com", 
                        "https://hub-mirror.c.163.com"
                      ]
}

三、验证

docker info

【dockers】给普通用户赋予docker权限

1、 查看当前用户组中是否有docker组

sudo cat /etc/group | grep docker

2、 如果没有则创建

sudo groupadd docker

3、 将用户加入docker组

sudo usermod -aG docker $USER
sudo usermod -aG dockerroot $USER

4、 退出用户重连即可

【NPM】run `npm fund` for details解决【NPM】

1、其实上面的提示也已经给出了解决或者排除问题的方法,那就是紧接着上面提示的下面,输入命令行:
npm fund
2、然后可以查看提示具体的提示内容,是依赖的打赏捐赠提示,然后再接着输入一行命令:
npm run dev
3、回车就可以了,一般都是开发者捐赠支持的提示,打开一个github的链接之后,会显示需要打赏捐赠的信息,此时如果不想捐赠或者跳过这个提示的话,直接在后面加–no-fund即可,具体命令如下:
npm install –no-fund