15AH, San Francisco

California, United States.

Send Your Mail At:

tianyingkejishe@sina.cn

Working Hours

Mon-Sat: 9.30am To 7.00pm

作者标题

Autem vel eum iriure dolor in hendrerit in vulputate velit esse molestie consequat, vel illum dolore eu feugiat nulla facilisis at vero eros et dolore feugait.

Author Archive by stormwind

【python】python爬取新闻资讯

# 导入爬虫库
import requests
# 导入pyquery(数据提取)
from pyquery import PyQuery as pq
# 用于延时请求
import  time


# 请求头
headers ={'User-Agent':'Mozilla/5.0 (Windows NT 10.0; WOW64) AppleWebKit/537.36 (KHTML, like Gecko) Chrome/81.0.4044.9 Safari/537.36',
          'Cookie':'aliyungf_tc=AQAAACrtMHyGHA4ARxkbZ27Kgw3kCofh; route=ac205598b1fccbab08a64956374e0f11; JSESSIONID=5B42F8C6E712092B9A963E3F0532AD21; uuid=9065c880-0293-4758-86a8-0a228c6cfb2c; SERVERID=srv-omp-ali-portal10_80; Hm_lvt_94a1e06bbce219d29285cee2e37d1d26=1587280903; Hm_lpvt_94a1e06bbce219d29285cee2e37d1d26=1587280903; UM_distinctid=17191507d62338-03d1defec13f5f-721f3a40-144000-17191507d63400; CNZZDATA1261102524=262517629-1587279306-null%7C1587279306; __ads_session=6NY9VLMBdgmIzmsFHgA=',
          'Accept':'text/html,application/xhtml+xml,application/xml;q=0.9,image/webp,image/apng,*/*;q=0.8,application/signed-exchange;v=b3;q=0.9',
          'Host':'www.thepaper.cn'}

# 封装一个获取新闻内容的函数
def get_news(href,title):
    # 对新闻内容网址发送请求
    response = requests.get(href,headers=headers).text
    # 数据初始化
    doc =pq(response)
    # 通过类选择器news_txt提取新闻内容
    news = doc(".index_cententWrap__Jv8jK").items()
    # 遍历数据
    for x in news:
        # 取出数据中的文本数据,获取到新闻信息
        new = x.text()
        print(new)

# 封装一个获取新闻内容网址和新闻标题的函数
def get_news_title():
    # 新闻网首页的链接
    url = 'https://www.thepaper.cn/channel_25951'
    # 对首页发送请求,并返回文本数据
    respoonse = requests.get(url, headers=headers,).text
    time.sleep(1)
    # 数据初始化
    doc = pq(respoonse)
    # 通过类选择器news_li 下级标签 h2 a 定位数据
    # .itens把数据变成可遍历的数据
    a = doc(".small_toplink__GmZhY a").items()
    print(a)
    # 遍历数据
    for x in a:
        # 通过属性href提取出新闻网址
        href = "https://www.thepaper.cn/" + x.attr("href")
        print(href)
        # 提取数据中的文本 获取新闻标题
        title = x.text()
        print(title)
        get_news(href,title)

if __name__ == '__main__':
    get_news_title()

【Linux】打印机环境安装二

前言

传统USB打印机如何实现网络打印机转变,发挥打印机余热。目前好多不用的机顶盒,我们刷成Linux系统。把打印机的USB线插到机顶盒上,机顶盒通过网线或者wifi连接到路由器上,实现USB到网络转换。那路由器Linux到底需要做哪些操作呢,接下来咱们一起聊聊。

一、安装打印机驱动环境

CUPS是开源的打印机服务开源框架,已集成成千上万的各式打印机驱动,我们不用重复造轮子。

1、安装cups

登陆机顶盒调试,会Linux开发的大家都明白。

apt install cups

2、修改 CUPS 配置文件 /etc/cups/cupsd.conf

将 Listen 修改为 0.0.0.0:631

将 Browsing 修改为 Yes

对应位置加上 Allow all

# Only listen for connections from the local machine.
Listen localhost:631 // [!code --]
Listen 0.0.0.0:631 // [!code ++]
Listen /run/cups/cups.sock 
​
# Show shared printers on the local network.
Browsing Off // [!code --]
Browsing Yes // [!code ++]
BrowseLocalProtocols dnssd
​
# Restrict access to the server...

  Order allow,deny
  Allow all // [!code ++]

​
# Restrict access to the admin pages...

  Order allow,deny
  Allow all // [!code ++]

​
# Restrict access to configuration files...

  AuthType Default
  Require user @SYSTEM
  Order allow,deny
  Allow all // [!code ++]

​
# Restrict access to log files...

  AuthType Default
  Require user @SYSTEM
  Order allow,deny
  Allow all // [!code ++]

3、重启cups服务

systemctl restart cups

4、登陆服务器web,进行打印机添加

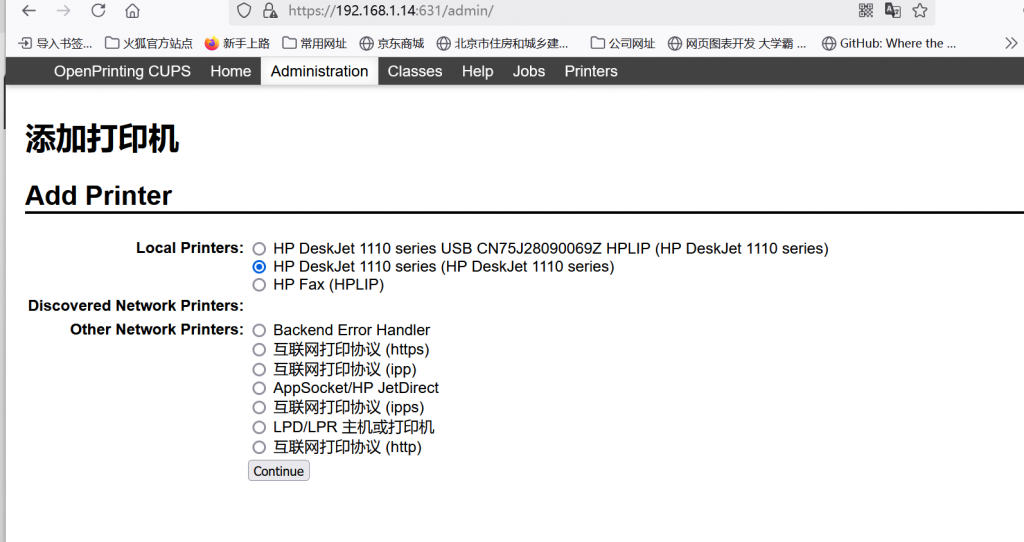
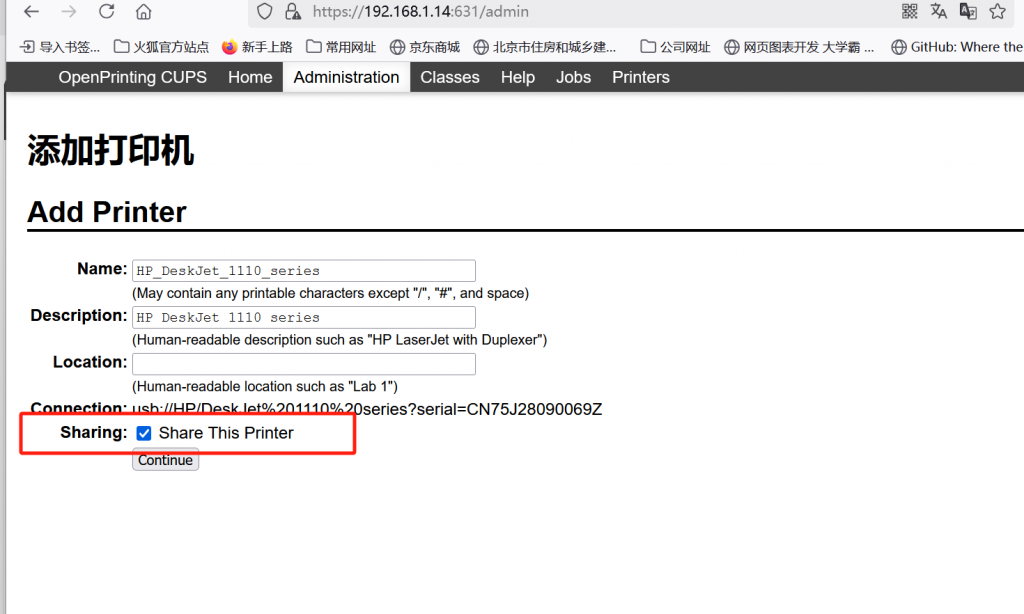
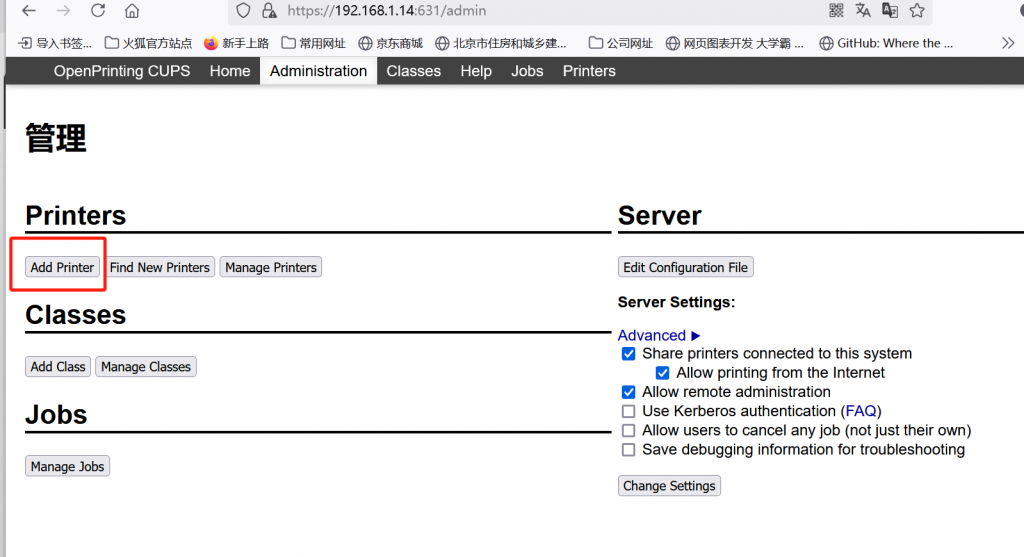
访问 https://ip:631 进入 CUPS 的 Web UI,点击添加 Add Printer

5、windows添加网络打印机

【git】git 头指针分离于 xxxx解决方法

通常,我们工作在某一个分支上,比如 master 分支。这个时候 master 指针和 HEAD 指针是一起前进的,每做一次提交,这两个指针就会一起向前挪一步。但是在某种情况下(例如 checkout 了某个具体的 commit),master 指针 和 HEAD 指针这种「绑定」的状态就被打破了,变成了分离头指针状态。我那天遇到的情况是,master 和 HEAD 指针看上去指在同一个 commit 上,但其实已经处在分离头指针状态。当我在此时又做了一次新的提交时,HEAD 指针跑到 master 指针前面去了。如果我直接检出 master 分支,HEAD 指针就会回退一格到 master 指针的位置,而最新的那次提交就变成了孤立的提交,没有任何分支能追踪到它,刚才的活白干了。

# 强制将 master 分支指向当前头指针的位置
$ git branch -f master HEAD
# 检出 master 分支
$ git checkout master

【Linux】打印机环境安装一

一、环境配置

 sudo apt-get update
 sudo apt-get upgrade
 sudo apt install cups  #公共UNIX打印系统

二、驱动安装

sudo apt-get install hplip

三、打印机安装

hp-setup -i #第一个选0,第二个按p
xiaobao@armbian:~/software/shareprint$ hp-setup -i

HP Linux Imaging and Printing System (ver. 3.23.12)
Printer/Fax Setup Utility ver. 9.0

Copyright (c) 2001-18 HP Development Company, LP
This software comes with ABSOLUTELY NO WARRANTY.
This is free software, and you are welcome to distribute it
under certain conditions. See COPYING file for more details.

(Note: Defaults for each question are maked with a '*'. Press <enter> to accept the default.)


--------------------------------
| SELECT CONNECTION (I/O) TYPE |
--------------------------------

  Num       Connection  Description
            Type
  --------  ----------  ----------------------------------------------------------
  0*        usb         Universal Serial Bus (USB)
  1         net         Network/Ethernet/Wireless (direct connection or JetDirect)

Enter number 0...1 for connection type (q=quit, enter=usb*) ? 0

Using connection type: usb

Setting up device: hp:/usb/DeskJet_1110_series?serial=CN75J28090069Z


---------------------
| PRINT QUEUE SETUP |
---------------------


Please enter a name for this print queue (m=use model name:'DeskJet_1110'*, q=quit) ?
Using queue name: DeskJet_1110
Locating PPD file... Please wait.

Found PPD file: hplip:0/ppd/hplip/HP/hp-deskjet_1110_series.ppd
Description:

Note: The model number may vary slightly from the actual model number on the device.

Does this PPD file appear to be the correct one (y=yes*, n=no, q=quit) ?
Enter a location description for this printer (q=quit) ?
Enter additonal information or notes for this printer (q=quit) ?

Adding print queue to CUPS:
Device URI: hp:/usb/DeskJet_1110_series?serial=CN75J28090069Z
Queue name: DeskJet_1110
PPD file: hplip:0/ppd/hplip/HP/hp-deskjet_1110_series.ppd
Location:
Information:


You do not have permission to add a printer. You need authentication.
Username: root
Password:


---------------------
| PRINTER TEST PAGE |
---------------------


Would you like to print a test page (y=yes*, n=no, q=quit) ? y

HP Linux Imaging and Printing System (ver. 3.23.12)
Testpage Print Utility ver. 6.0

Copyright (c) 2001-18 HP Development Company, LP
This software comes with ABSOLUTELY NO WARRANTY.
This is free software, and you are welcome to distribute it
under certain conditions. See COPYING file for more details.


HP Linux Imaging and Printing System (ver. 3.23.12)
System Tray Status Service ver. 2.0

Copyright (c) 2001-18 HP Development Company, LP
This software comes with ABSOLUTELY NO WARRANTY.
This is free software, and you are welcome to distribute it
under certain conditions. See COPYING file for more details.

warning: No display found.
error: hp-systray requires Qt4 GUI and DBus support. Exiting.
warning: Unable to connect to dbus. Is hp-systray running?
Printing test page to printer DeskJet_1110...
请求 ID 为 DeskJet_1110-1 (1 个文件)
Test page has been sent to printer.

note: If an error occured, or the test page failed to print, refer to the HPLIP website
note: at: http://hplip.sourceforge.net for troubleshooting and support.


Done.

Done.

【摄像头】MT7628wifi摄像头使用说明

一、简介

wifi摄像头采用Linux系统,使用更灵活,功能更强大,采用ov5693传感器500万像素,高清自动聚焦。

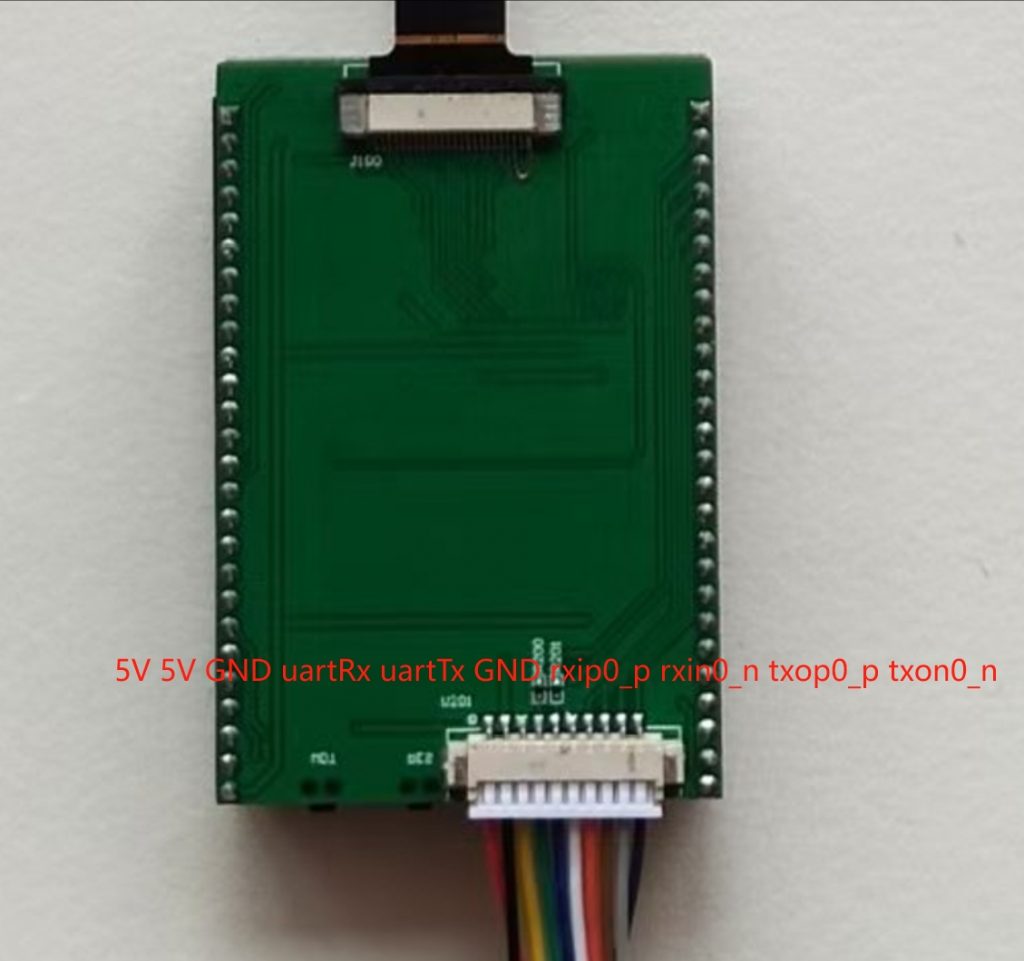
二、接口定义

1、电源管脚

管脚1:DC5V 正极

管脚2:DC5V 正极

管脚3:GND 负极

2、串口管脚

管脚4:uart-rx

管脚5:uart-tx

管脚6:GND

3、网口管脚

管脚7:rx0-p

管脚8:rx0-n

管脚9:tx0-p

管脚10:tx0-n

三、应用软件

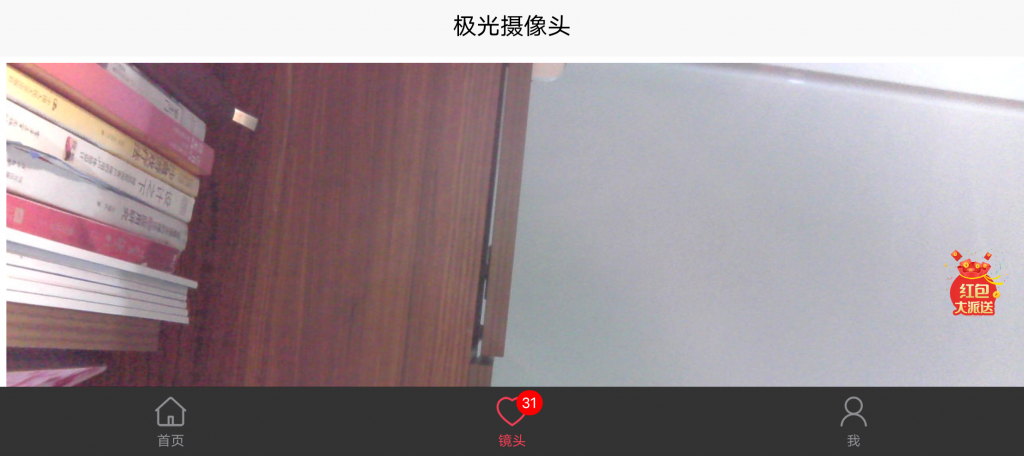
1、打开极光摄像头APP

2、点击“连接设备”

3、连接“RecologyPower”摄像头热点,返回主界面

4、点击镜头按键,观看视频

【Ubuntu】word转pdf

一、使用Unoconv工具

Unoconv是一个开源工具,用于将各种文档格式转换为PDF格式。可以使用以下命令安装:

$ sudo apt-get install unoconv

转换文件的命令如下:

$ unoconv -f pdf filename.doc

其中,filename.doc为待转换的Word文件名。

使用Unoconv工具的优点是非常简单易用,但需要注意的是,该工具需要依赖OpenOffice或LibreOffice来实现转换,所以在使用前需要确保已经安装了相应的软件。

二、使用LibreOffice命令行工具

与Unoconv类似,LibreOffice也提供了一个命令行工具soffice,可以用于将各种文档格式转换为PDF格式。可以使用以下命令安装LibreOffice:

$ sudo apt-get install libreoffice

转换文件的命令如下:

$ soffice --convert-to pdf filename.doc

其中,filename.doc为待转换的Word文件名。

使用LibreOffice命令行工具的优点是它不依赖于其他软件,并且支持各种Office文档格式。但是转换速度可能会比其他工具慢一些。

三、使用Pandoc工具

Pandoc也是一个开源工具,可以将各种文档格式转换为PDF格式。可以使用以下命令安装Pandoc:

$ sudo apt-get install pandoc

转换文件的命令如下:

$ pandoc -s filename.doc -o filename.pdf

其中,filename.doc为待转换的Word文件名。

使用Pandoc工具的优点是它支持各种文档格式,并且可以自定义文档样式,转换后的PDF文件也会自动添加书签,方便查阅。但是需要注意的是,Pandoc工具并不是专门用于文档转换的,所以在转换复杂文档时可能会出现格式错误。

四、使用Liberation字体

在Word文件转换为PDF格式时,由于Linux和Windows系统的字体库不一样,可能导致PDF文档出现乱码或格式错误。为了解决这个问题,我们可以在Linux系统中安装Microsoft Office的字体Liberation字体,实现Linux和Windows字体的兼容。

安装Liberation字体的命令如下:

$ sudo apt-get install fonts-liberation

安装完毕后,我们就可以在Word文件转换成PDF文件时使用Liberation字体了。

五、小结

以上就是在Linux下实现Word文件转PDF的方法,我们可以根据需要选择不同的工具来实现转换,以满足我们的工作需求。同时,为了避免字体的兼容性问题,我们也可以安装Liberation字体来保证转换后的PDF文件格式正确。

linux 获取OS盘符的方法

在服务器测试中,对硬盘的测试有很多,有些测试用例需要我们写一下自动化的脚本,比如给服务器所有的盘施加压力,这个就需要我们把除了OS盘的所有盘遍历出来,下面介绍几种方法来筛选OS盘
我们知道,判断os 盘的方法一般是看其有没有boot分区,通常用两个指令来获取:lsblk和df -h 下面一次介绍一下这两种方法的写法

1、 lsblk 如图所示 带有boot 分区的就是OS盘

系统盘是sda

系统盘是nvme0n1

shell命令行:

lsblk -l  |grep -i boot -B 1 |grep -i disk |awk '{print $1}'

筛选除了OS外所有的盘符

lsblk -l  |grep -vw sda |grep -i disk |awk '{print $1}'
lsblk -l  |grep -vw nvme0n1 |grep -i disk |awk '{print $1}'

2、 df -h

系统盘是sda

shell命令行

df -h | awk '{print $1}' | grep -iE "/dev/sd" | sed 's/[0-9]//g' |sort -u |awk -F "/" {'print $NF'}

系统盘是nvme0n1

shell 命令行

 df -h | awk '{print $1}' | grep -iE "/dev/nvme" | sed 's/p[0-9]//g' |sort -u |awk -F "/" {'print $NF'}

对此可以写成一个小脚本来判断OS,代码如下:

#!/bin/bash
bootdisk=`df -h |grep -i boot | awk '{print $1}' | grep -iE "/dev/sd" | sed 's/[0-9]//g' |sort -u|awk -F "/" '{print $NF}'`
if  test -z "$bootdisk"
then
        bootdisk=`df -h |grep -i boot| awk '{print $1}' | grep -iE "/dev/nvme" | sed 's/p[0-9]*//g' |sort -u|awk -F "/" '{print $NF}'`
        echo "os disk os $bootdisk"
else
        echo "os disk is $bootdisk"
fi

运行结果如下图:

【ubuntu】sudo: error in /etc/sudo.conf, line 0 while loading plugin `sudoers_policy’ 解决方法

报错:

sudo: error in /etc/sudo.conf, line 0 while loading plugin ‘sudoers_policy’
sudo: /usr/lib/sudo/sudoers.so must only be writable by owner
sudo: fatal error, unable to load plugins

导致的原因:

用ll查看了一下sudoer.so和sudo的用户权限,发现owner都是非root用户,所以才导致当前用户没有权限执行sudo命令,修改权限后,即可解决此问题。

解决方法:

chmod 644 /usr/lib/sudo/sudoers.so
su 输入密码进入su
chown -R root /usr/lib/sudo

【Android Studio】安装app报错Installation did not succeed. The application could not be installed: INSTALL

问题描述
安装app demo报错;app安装不上
Installation did not succeed.
The application could not be installed: INSTALL_FAILED_INSUFFICIENT_STORAGE
The device needs more free storage to install the application (extra space is needed in addition to APK size).

原因分析:
程序或手机内存空间不足

解决方案:
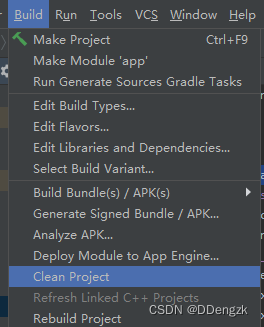
清理程序内存:Build -> Clean Project

清理手机内存:清理多余程序或空间
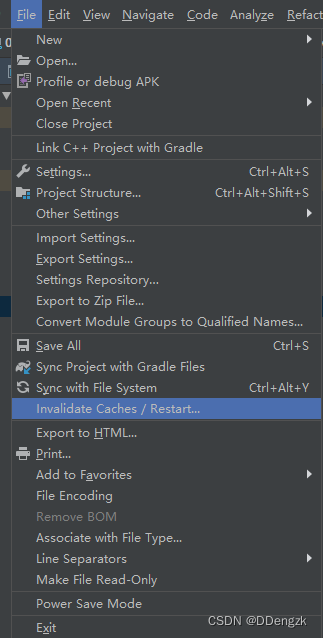
File -> Rest重启再运行

app安装成功