一、问题1
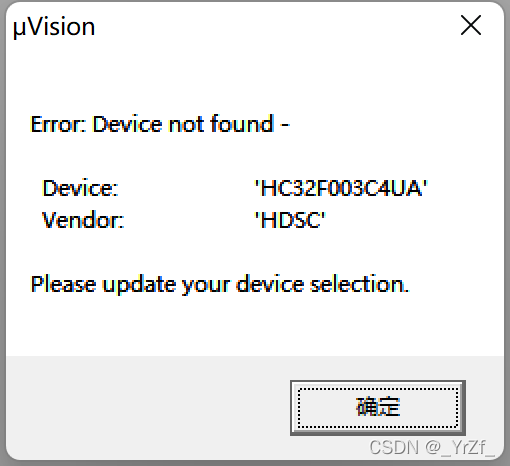
解决方式:将Project文件夹中的工程扩展名由.uvproj改为.uvprojx
问题原因:前提是所有的库安装都是正常且正确的,所以应该是如下问题:keil版本问题导致的Device导入错误,可能是使用keil4版本编写,使用keil5打开出错。
二、问题2
报错内容:
one or more devices family pack devices are not present
error:not found device
解决方式:安装库
解决方式:将Project文件夹中的工程扩展名由.uvproj改为.uvprojx
问题原因:前提是所有的库安装都是正常且正确的,所以应该是如下问题:keil版本问题导致的Device导入错误,可能是使用keil4版本编写,使用keil5打开出错。
报错内容:
one or more devices family pack devices are not present
error:not found device
解决方式:安装库
一、分析
通过字面意思可以得知目标程序需要arm版本5编译器.
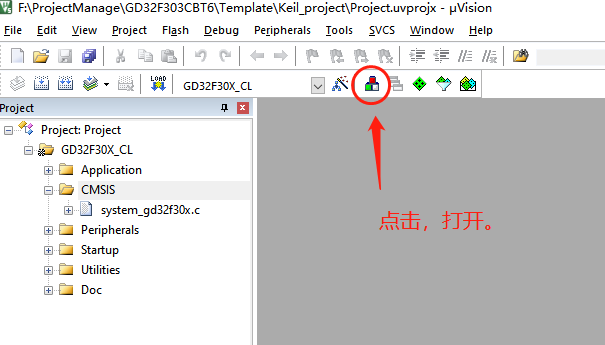
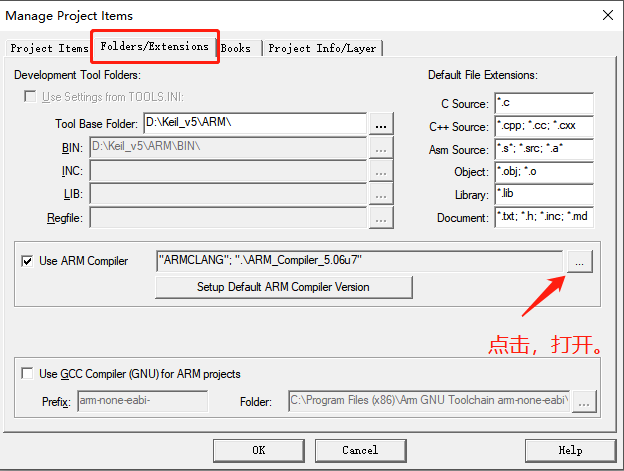
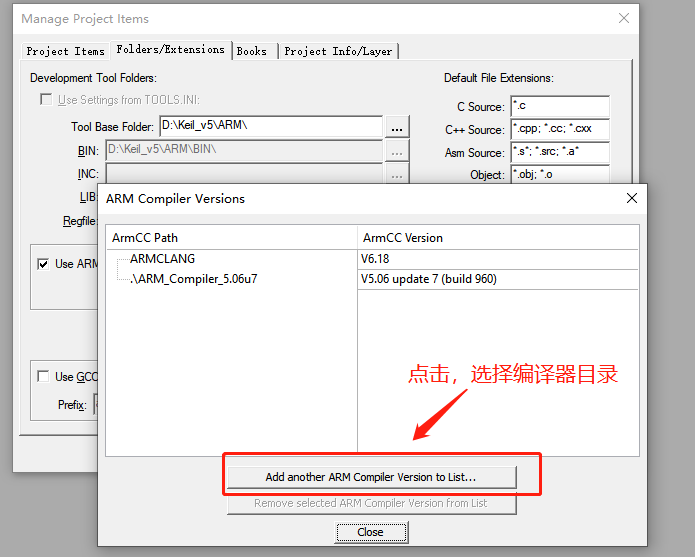
二、解决
1、官网下载编译
2、安装
注意:要安装到D:\Keil_v5\ARM\ARM_Compiler_5.06u7。盘符可根据实际情况。
3、keil添加多编译器

有时会需要扩展多个CAN接口,在CAN设备比较多的时候作分组控制。这里使用imx6q芯片,它本身已经自带了两个CAN接口,如果需再扩展4个接口,就要想想办法了。sja1000是一个经典的CAN控制器,稳定可靠,由于它在业界使用方案比较成熟,用它来扩展再好不过。imx6q作为一款性能强大的处理器,扩展sja1000这种相对慢速的芯片,着实有点屈才。可是没办法,项目需要,就像PCIE转ISA,或者USB转PCIE一样,效率并不是最重要的,硬件的兼容性和软件的易维护性同样重要。
这篇文档分硬件部分和软件部分来介绍下imx6q如何来与sja1000芯片组合应用起来,主要实现了通过imx6芯片的eim总线外扩4个sja1000 can控制器的功能。
首先来一张sja1000芯片的经典电路,是与8051单片机配合使用的。
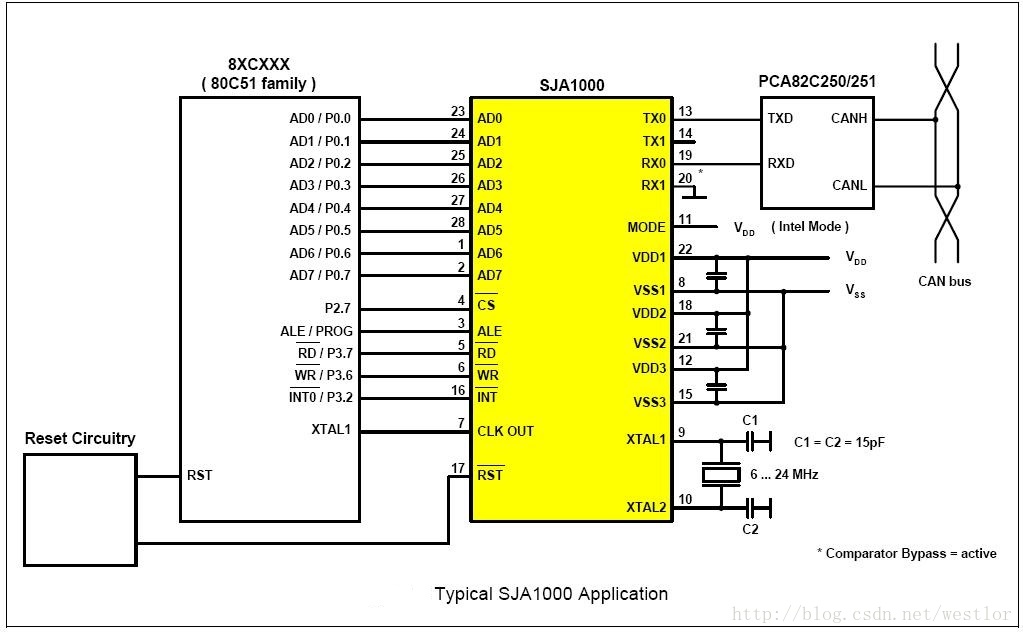
看到这张图,是不是首先就想到了8051单片机的P0脚,还记得当时刚刚接触51单片机时,还会对P0与P1/P2/P3引脚的特性不同有些困惑。P0脚是3态的,可以应用在地址/数据总线。51单片机就是通过P0接口来扩展些SRAM、ROM啥的。这个电路图中,就是一个典型的外扩SRAM的接法:P0做地址/数据总线,P2.7独立GPIO控制CS脚(CS脚为低SJA1000芯片才工作),ALE/RO/WE是读写控制信号,INT中断脚接到P3.2接口上。从而可以看出,sja1000芯片留给外部的接口就是一个SRAM接口(CPU通过总线读写sja1000芯片的寄存器来控制),只要CPU有能够扩展SRAM的总线接口,那么就能外扩sja1000芯片。那么imx6芯片有没有类似的总线呢?
答案是肯定的,imx6系列芯片功能丰富,性能爆表,区区一个SRAM总线接口,怎会没有。imx6芯片带有WEIM接口,支持16/32bit的地址/数据总线混合模式,不过地址线最高为27bit,这个接口可灵活配置地址/数据端口,支持外接SRAM、NorFalsh和OneNAND等设备,先来看一张典型的imx6芯片的EIM接口图。
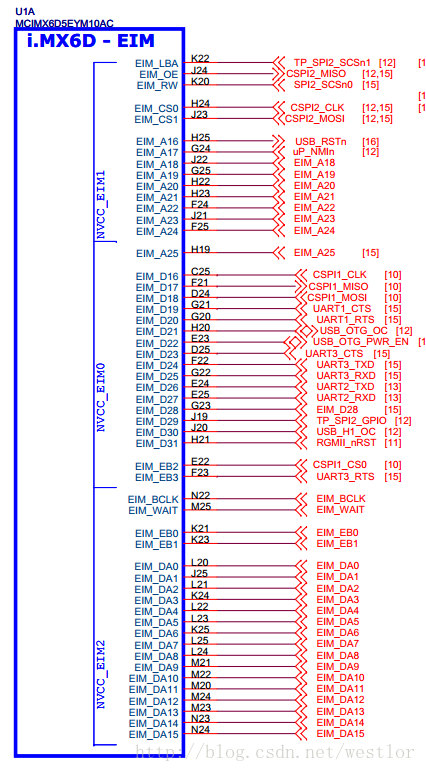
EIM总线地址总线引脚范围为EIM_DA0_15、EIM_A16_26,数据总线引脚范围为EIM_DA0_15、EIM_D16_31(图中有些引脚没有引出)。sja1000与之相连,可以是地址/数据总线复用的方式,也可以是地址总线与数据总线分离的方式(通过配置地址和数据引脚端口)。从电路简洁性上讲,当然采用复用的方式,就像51单片机的P0接口一样。有些芯片的SRAM接口并不支持地址/数据总线复用,与sja1000芯片相接时需要在电路上加逻辑器件,这个在另一篇文档中再写吧。
imx6芯片手册中指出,EIM总线只支持16/32bit的复用方式,通过EIM_CSnGCR1寄存器来配置,如下图。
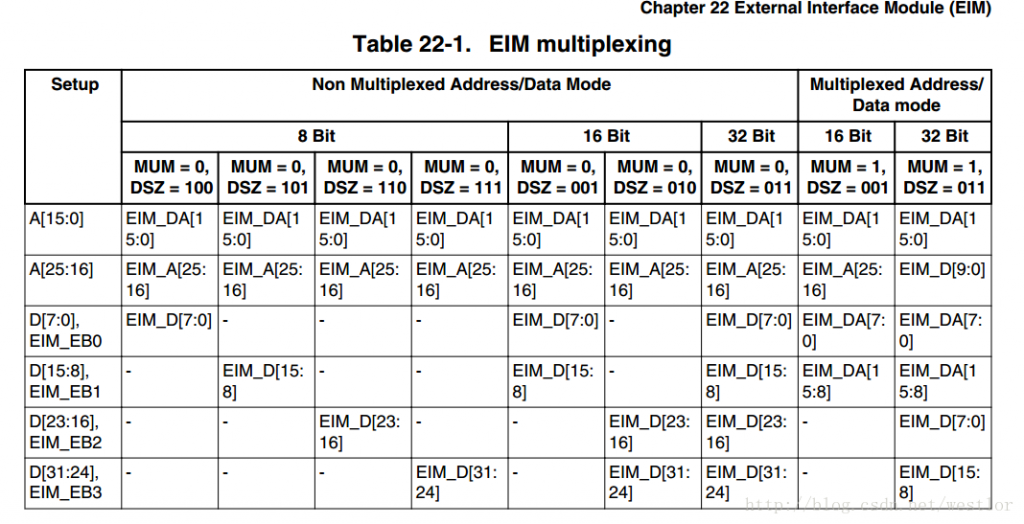
EIM总线与sja1000这种8位的SRAM接口类型芯片相连,用16bit的multiplexing模式搓搓有余。可以16位的总线来访问8位总线存储器时,会有地址无法对齐的尴尬情况。举个例子说,16位总线读地址0x0000时(忽略基地址),read_byte()读的是D0_7这一组的电平值,读地址0x0001时,read_byte(),读的是D8_15这一组的电平值,反之写操作也是一样。那么16位总线与sja1000相连时,如果只用DA0_7脚,必然导致虽偶地址访问正常,奇地址访问不到的情况。这个也好解决,我们用DA1_8引脚就可以了。整个连接起来如下图的样子。
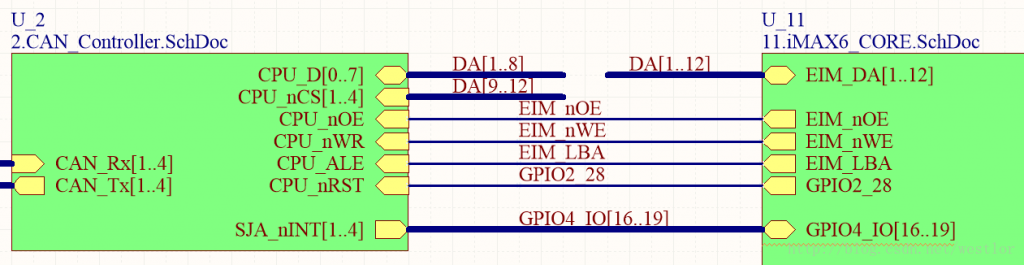
其中EIM_nOE、EIM_nWE和EIM_LBA与51单片机的WR、RD和ALE类似,DA1_8为地址/数据复用总线的0_7位,DA9_12则用来当4个CS信号线用(接了4片SJA1000芯片),EIM总线有CS0_3,不过被其它功能引脚复用占了,这里就只能这么干了。至于RST和INT线,随便找几个GPIO就行。
接下来简单分析下硬件时序,先看sja1000芯片的读时序。
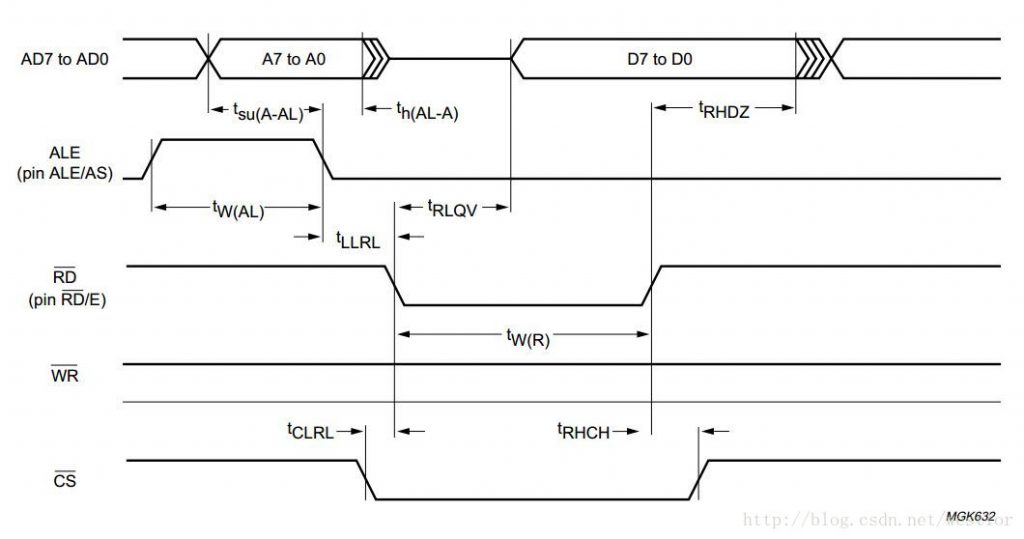
从图中可以看出,读操作周期中,主机端先给出要读的地址(AD0_7上产生),然后拉低ALE信号,提示sja1000设备进行地址锁存,拉低CS信号,使能sja1000设备,最后拉低RD信号,释放地址/数据总线。sja1000设备在t_RLQV时间内准备好数据,然后写在数据总线上。主机在t_W/R时间后,拉高RD信号,读取地址/总线上的数据,拉高CS线,完成一个读操作周期。整个读操作周期中WR信号为高。写操作周期与之类似,如下图所示。
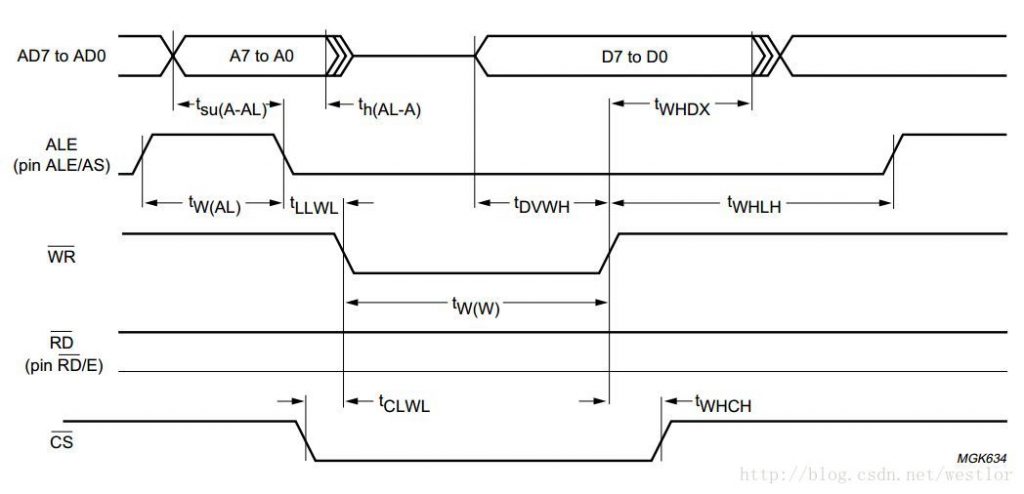
同样,主机端准备好地址信号,拉低ALE信号、CS信号,然后拉低WR信号,提示sja1000设备将进行写操作。之后主机端在地址/总线上写数据信号,等待t_DVWH后,拉高WR信号线,在t_WHDX时间后释放总线。sja100设备在拉高WR信号的时候进行接收数据。
这里使用的是3.14.28版本linux内核,由于支持设备树,为驱动程序的编写带来了很多便利。首先修改dts文件,使能WEIM总线,并配置需要用到的功能引脚、GPIO、中断引脚。
&weim {
    pinctrl-names = "default";
    pinctrl-0 = <&pinctrl_weim>;
    status = "okay";
};
&iomuxc {
        pinctrl_weim: weim1grp {
            fsl,pins = <
                MX6QDL_PAD_EIM_OE__EIM_OE_B         0x9091
                MX6QDL_PAD_EIM_RW__EIM_RW           0x9091
                MX6QDL_PAD_EIM_CS0__EIM_CS0_B       0x9091
                MX6QDL_PAD_EIM_LBA__EIM_LBA_B       0x9091
                /* SJA1000_RST */
                MX6QDL_PAD_EIM_EB0__GPIO2_IO28      0x9091
                /* SJA1000 INT */
                MX6QDL_PAD_DI0_DISP_CLK__GPIO4_IO16 0x9091
                MX6QDL_PAD_DI0_PIN15__GPIO4_IO17    0x9091
                MX6QDL_PAD_DI0_PIN2__GPIO4_IO18     0x9091
                MX6QDL_PAD_DI0_PIN3__GPIO4_IO19     0x9091
                /* SJA1000 LED */
                MX6QDL_PAD_DISP0_DAT5__GPIO4_IO26   0x80000000
                MX6QDL_PAD_DISP0_DAT6__GPIO4_IO27   0x80000000
                MX6QDL_PAD_DISP0_DAT7__GPIO4_IO28   0x80000000
                MX6QDL_PAD_DISP0_DAT8__GPIO4_IO29   0x80000000
                /* SJA1000_ADDA */
                MX6QDL_PAD_EIM_DA0__EIM_AD00        0x9091
                MX6QDL_PAD_EIM_DA1__EIM_AD01        0x9091
                MX6QDL_PAD_EIM_DA2__EIM_AD02        0x9091
                MX6QDL_PAD_EIM_DA3__EIM_AD03        0x9091
                MX6QDL_PAD_EIM_DA4__EIM_AD04        0x9091
                MX6QDL_PAD_EIM_DA5__EIM_AD05        0x9091
                MX6QDL_PAD_EIM_DA6__EIM_AD06        0x9091
                MX6QDL_PAD_EIM_DA7__EIM_AD07        0x9091
                MX6QDL_PAD_EIM_DA8__EIM_AD08        0x9091
                MX6QDL_PAD_EIM_DA9__EIM_AD09        0x9091
                MX6QDL_PAD_EIM_DA10__EIM_AD10       0x9091
                MX6QDL_PAD_EIM_DA11__EIM_AD11       0x9091
                MX6QDL_PAD_EIM_DA12__EIM_AD12       0x9091
                MX6QDL_PAD_EIM_DA13__EIM_AD13       0x9091
                MX6QDL_PAD_EIM_DA14__EIM_AD14       0x9091
                MX6QDL_PAD_EIM_DA15__EIM_AD15       0x9091
            >;
        };
    };
};
weim总线中配置的引脚有 EIM_DA0_15(只用到DA1_12)、EIM_OE、EIM_RW、EIM_LBA、EIM_CS0(cs线由高位地址线取代,这里无用),sja1000驱动中添加了四个中断引脚(对应4个sja1000芯片)、4个LED gpio(CAN通信指示灯用)、RST GPIO(产生硬复位信号,一般不用)。接下来看sja1000驱动需要添加的dts文件内容。
/ {
    sja1000@08001C00 {
        compatible  = "weim,sja1000";
        reg         = <0x08001C00 0x1FF>;
        nxp,external-clock-frequency = <16000000>;
        nxp,tx-output-config = <0x16>;
        nxp,no-comparator-bypass;
        interrupt-parent    =   <&gpio4>;
        interrupts          =   <16 0>;
        int-gpios           =   <&gpio4 16 0>;
        rst-gpios           =   <&gpio2 28 0>;
        led-gpios           =   <&gpio4 26 0>;
    };
    sja1000@08001A00 {
        compatible  = "weim,sja1000";
        reg         = <0x08001A00 0x1FF>;
        nxp,external-clock-frequency = <16000000>;
        nxp,tx-output-config = <0x16>;
        nxp,no-comparator-bypass;
        interrupt-parent    =   <&gpio4>;
        interrupts          =   <17 0>;
        int-gpios           =   <&gpio4 17 0>;
        led-gpios           =   <&gpio4 27 0>;
    };
    sja1000@08001600 {
        compatible  = "weim,sja1000";
        reg         = <0x08001600 0x1FF>;
        nxp,external-clock-frequency = <16000000>;
        nxp,tx-output-config = <0x16>;
        nxp,no-comparator-bypass;
        interrupt-parent    =   <&gpio4>;
        interrupts          =   <18 0>;
        int-gpios           =   <&gpio4 18 0>;
        led-gpios           =   <&gpio4 28 0>;
    };
    sja1000@08000E00 {
        compatible  = "weim,sja1000";
        reg         = <0x08000E00 0x1FF>;
        nxp,external-clock-frequency = <16000000>;
        nxp,tx-output-config = <0x16>;
        nxp,no-comparator-bypass;
        interrupt-parent    =   <&gpio4>;
        interrupts          =   <19 0>;
        int-gpios           =   <&gpio4 19 0>;
        led-gpios           =   <&gpio4 29 0>;
    };
};
四片sja1000芯片的基地址计算方式:weim总线的基地址为0x08000000,第一片sja1000芯片读写时DA1_8 对应地址/数据总线的D0_7,地址范围为 0x08000000~0x080001FF(忽略DA0的信号),由于DA9_12充当CS信号,读写第一片sja1000芯片时,需要保持DA9为0、DA10为1、DA11为1、DA12为1,从而第一片sja1000芯片的基地址为0x08001C00。同理,第二三四片sja1000芯片的基地址分别为 0x08001A00 、0x08001600、0x08000E00。
dts资源配置好后,需要在对应的驱动程序中正确引用。linux内核中已经有了sja1000_platform驱动(位于driver/net/can/sja1000目录下),直接在它的基础上修改下就行。
static struct of_device_id sp_of_table[] = {
    {.compatible = "weim,sja1000"},
    {},
};
MODULE_DEVICE_TABLE(of, sp_of_table);

static struct platform_driver sp_driver = {
    .probe = sp_probe,
    .remove = sp_remove,
    .driver = {
        .name = DRV_NAME,
        .owner = THIS_MODULE,
        .of_match_table = sp_of_table,
    },
};
2. 初始化weim总线
这里通过修改寄存器完成,程序在加载驱动程序时调用,主要配置weim时钟、中断、地址/数据总线端口、时序控制等,详见imx6数据手册。
static int __init sp_init(void)
{
    mx6q_setup_weimcs();
    return platform_driver_register(&sp_driver);
}
module_init(sp_init);
void mx6q_setup_weimcs(void)
{
    unsigned int reg;

    void __iomem *eim_reg = ioremap(WEIM_BASE_ADDR, 0x20);
    void __iomem *ccm_reg = ioremap(CCM_BASE_ADDR, 0x80);

    if(!eim_reg){
        printk("error iomem eim_reg\n");
    }
    if(!ccm_reg){
        printk("error iomem ccm_reg\n");
    }

    // divicer for aclk_eim_slow
    reg = readl(ccm_reg + 0x1C);
    reg &= ~(0x60000000);
    reg |= 0x00380000;
    writel(reg, ccm_reg + 0x1C);

    /* CLKCTL_CCGR6: Set emi_slow_clock to be on in all modes */
    reg = readl(ccm_reg + 0x80);
    reg |= 0x00000C00;
    writel(reg, ccm_reg + 0x80);

    /* CS0GCR1:
     *  [22-20 CSREC: minimum EIM clock cycles width of CS, OE and WE signals]
     *  DSZ[16:18]:
        001 16 bit port resides on DATA[15:0]
     *  EIM Operation Mode: MUM=1, SRD = SWR = 0.
     *      (Async write/Async page read, multiplexed)
     */
    writel(0x07f13039, eim_reg);
    writel(0x00001002, eim_reg + 0x00000004);

    /* CS0RCR1:
     * Bit 31 30 29 28--27 26 25 24--23 22 21 20--19  18 17 16
     *     0     RWSC                0  RADVA     RAL RADVN
     * Bit 15 14 13 12--11 10 9--8 7 6 5 4--3 2 1 0
     *     0  OEA       0  OEN   0 RCSA     0 RCSN
     * CS0RCR2:
     *  APR = 0 (Async Page Read);      [15]
     *  PAT = 7 (9 EIM clock sycles)    [12:14]
     *  RBEA = 7 (Read BE Assertion)    [4:6]
     *  RBE = 1 (Read BE enable)        [3]
     *  RBEN = 7 (Read BE Negation)     [0:2]
     */
    writel(0x18683372, eim_reg + 0x00000008);
    writel(0x00000068, eim_reg + 0x0000000C);

    /*
     * For EIM Write Configuration registers.
     *
     * CS0WCR1:
     *  Bit 31  30   29 28 27 26 25 24 23 22 21 20--19 18 17 16--15
     *      WAL WBED WWSC              WADVA    WADVN     WBEA
     *      1   1    01 1000           011      0--00     11--1
     *  Bit 14 13 12 11 10 9 8-- 7 6 5 4 3 2 1 0
     *      WBEN     WEA     WEN   WCSA  WCSN
     *      111      111     1--11   100   110
     * CS0WCR2:
     *  WBCDD = 0
     */
    writel(0xd863ffe6, eim_reg + 0x00000010);
    writel(0x00000000, eim_reg + 0x00000014);

    printk("WEIM init end, CS0GCR1_is %x\n", readl(eim_reg));

    iounmap(eim_reg);
    iounmap(ccm_reg);
}
3、probe函数修改
probe函数中主要针对添加了rst引脚和led引脚,其它未做改变。可以看到,probe函数中,申请了sja1000设备的总线资源,根据GPIO中断引脚号申请了终端,然后将platform设备注册到sja1000驱动中。
static int sp_probe(struct platform_device *pdev)
{
    ...
    res_mem = platform_get_resource(pdev, IORESOURCE_MEM, 0);
    if (!res_mem)
        return -ENODEV;

    if (!devm_request_mem_region(&pdev->dev, res_mem->start, resource_size(res_mem), DRV_NAME))
        return -EBUSY;

    addr = devm_ioremap_nocache(&pdev->dev, res_mem->start, resource_size(res_mem));
    if (!addr)
        return -ENOMEM;

    if (of){
        reset_pin   = of_get_named_gpio(of, "rst-gpios", 0);
        irq_pin     = of_get_named_gpio(of, "int-gpios", 0);
        led_pin     = of_get_named_gpio(of, "led-gpios", 0);
        irq = irq_of_parse_and_map(of, 0);

        if(gpio_is_valid(reset_pin)) {
            err = devm_gpio_request_one(&pdev->dev, reset_pin,
                    GPIOF_OUT_INIT_HIGH, "sja1000 reset");
            if (err) {
                dev_err(&pdev->dev,
                    "Failed to request GPIO %d as reset pin, error %d\n",
                    reset_pin, err);
            }
        }
        if(gpio_is_valid(irq_pin)){
            err = devm_gpio_request_one(&pdev->dev, irq_pin,
                    GPIOF_IN, "sja1000 int");
            if (err) {
                dev_err(&pdev->dev,
                    "Failed to request GPIO %d as irq pin, error %d\n",
                    irq_pin, err);
            }
        }
        if(gpio_is_valid(led_pin)) {
            err = devm_gpio_request_one(&pdev->dev, led_pin,
                    GPIOF_OUT_INIT_LOW, "sja1000 led");
            if (err) {
                dev_err(&pdev->dev,
                    "Failed to request GPIO %d as led pin, error %d\n",
                    irq_pin, err);
            }
        }
    }else{
        res_irq = platform_get_resource(pdev, IORESOURCE_IRQ, 0);
    }

    ...
    dev = alloc_sja1000dev(0);
    ...
    priv = netdev_priv(dev);

    if (res_irq) {
        irq = res_irq->start;
        priv->irq_flags = res_irq->flags & IRQF_TRIGGER_MASK;
        if (res_irq->flags & IORESOURCE_IRQ_SHAREABLE)
            priv->irq_flags |= IRQF_SHARED;
    } else {
        priv->irq_flags |= IRQF_TRIGGER_LOW;
    }

    dev->irq = irq;
    priv->reg_base  = addr;
    priv->irq_pin   = irq_pin;
    priv->reset_pin = reset_pin;
    priv->led_pin   = led_pin;
    priv->led_status = 0;
    priv->wdataOffset = res_mem->start - 0x08000000;        /* add write data offset */

    if (of)
        sp_populate_of(priv, of);
    else
        sp_populate(priv, pdata, res_mem->flags);

    platform_set_drvdata(pdev, dev);
    SET_NETDEV_DEV(dev, &pdev->dev);

    err = register_sja1000dev(dev);
    ...
}
4. read/write 地址偏移
由于使用的是DA1_8引脚(DA9_12充当了CS信号),其读写地址肯定不能直接在基地址上了。修改sja100_platform中的write8和read8函数,完成读写的地址偏移。
static u8 sp_read_reg8(const struct sja1000_priv *priv, int reg)
{
    u16 data;
    data = ioread16(priv->reg_base + reg*2);
    return data>>1;
}

static void sp_write_reg8(const struct sja1000_priv *priv, int reg, u8 val)
{
    u16 data=val;
    data = data*2;
    iowrite16(data + priv->wdataOffset, priv->reg_base + reg*2);
}最近做了一个项目使用的正点原子的imx6ull核心板平台,里面涉及到了有关于使用imx6ull的EIM接口进行外部串口扩展的部分,串口扩展芯片使用的是ST16C554这个芯片。这里针对这部分内容做一个记录和分享。
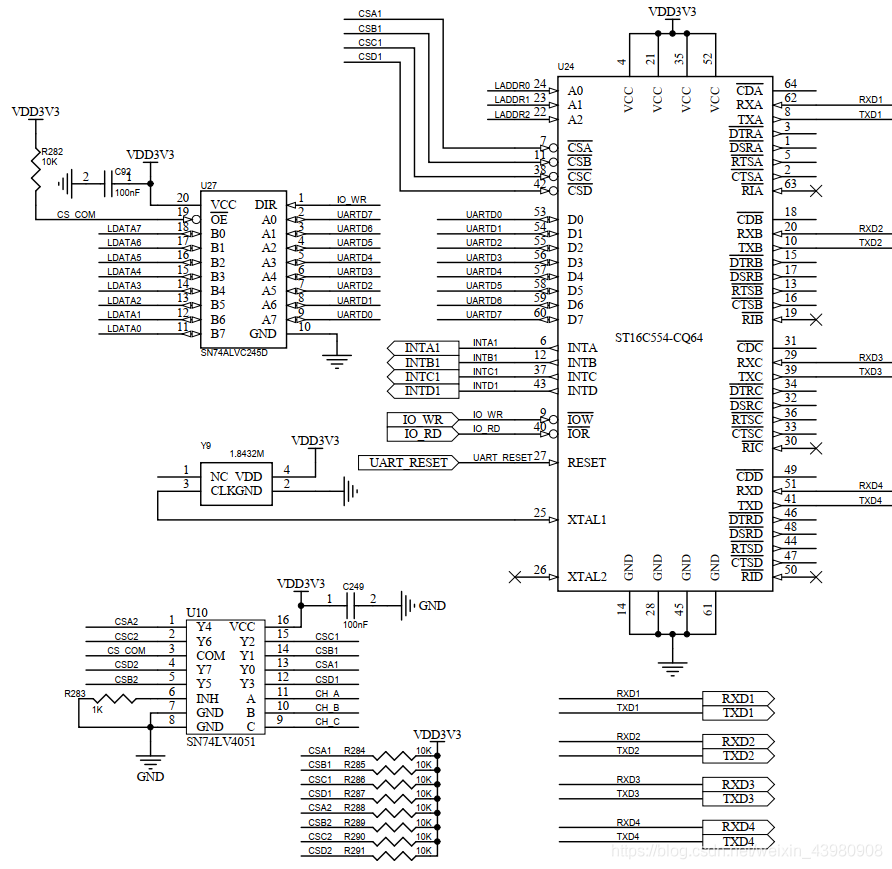
设备树部分
pinctrl_COM1_8: COM1_8 {
			fsl,pins = <
				MX6UL_PAD_LCD_DATA08__EIM_DATA00 0x10b1
				MX6UL_PAD_LCD_DATA09__EIM_DATA01 0x10b1
				MX6UL_PAD_LCD_DATA10__EIM_DATA02 0x10b1
				MX6UL_PAD_LCD_DATA11__EIM_DATA03 0x10b1
				MX6UL_PAD_LCD_DATA12__EIM_DATA04 0x10b1
				MX6UL_PAD_LCD_DATA13__EIM_DATA05 0x10b1
				MX6UL_PAD_LCD_DATA14__EIM_DATA06 0x10b1
				MX6UL_PAD_LCD_DATA15__EIM_DATA07 0x10b1

				MX6UL_PAD_CSI_PIXCLK__EIM_OE 0x10b1 /* IO_RD */
				MX6UL_PAD_CSI_VSYNC__EIM_RW  0x10b1 /* IO_WR */

				MX6UL_PAD_CSI_DATA00__EIM_AD00 0x10b1 /* A0 */
				MX6UL_PAD_CSI_DATA01__EIM_AD01 0x10b1 /* A1 */
				MX6UL_PAD_CSI_DATA02__EIM_AD02 0x10b1 /* A2 */
				MX6UL_PAD_CSI_DATA03__EIM_AD03 0x10b1 /* A3 模拟开关选择 */
				MX6UL_PAD_CSI_DATA04__EIM_AD04 0x10b1 /* A4 模拟开关选择 */
				MX6UL_PAD_CSI_DATA05__EIM_AD05 0x10b1 /* A5 模拟开关选择 */

				MX6UL_PAD_CSI_MCLK__EIM_CS0_B 0x10b1 /* CS0 8选1 */

				MX6UL_PAD_LCD_DATA20__GPIO3_IO25 0x3000 /* INTA1 */
				MX6UL_PAD_LCD_DATA19__GPIO3_IO24 0x3000 /* INTB1 */
				MX6UL_PAD_LCD_DATA21__GPIO3_IO26 0x3000 /* INTC1 */
				MX6UL_PAD_LCD_DATA18__GPIO3_IO23 0x3000 /* INTD1 */

				MX6UL_PAD_LCD_DATA17__GPIO3_IO22 0x3000 /* INTA2 */
				MX6UL_PAD_LCD_DATA16__GPIO3_IO21 0x3000 /* INTB2 */
				MX6UL_PAD_LCD_DATA22__GPIO3_IO27 0x3000 /* INTC2 */
				MX6UL_PAD_LCD_DATA23__GPIO3_IO28 0x3000 /* INTD2 */

				MX6UL_PAD_GPIO1_IO05__GPIO1_IO05 0x10b1 /* UART_RESET */
			>;
上面的是设备树的引脚属性设置部分。
&weim {
	pinctrl-names = "default";
  	pinctrl-0 = <&pinctrl_COM1_8>;
	#address-cells = <2>;
	#size-cells = <1>;
	fsl,weim-cs-gpr = <&gpr>;
	ranges = <0 0 0x50000000 0x08000000>;
	status = "okay";

	st16c554@0,8 {
		compatible = "st16c554";
		reg = <0 0 0x08000000>;
		fsl,weim-cs-timing = <0x00640081 0x00000001 0x1c022000
					0x0000c000 0x1404a38e 0x00000000>;
	};
};
上面的是设备树中关于eim接口的相关设置。这里主要说明一下fsl,weim-cs-timing属性,该属性就是设置eim通道的寄存器值的,imx6ull的eim接口根据cs计算一共4个通道,我这里通过ranges 设置只使用了通道0,fsl,weim-cs-timing的六个值就会设置为通道0的6个寄存器对应的值。设备树中的其他属性对应的意义可以参考linux的文档说明Documentation\devicetree\bindings\bus\imx-weim.txt,寄存器的具体含义参考imx6ull的参考文档即可。

开启8250串口驱动,使用的端口数量的话根据自己的使用你情况进行配置即可,我这里用到8个所以设置8个。还有我发现一个奇怪的现象就是设置0个端口register at runtime时内核好像就会启动失败,控制台什么都不输出了,不知道是什么情况,总之设置时下面那个数字不要设置为0。
#include <linux/module.h>
#include <linux/init.h>
#include <linux/serial_8250.h>
#include <linux/platform_device.h>
#include <linux/kernel.h>
#include <linux/of_irq.h>
#include <linux/irq.h>
#include <linux/of_gpio.h>
#include <linux/delay.h>
#include <linux/gpio.h>

#include <asm/irq.h>
#include <asm/mach/map.h>
#include <asm/io.h>

#define ST16C554_REG_SIZE  0x08

#define IMX_GPIO_NR(bank, nr)		(((bank) - 1) * 32 + (nr))

#define CS0_BASE    0x50000000

#define CSA1_BASE    CS0_BASE
#define CSB1_BASE    (CS0_BASE | 1 << 3)   //A3 A4 A5作为8选1模拟开关选择线
#define CSC1_BASE    (CS0_BASE | 2 << 3)
#define CSD1_BASE    (CS0_BASE | 3 << 3)
#define CSA2_BASE    (CS0_BASE | 4 << 3)
#define CSB2_BASE    (CS0_BASE | 5 << 3)
#define CSC2_BASE    (CS0_BASE | 6 << 3)
#define CSD2_BASE    (CS0_BASE | 7 << 3)

/* 寄存器地址偏移定义 */
#define PORT_REG_RHR    0
#define PORT_REG_THR    0
#define PORT_REG_IER    1
#define PORT_REG_ISR    2
#define PORT_REG_FCR    2
#define PORT_REG_LCR    3
#define PORT_REG_MCR    4
#define PORT_REG_LSR    5
#define PORT_REG_MSR    6
#define PORT_REG_SPR    7
#define PORT_REG_DLL    0  //波特率设置寄存器
#define PORT_REG_DLM    1

#define PORT(_base,_irq)				\
	{						\
        .type       = PORT_16550A,  \
        .iobase     = _base,        \
        .mapbase    = _base,         \
		.irq		= _irq,			\
        .irqflags   = IRQF_TRIGGER_RISING,  \
		.uartclk	= 1843200,		\
		.iotype		= UPIO_MEM,		\
        .regshift   = 0,                \
		.flags		= UPF_BOOT_AUTOCONF | UPF_IOREMAP,	\
	}

#define ST16C554_INTA1 gpio_to_irq(IMX_GPIO_NR(3,25))
#define ST16C554_INTB1 gpio_to_irq(IMX_GPIO_NR(3,24))
#define ST16C554_INTC1 gpio_to_irq(IMX_GPIO_NR(3,26))
#define ST16C554_INTD1 gpio_to_irq(IMX_GPIO_NR(3,23))
#define ST16C554_INTA2 gpio_to_irq(IMX_GPIO_NR(3,22))
#define ST16C554_INTB2 gpio_to_irq(IMX_GPIO_NR(3,21))
#define ST16C554_INTC2 gpio_to_irq(IMX_GPIO_NR(3,27))
#define ST16C554_INTD2 gpio_to_irq(IMX_GPIO_NR(3,28))


static struct plat_serial8250_port exar_data[] = {
	PORT(CSA1_BASE, 0),
	PORT(CSB1_BASE, 0),
	PORT(CSC1_BASE, 0),
	PORT(CSD1_BASE, 0),
    PORT(CSA2_BASE, 0),
	PORT(CSB2_BASE, 0),
	PORT(CSC2_BASE, 0),
	PORT(CSD2_BASE, 0),
	{ },
};

static struct platform_device exar_device = {
	.name			= "serial8250",
	// .id			= PLAT8250_DEV_EXAR_ST16C554,
	.dev			= {
		.platform_data	= exar_data,
	},
};

int fsl8250_handle_irq(struct uart_port *port)
{
	unsigned char lsr, orig_lsr;
	unsigned long flags;
	unsigned int iir;
	struct uart_8250_port *up = up_to_u8250p(port);

    // printk("irq = %d ", port->irq);

	spin_lock_irqsave(&up->port.lock, flags);
	iir = port->serial_in(port, PORT_REG_ISR);
	if (iir & 0x01) {
		spin_unlock_irqrestore(&up->port.lock, flags);
		return 0;
	}
    /* This is the WAR; if last event was BRK, then read and return */
	if (unlikely(up->lsr_saved_flags & 0x10)) {
		up->lsr_saved_flags &= ~0x10;
		port->serial_in(port, PORT_REG_RHR);
		spin_unlock_irqrestore(&up->port.lock, flags);
		return 1;
	}

	lsr = orig_lsr = up->port.serial_in(&up->port, PORT_REG_LSR);
	if (lsr & 0x01)
		lsr = serial8250_rx_chars(up, lsr);

	serial8250_modem_status(up);

	if (lsr & 0x20)
		serial8250_tx_chars(up);

	up->lsr_saved_flags = orig_lsr;
	spin_unlock_irqrestore(&up->port.lock, flags);
	return 1;
}

static int __init my_serial_init(void)
{
    int ret;
    int rst_io;

    exar_data[0].irq = ST16C554_INTA1;
    exar_data[1].irq = ST16C554_INTB1;
    exar_data[2].irq = ST16C554_INTC1;
    exar_data[3].irq = ST16C554_INTD1;
    exar_data[4].irq = ST16C554_INTA2;
    exar_data[5].irq = ST16C554_INTB2;
    exar_data[6].irq = ST16C554_INTC2;
    exar_data[7].irq = ST16C554_INTD2;

    exar_data[0].handle_irq = fsl8250_handle_irq;
    exar_data[1].handle_irq = fsl8250_handle_irq;
    exar_data[2].handle_irq = fsl8250_handle_irq;
    exar_data[3].handle_irq = fsl8250_handle_irq;
    exar_data[4].handle_irq = fsl8250_handle_irq;
    exar_data[5].handle_irq = fsl8250_handle_irq;
    exar_data[6].handle_irq = fsl8250_handle_irq;
    exar_data[7].handle_irq = fsl8250_handle_irq;

    rst_io = IMX_GPIO_NR(1,5); //获得io编号
    ret = gpio_direction_output(rst_io, 0); //复位
    ret = gpio_direction_output(rst_io, 1);
    if (ret < 0) {
            printk("%s rst_io ouput error\n", __func__);
    }
    udelay(10); //延时10us
    gpio_set_value(rst_io, 0);
    udelay(1000); //延时1000us

	return platform_device_register(&exar_device);
}

static void __exit my_serial_exit(void)
{
    printk("unregister st16c554_driver\n");
	platform_device_unregister(&exar_device);
}

module_init(my_serial_init);
module_exit(my_serial_exit);

MODULE_LICENSE("GPL");
MODULE_AUTHOR("ljf");
PORT里面的参数我捡几个主要的进行说明一下,mapbase和iobase都是实际的物理地址,这个和你的EIM总线配置以及硬件连接有关。irq就是中断号,uartclk就是外接的时钟频率我接的是1.8432M的时钟就设置为1843200,串口的波特率最大就是clk/16,iotype设置为UPIO_MEM表示8位的内存地址,regshift表示地址偏移由于我是A0对应的ST16C554的A0所以设置为0表示没有偏移,UPF_IOREMAP表示地址需要映射到虚拟地址进行访问。
然后在init函数中申请中断号,设置handle_irq,进行芯片复位,最后将其注册成platform设备。然后就会和8250驱动匹配上进行8250驱动的一套流程,这里就不分析了。handle_irq函数可以参考8250_fsl.c和8250_core.c文件,里面都有相应的示例。
虽然驱动写完了但是还是不能直接使用,使用之前还需要开启EIM的时钟,虽然设备树里面设置了status的属性为okay但是eim的时钟却没有被开启,而且我试了直接在上面驱动中的init函数里设置CCM_CCGR6寄存器的bit10-11位,但是没用,只能在内核初始化完成之后再开启对应的时钟。于是我就又写了一个开启时钟的驱动。
static int __init st16c554_cmd_init(void)
{
    void __iomem *ccm_ccgr6 = ioremap(CCM_BASE_ADDR + 0x80, 4);
    unsigned int reg;

    /* CLKCTL_CCGR6: Set emi_slow_clock to be on in all modes */
    reg = readl(ccm_ccgr6);
    reg |= 0x00000C00;
    writel(reg, ccm_ccgr6);
    reg = readl(ccm_ccgr6);
    iounmap(ccm_ccgr6);

    return 0;
}

static void __exit st16c554_cmd_exit(void)
{
}

module_init(st16c554_cmd_init);
module_exit(st16c554_cmd_exit);

MODULE_LICENSE("GPL");
驱动里面直接就是映射寄存器地址然后设置值,其他的什么都不做。这个驱动会在根文件系统加载之后被调用自动开启eim总线的时钟。

将驱动编译进内核里面,用新的内核进行启动如果驱动加载成功之后内核启动就会打印出相应的信息来,如上图所示。查看/dev目录可以看到已经有ttyS0-7这几个设备节点了。
/* DDR model number: MT40A1G16KNR-062E:E */
#ifdef CONFIG_SYS_DDR_RAW_TIMING
dimm_params_t ddr_raw_timing = {
.n_ranks = 1, /* Number of ranks/ chip selects of DDR */
.rank_density = 8589934592u, /* this is size in one rank, here 8GB */
.capacity = 8589934592u, /* this is the total size, here 8GB */
.primary_sdram_width = 64, /* this is the data bus width */
.ec_sdram_width = 8, /* this is the ECC data width */
.die_density = 0x5, /* this is each DRAM die density, here twin 8Gbit die density. 0x44Gbit, 0x58Gbit, 0x616Gbit*/
.registered_dimm = 0, /* if register chip is used similar to an RDIMM = 1, otherwise = 0 */
.mirrored_dimm = 0, /* =1 if C/A bus mirroring is used, all UDIMMs with two ranks are mirrored */
.n_row_addr = 16, /* number of rows from dram datasheet */
.n_col_addr = 10, /* number of columns from dram datasheet */
.bank_addr_bits = 0, /* for DDR4 this is always = 0 defining two bits bank address in DRAM */
.bank_group_bits = 2, /* for x16 dram = 1, 1-bit BG, for x8 dram = 2, 2-bits for BG */
.edc_config = 2, /* leave as is, does not change. 0no ECC, 2 ECC*/
.burst_lengths_bitmask = 0x0c, /* leave as is, this is needed for uboot masking, does not change */
.tckmin_x_ps = 625, /* tck min = 625ps from DRAM datasheet */
.tckmax_ps = 1500, /* tck max = 1500ps from DRAM datasheet */
.caslat_x = 0x00FFFA00, /* leave as is, this is needed for uboot masking, does not change */
.taa_ps = 13750, /* tAA from DRAM datasheet (ps)*/
.trcd_ps = 13750, /* tRCD from DRAM datasheet (ps) */
.trp_ps = 13750, /* tRP from DRAM datasheet (ps)*/
.tras_ps = 32000, /* tRAS from DRAM datasheet (ps) */
.trc_ps = 45750, /* tRC = tRP+tRCD or from DRAM datasheet (ps)*/
.trfc1_ps = 350000, /* tRFC1 from DRAM datasheet (ps)*/
.trfc2_ps = 260000, /* tRFC2 from DRAM datasheet (ps)*/
.trfc4_ps = 160000, /* tRFC4 from DRAM datasheet (ps)*/
.tfaw_ps = 21000, /* tFAW from DRAM datasheet (ps)*/
.trrds_ps = 2500, /* tRRD_S from DRAM datasheet (ps)*/
.trrdl_ps = 4900, /* tRRD_L from DRAM datasheet (ps)*/
.tccdl_ps = 5000, /* tCCD_L from DRAM datasheet (ps)*/
.refresh_rate_ps = 7800000, /* tREFI from DRAM datasheet (ps)*/
};
1588 setting following information:
*******************************************
1) For the constant pulse width of the PPS signal, you must set the Fiper value that satisfies the equation given in LS1046ADPAARM (page 1254).
2) To get a pulse at every 1 second, the value written in Fiper register + TMR_CTRL[TCLK_PERIOD] must equal 1000,000,000.
e.g. given the two examples of different pulse width:

Case 1:
    -Clock_IN = 125MHz
    -Nominal_clock = 100MHz
    -Frequency Div Ratio = Clock_IN/Nominal_clock = 125/100 = 1.25
    -Addenden = (2^32)/1.25 = 3,435,973,836 = 0xCCCCCCCC
    -TCLK_PERIOD should be equal to reciprocal of frequency of “nominal clock” and is recommended to have TCLK_PERIOD as integral factor of 10^9 = 10^9 / Nominal clock = 10^9 / 100*10^6 = 10 = 0xA
    -Prescalar = 1000
    -Output_Clock = 100MHz/1000 = 0.1MHz = 100KHz
    -Fiper value = tmr_prsc * tclk_period * N - tclk_period, where N is an integer more than 2
                 = 1000 * 10 * 100000 - 10
                 = 999,999,990
                 = 0x3B9AC9F6

    In this case, you will see pulse with width of 1/100KHz = 0.01 ms every 1 second

Case 2:
    -Clock_IN = 125MHz
    -Nominal_clock = 100MHz
    -Frequency Div Ratio = Clock_IN/Nominal_clock = 125/100 = 1.25
    -Addenden = (2^32)/1.25 = 3,435,973,836 = 0xCCCCCCCC
    -TCLK_PERIOD should be equal to reciprocal of frequency of “nominal clock” and is recommended to have TCLK_PERIOD as integral factor of 10^9 = 10^9 / Nominal clock = 10^9 / 100*10^6 = 10 = 0xA
    -Prescalar = 10000
    -Output_Clock = 100MHz/10000 = 0.01MHz = 10KHz
    -Fiper value = tmr_prsc * tclk_period * N - tclk_period, where N is an integer more than 2
                 = 10000 * 10 * 10000 - 10
                 = 999,999,990
                 = 0x3B9AC9F6

    In this case, you will see pulse with width of 1/10KHz = 0.1 ms every 1 second


-examples: dpaa2

TimerOsc     = 125 MHz
tclk_period  = 10 nanoseconds
NominalFreq  = 1000 / 10 = 100 MHz
FreqDivRatio = TimerOsc / NominalFreq = 125 / 100 = 1.25    (must be greater that 1.0)
tmr_add      = ceil(2^32 / FreqDivRatio) = ceil(2^32 / 1.25) = 3,435,973,837 = 0xcccccccd
OutputClock  = NominalFreq / tmr_prsc = 100 / 10000 = 0.01 MHz
PulseWidth   = 1 / OutputClock = 1 / 0.01= 100 microseconds  (attention:The 1pps pulse width is related to the 1588 output clock frequency.)
FiperFreq1   = desired frequency in Hz = 1 Hz
FiperDiv1    = 1000000 * OutputClock / FiperFreq1 = 1000000 * 0.01 / 1 = 10000
(1) tmr_fiper1   = tmr_prsc * tclk_period * FiperDiv1 - tclk_period = 10000 * 10 * 10000 - 10 = 999,999,990
FiperFreq2   = desired frequency in Hz = 100 Hz
FiperDiv2    = 1000000 * OutputClock / FiperFreq2 = 1000000 * 0.01 / 100 = 100
tmr_fiper2   = tmr_prsc * tclk_period * FiperDiv2 - tclk_period = 10000 * 10 * 100 - 10 = 9,999,990
max_adj      = 1000000000 * (FreqDivRatio - 1.0) - 1 = 1000000000 * (1.25 - 1.0) - 1 = 249,999,999

 soc {
		    ptp-timer@8b95000 {
			compatible = "fsl,dpaa2-ptp";
			reg = <0x0 0x8b95000 0x0 0x100>;
			clocks = <&clockgen 4 1>;
			little-endian;
			fsl,extts-fifo;
			fsl,cksel       = <0>;
			fsl,tclk-period = <10>;
			fsl,tmr-prsc    = <10000>;
			fsl,tmr-add     = <0xcccccccd>;
			fsl,tmr-fiper1  = <999999990>;
			fsl,tmr-fiper2  = <9999990>;
			fsl,tmr-fiper3  = <499990>;
			fsl,max-adj     = <249999999>;
		    };
   };

more info: 8.7.7.4 PTP device tree node configuration LSDK user guide 2108 or ref dts in kernel
:vim ./Documentation/devicetree/bindings/ptp/ptp-qoriq.txt
* Freescale QorIQ 1588 timer based PTP clock

General Properties:

  - compatible   Should be "fsl,etsec-ptp" for eTSEC
                 Should be "fsl,fman-ptp-timer" for DPAA FMan
                 Should be "fsl,dpaa2-ptp" for DPAA2
                 Should be "fsl,enetc-ptp" for ENETC
  - reg          Offset and length of the register set for the device
  - interrupts   There should be at least two interrupts. Some devices
                 have as many as four PTP related interrupts.

Clock Properties:

  - fsl,cksel        Timer reference clock source.
  - fsl,tclk-period  Timer reference clock period in nanoseconds.
  - fsl,tmr-prsc     Prescaler, divides the output clock.
  - fsl,tmr-add      Frequency compensation value.
  - fsl,tmr-fiper1   Fixed interval period pulse generator.
  - fsl,tmr-fiper2   Fixed interval period pulse generator.
  - fsl,tmr-fiper3   Fixed interval period pulse generator.
                     Supported only on DPAA2 and ENETC hardware.
  - fsl,max-adj      Maximum frequency adjustment in parts per billion.
  - fsl,extts-fifo   The presence of this property indicates hardware
                     support for the external trigger stamp FIFO.
  - little-endian    The presence of this property indicates the 1588 timer
                     IP block is little-endian mode. The default endian mode
                     is big-endian.

  These properties set the operational parameters for the PTP
  clock. You must choose these carefully for the clock to work right.
  Here is how to figure good values:

  TimerOsc     = selected reference clock   MHz
  tclk_period  = desired clock period       nanoseconds
  NominalFreq  = 1000 / tclk_period         MHz
  FreqDivRatio = TimerOsc / NominalFreq     (must be greater that 1.0)
  tmr_add      = ceil(2^32 / FreqDivRatio)
  OutputClock  = NominalFreq / tmr_prsc     MHz
  PulseWidth   = 1 / OutputClock            microseconds
  FiperFreq1   = desired frequency in Hz
  FiperDiv1    = 1000000 * OutputClock / FiperFreq1
  tmr_fiper1   = tmr_prsc * tclk_period * FiperDiv1 - tclk_period
  max_adj      = 1000000000 * (FreqDivRatio - 1.0) - 1

  The calculation for tmr_fiper2 is the same as for tmr_fiper1. The
  driver expects that tmr_fiper1 will be correctly set to produce a 1
  Pulse Per Second (PPS) signal, since this will be offered to the PPS
  subsystem to synchronize the Linux clock.

  Reference clock source is determined by the value, which is holded
  in CKSEL bits in TMR_CTRL register. "fsl,cksel" property keeps the
  value, which will be directly written in those bits, that is why,
  according to reference manual, the next clock sources can be used:

  For eTSEC,
  <0> - external high precision timer reference clock (TSEC_TMR_CLK
        input is used for this purpose);
  <1> - eTSEC system clock;
  <2> - eTSEC1 transmit clock;
  <3> - RTC clock input.

  For DPAA FMan,
  <0> - external high precision timer reference clock (TMR_1588_CLK)
  <1> - MAC system clock (1/2 FMan clock)
  <2> - reserved
  <3> - RTC clock oscillator

  When this attribute is not used, the IEEE 1588 timer reference clock
  will use the eTSEC system clock (for Gianfar) or the MAC system
  clock (for DPAA).

Example:

        ptp_clock@24e00 {
                compatible = "fsl,etsec-ptp";
                reg = <0x24E00 0xB0>;
                interrupts = <12 0x8 13 0x8>;
                interrupt-parent = < &ipic >;
                fsl,cksel       = <1>;
                fsl,tclk-period = <10>;
                fsl,tmr-prsc    = <100>;
                fsl,tmr-add     = <0x999999A4>;
                fsl,tmr-fiper1  = <0x3B9AC9F6>;
                fsl,tmr-fiper2  = <0x00018696>;
                fsl,max-adj     = <659999998>;
        };

ls1046可以编辑 vim ./arch/arm64/boot/dts/freescale/qoriq-fman3-0.dtsi

 130 ptp_timer0: ptp-timer@1afe000 {
 131     compatible = "fsl,fman-ptp-timer", "fsl,fman-rtc";
 132     reg = <0x0 0x1afe000 0x0 0x1000>;
 133     interrupts = <GIC_SPI 44 IRQ_TYPE_LEVEL_HIGH>;
 134     clocks = <&clockgen 3 0>;
 135     fsl,extts-fifo;
 136 };

增加属性根据需求:
cksel           --- 时钟选择。参考上文。
tclk-period     --- 想获取周期,即一个cnt对应周期 单位ns,决定了1588的 nominalfreq,nominalfreq= 1000/tclk-period


+ fsl,cksel = <0>;               /* 125M external high precision timer reference clock,rdb board */
+ fsl,tclk-period = <10>;        /* 10 ns nominalfreq = 1000/10 = 100MHz */
+ fsl,tmr-prsc = <10000>;        /* 输入时钟100MHz 输出时钟= 100/tmr-prsc=1/100Mhz=10Khz,且决定了1pps的脉宽是1/10Khz=0.1ms.
+ fsl,tmr-add = <0xCCCCCCCD>;    /* ceil(2^32/FreqDivRatio)=(4294967296/(125M/100M)) = 0xCCCCCCCD
+ fsl,tmr-fiper1 = <999999990>;  /* tmr_prsc * tclk_period * FiperDiv1 - tclk_period = 10000*10*(10*1000Hz/1Hz)-10 = 999,999,990 = 0x3B9AC9F6
+ fsl,tmr-fiper2 = <9999990>;    /* FiperFreq2   = desired frequency in Hz = 100 Hz;FiperDiv2 = 1000000 * OutputClock / FiperFreq2 = 1000000 * 0.01 / 100 = 100;tmr_fiper2 = tmr_prsc * tclk_period * FiperDiv2 - tclk_period = 10000 * 10 * 100 - 10 = 9,999,990
+ fsl,max-adj = <>;     /* 10^9 *(FreqDivRatio - 1.0)-1 = 1000000000 * (FreqDivRatio - 1.0) - 1 = 1000000000 * (1.25 - 1.0) - 1 = 249,999,999


-fsl,cksel定时器参考时钟源。
-fsl,tclk period Timer参考时钟周期(纳秒)。
-fsl、tmr prsc预分频器对输出时钟进行分频。
-fsl、tmr增加频率补偿值。
-fsl,tmr-fiper1固定间隔周期脉冲发生器。
-fsl,tmr-fiper2固定间隔周期脉冲发生器。
-fsl,tmr-fiper3固定间隔周期脉冲发生器。
仅在DPAA2和ENEC硬件上受支持。
-fsl,max adj最大频率调整,单位为十亿分之一。
-fsl,extts fifo此属性的存在表示硬件支持外部触发戳FIFO。
-little endian此属性的存在表示1588计时器
IP块为小端模式。默认endian模式是big endian。
硬件配置:5颗ddr4,其中一颗作为ecc。
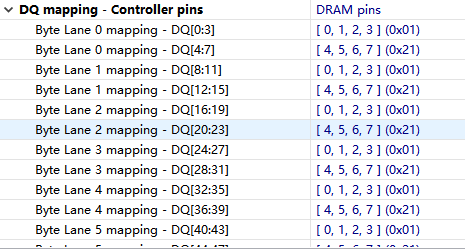
1、DDR问题会导致uboot无法加载运行。所以RCW配置完后最重要的就是调试DDR。首先检查ddr硬件上的设计,DQ信号设计应该是4位交叉(swap),主要原因是CW软件DQ mapping是按照4位配置的,没有8位的swap配置,如果硬件不是按照4位swizzled的,ddr的参数校准会通不过。我们的项目第一版即使因为硬件DQ信号是按照8位设计的,DQ参数无法正确配置,从而ddr校准不过,不得已最后改版成4位swpa,才成功了。DQ mapping参数由硬件提供,然后再cw上对应填写就行。DQ_MAP原理图:
Codewarrior DQ mapping配置-4位swap,根据实际电路调整:
2、在创建ddr配置工程的时候,需要填写的clk to dqs由硬件提供,要正确填写。其他的值按照ddr手册配置好就行
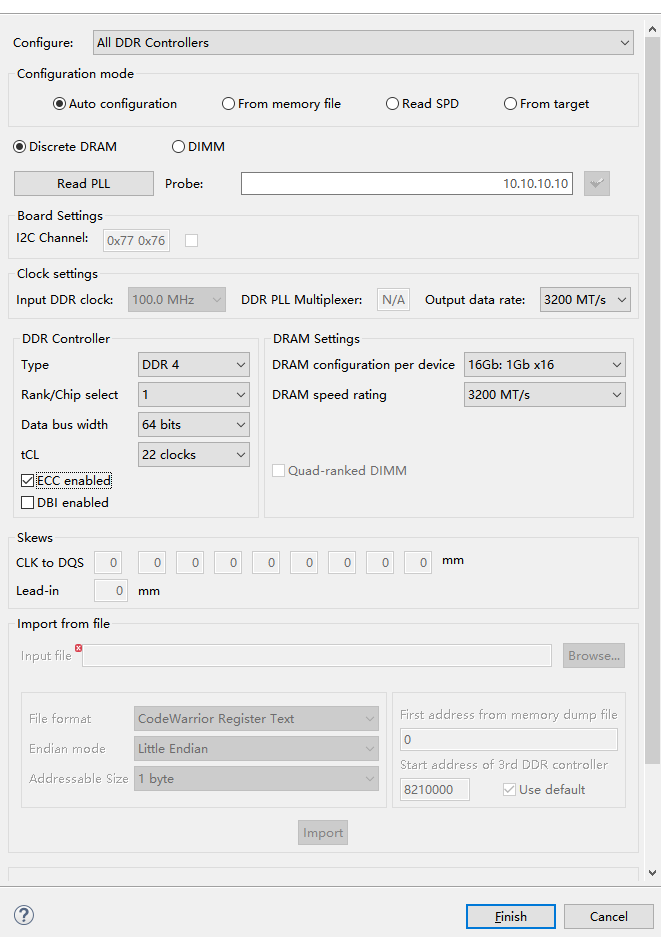
1、DRAM type: 颗粒的配置成NoDimm
2、使用CW做validation参数校准,这个比较费时。
3、校准完毕后,和RCW一样,点击生成代码按钮,会生成ddr_init1.c,找到ddr_raw_timing结构体,复制到自己的ddr_init.c中替代。
struct dimm_params ddr_raw_timing = {
        .n_ranks = 1,
        .rank_density = 8589934592u,
        .capacity = 8589934592u,
        .primary_sdram_width = 64,
        .ec_sdram_width = 8,
        .device_width = 8,
        .die_density = 0x08,
        .rdimm = 0,
        .mirrored_dimm = 0,
        .n_row_addr = 16,
        .n_col_addr = 10,
        .bank_addr_bits = 0,
        .bank_group_bits = 2,
        .edc_config = 2,
        .burst_lengths_bitmask = 0x0c,
        .tckmin_x_ps = 625,
        .tckmax_ps = 1600,
        .caslat_x = 0x00FFFC00,
        .taa_ps = 18800,
        .trcd_ps = 18800,
        .trp_ps = 18800,
        .tras_ps = 43800,
        .trc_ps = 37600,
        .twr_ps = 20000,
        .trfc1_ps = 350000,
        .trfc2_ps = 260000,
        .trfc4_ps = 160000,
        .tfaw_ps = 25000,
        .trrds_ps = 25000,
        .trrdl_ps = 6200,
        .tccdl_ps = 6200,
        .refresh_rate_ps = 10237500
};
4、在packages/firmware/atf/plat/nxp/soc-lx2160/lx2160ardb/platform_def.h中定义下面的宏:
#define CONFIG_DDR_NODIMMflex-builder -c atf -m lx2160ardb_rev2 -b xspi 生成fip.bin文件,使用codewarrior tap下载到flash。建议先下载一个官方的复合固件,然后替换自己的fip.bin和fip_uboot.bin。
修改文件:flexbuild_lsdk2108/components/firmware/atf$ vim Makefile
修改内容:
修改文件:flexbuild_lsdk2108/components/firmware/atf/plat/nxp/soc-lx2160a/lx2160ardb/platform.mk
修改内容:增加DDR_DEBUG := yes
通讯方式有两种:
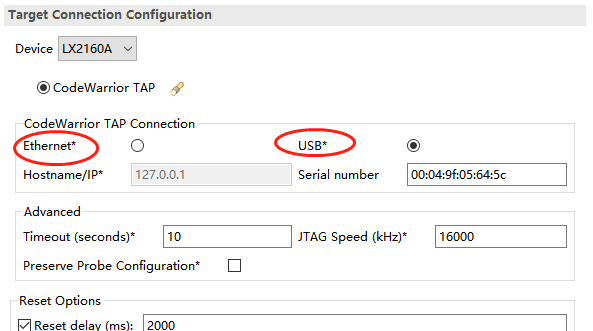
一、USB通讯
这个相对简单,但速率低。配置流程如下,配置完保存即可。
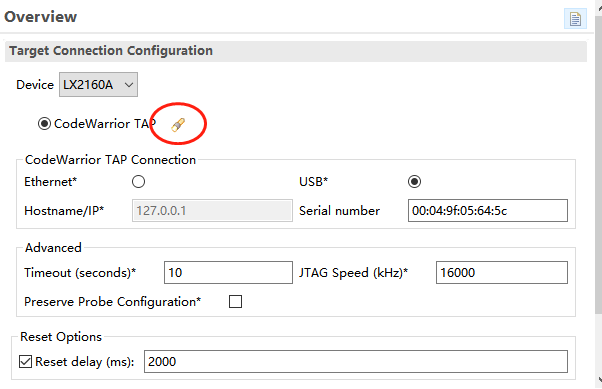
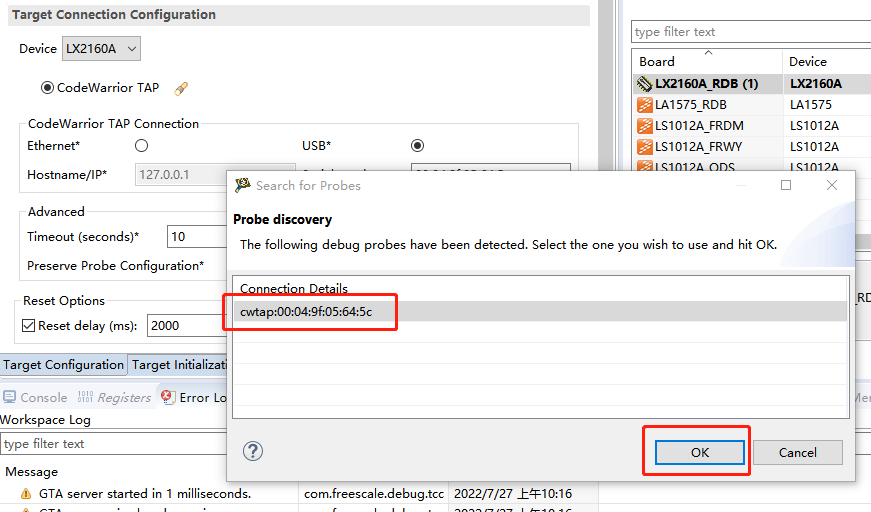
二、网口通讯
配置复杂,速率高。先连上USB,配置流程如下:
连接后,配置IP
Push enter to start console.

                  ####
               ##########
            ##########  ....          Freescale Semiconductor Inc.
               ####  ..........       Copyright (c) 2015
                  ..........  ####    All Rights Reserved
                     ....  ##########
                        ##########    Codewarrior TAP Firmware
                    ....   ####       Boot Loader Version 1.0.1
                 ..........             built Mon Aug 26 18:55:20 UTC 2013
              ..........  ####        OS Version 1.0.4
          ####   ....  ##########       built Thu Apr 23 22:28:59 UTC 2015
       ##########   ##########
    ##########  ....   ####           Main Board: CodeWarrior TAP (3.3V)
       ####  ..........               Probe Tip:  Power Architecture JTAG/COP
          ..........
      ####   ....
   ##########                         Note: This product uses open-source
##########                            components.  See "help license"
   ####                               for details.

Network not configured - defaulting to DHCP
core> help
Help is available for these commands:
  arp           ARP table commands.
  ccs           Display/manage CCS firmware
  gdbproxy      Display/manage gdbproxy firmware
  help          Get help on commands
  host          Host table commands
  license       Displays open-source license details
  netparam      Show/set nonvolatile networking parameters.
  netstat       Display network protocol statistics.
  ping          Test if host is alive.
  reset         Reboot this device.
  route         Route table commands.
  tgreset       Reset target
  tgtty         Get/set tty settings for target serial
  who           List any open connections.
core> help netparam
Usage: netparam [subcommand <subcommand options>]

This command displays or sets nonvolatile networking
parameters. If called with no subcommand, it displays all
parameters.  When called with one of the subcommands listed
below, it changes the parameters associated with that command.
Note that when changed, some parameters will not be activated
until the unit is rebooted.
Use "netparam <subcommand> --help" for help on a specific
subcommand.

Netparam recognizes the following subcommands:
         add_host               Add static host
         add_route              Add static route
         bootconfig             Boot method selection
         delete_host            Delete static host
         delete_route           Delete static route
         static_ip_address      Specify static IP address
         static_dns_server      Specify DNS server address
设置静态IP,命令会阻塞10s,这个时候CodeWarrior TAP的RX/TX灯变为绿色,
core> netparam static_ip_address 192.168.6.223 # wait for 10s
core> netparam add_route 192.168.6.254 gateway_ip 1 # hop_cnt=1
core> netparam bootconfig static:cw-tap0
Netmask defaults to 255.255.255.0
Using dynamic IP address 192.168.6.223
core> ping 192.168.6.6
PING 192.168.6.6 (192.168.6.6): 56 data bytes
64 bytes from 192.168.6.6: seq=0 ttl=128 time=0.917 ms
64 bytes from 192.168.6.6: seq=1 ttl=128 time=0.640 ms

--- 192.168.6.6 ping statistics ---
2 packets transmitted, 2 packets received, 0% packet loss
round-trip min/avg/max = 0.640/0.778/0.917 ms
跨网段设置路由,有警告但是设置成功。
core> netparam add_route 192.168.12.0 192.168.6.254 1
Netmask defaults to 255.255.255.0
gateway_ip: Unknown host
route: netmask doesn't match route address
Usage: route [-nNvee] [-FC] [<AF>]           List kernel routing tables
       route [-v] [-FC] {add|del|flush} ...  Modify routing table for AF.

       route {-h|--help} [<AF>]              Detailed usage syntax for specified AF.
       route {-V|--version}                  Display version/author and exit.

        -v, --verbose            be verbose
        -n, --numeric            don't resolve names
        -e, --extend             display other/more information
        -F, --fib                display Forwarding Information Base (default)
        -C, --cache              display routing cache instead of FIB

  <AF>=Use '-A <af>' or '--<af>'; default: inet
  List of possible address families (which support routing):
    inet (DARPA Internet) ax25 (AMPR AX.25) netrom (AMPR NET/ROM)
    ipx (Novell IPX) ddp (Appletalk DDP) x25 (CCITT X.25)
SIOCADDRT: File exists
core> ping 192.168.12.16
PING 192.168.12.16 (192.168.12.16): 56 data bytes
64 bytes from 192.168.12.16: seq=0 ttl=127 time=2.608 ms
64 bytes from 192.168.12.16: seq=1 ttl=127 time=0.526 ms
64 bytes from 192.168.12.16: seq=2 ttl=127 time=0.585 ms

--- 192.168.12.16 ping statistics ---
3 packets transmitted, 3 packets received, 0% packet loss
round-trip min/avg/max = 0.526/1.239/2.608 ms
查看路由表
core> netparam add_route 192.168.16.0 192.168.6.254 1
Netmask defaults to 255.255.255.0
gateway_ip: Unknown host
route: netmask doesn't match route address
Usage: route [-nNvee] [-FC] [<AF>]           List kernel routing tables
       route [-v] [-FC] {add|del|flush} ...  Modify routing table for AF.

       route {-h|--help} [<AF>]              Detailed usage syntax for specified AF.
       route {-V|--version}                  Display version/author and exit.

        -v, --verbose            be verbose
        -n, --numeric            don't resolve names
        -e, --extend             display other/more information
        -F, --fib                display Forwarding Information Base (default)
        -C, --cache              display routing cache instead of FIB

  <AF>=Use '-A <af>' or '--<af>'; default: inet
  List of possible address families (which support routing):
    inet (DARPA Internet) ax25 (AMPR AX.25) netrom (AMPR NET/ROM)
    ipx (Novell IPX) ddp (Appletalk DDP) x25 (CCITT X.25)
SIOCADDRT: File exists
SIOCADDRT: File exists
core> netstat -r
Kernel IP routing table
Destination     Gateway         Genmask         Flags   MSS Window  irtt Iface
127.0.0.0       *               255.0.0.0       U         0 0          0 lo
169.254.0.0     *               255.255.0.0     U         0 0          0 usb0
192.168.6.0     *               255.255.255.0   U         0 0          0 eth0
192.168.6.0     192.168.6.254   255.255.255.0   UG        0 0          0 eth0
192.168.12.0    192.168.6.254   255.255.255.0   UG        0 0          0 eth0
192.168.16.0    192.168.6.254   255.255.255.0   UG        0 0          0 eth0
重启,需要把secureCRT的串口disconnect
core> reset
Close this configuration console to reboot...
(hit Ctrl+c to abort)
再重新打开,输入回车,和之前显示不一样了
Push enter to start console.

                  ####
               ##########
            ##########  ....          Freescale Semiconductor Inc.
               ####  ..........       Copyright (c) 2015
                  ..........  ####    All Rights Reserved
                     ....  ##########
                        ##########    Codewarrior TAP Firmware
                    ....   ####       Boot Loader Version 1.0.1
                 ..........             built Mon Aug 26 18:55:20 UTC 2013
              ..........  ####        OS Version 1.0.4
          ####   ....  ##########       built Thu Apr 23 22:28:59 UTC 2015
       ##########   ##########
    ##########  ....   ####           Main Board: CodeWarrior TAP (3.3V)
       ####  ..........               Probe Tip:  Power Architecture JTAG/COP
          ..........
      ####   ....
   ##########                         Note: This product uses open-source
##########                            components.  See "help license"
   ####                               for details.

Network configuration is static:cw-tap0
Using static IP address 192.168.6.223
这个时候,断开USB,采用USB供电,方可使用网络来连接,下载器自带了一个串口,设置串口参数,查看串口设置
core> help tgtty
Usage: tgtty [<options>]

Use this command to get and set target serial settings.  Without
options, this command displays current settings.  The following
options are accepted:
[reset]                                       -- terminates any open connections
[default]                                     -- set default settings
[<9600 | 19200 | 38400 | 57600 | 115200>]     -- baud rate
[<data5 | data6 | data7 | data8>]             -- data bits
[<stop1 | stop2>]                             -- stop bits
[<noparity | oddparity | evenparity>]         -- parity
[<rtscts | nortscts | rxtx>]                  -- hardware flow control
[<noxon | xon>]                               -- XON/XOFF flow control
[<echo | noecho>]                             -- whether the target echos

The default settings are:
9600 data8 stop1 noparity nortscts noxon echo
core> tgtty
115200 data8 stop1 noparity nortscts noxon echo
设置参数,会自动保存
core> tgtty 115200 data8 stop1 noparity nortscts noxon echo
恢复默认
core> tgtty default
使用这个串口,telnet登录下载器的1082端口。
查看板卡设备存在
root@localhost:~# ls /dev/ttyAMA*
ttyAMA0  ttyAMA1 。
官方哪里又要了一个内和设备树补丁。这个补丁很重要,应该是更改了pl011的驱动匹配。
diff --git a/arch/arm64/boot/dts/freescale/fsl-lx2160a.dtsi b/arch/arm64/boot/dts/freescale/fsl-lx2160a.dtsi
index 2fe86aca32da..e316bb09f7a1 100644
--- a/arch/arm64/boot/dts/freescale/fsl-lx2160a.dtsi
+++ b/arch/arm64/boot/dts/freescale/fsl-lx2160a.dtsi
@@ -894,26 +894,29 @@
 		};

 		uart1: serial@21d0000 {
-			compatible = "arm,sbsa-uart","arm,pl011";
+			compatible = "arm,pl011", "arm,primecell";
 			reg = <0x0 0x21d0000 0x0 0x1000>;
 			interrupts = <GIC_SPI 33 IRQ_TYPE_LEVEL_HIGH>;
-			current-speed = <115200>;
+			clocks = <&clockgen 4 7>, <&clockgen 4 7>;
+			clock-names = "uart", "apb_pclk";
 			status = "disabled";
 		};

 		uart2: serial@21e0000 {
-			compatible = "arm,sbsa-uart","arm,pl011";
+			compatible = "arm,pl011", "arm,primecell";
 			reg = <0x0 0x21e0000 0x0 0x1000>;
 			interrupts = <GIC_SPI 72 IRQ_TYPE_LEVEL_HIGH>;
-			current-speed = <115200>;
+			clocks = <&clockgen 4 7>, <&clockgen 4 7>;
+			clock-names = "uart", "apb_pclk";
 			status = "disabled";
 		};

 		uart3: serial@21f0000 {
-			compatible = "arm,sbsa-uart","arm,pl011";
+			compatible = "arm,pl011", "arm,primecell";
 			reg = <0x0 0x21f0000 0x0 0x1000>;
 			interrupts = <GIC_SPI 73 IRQ_TYPE_LEVEL_HIGH>;
-			current-speed = <115200>;
+			clocks = <&clockgen 4 7>, <&clockgen 4 7>;
+			clock-names = "uart", "apb_pclk";
 			status = "disabled";
 		};

-- 