15AH, San Francisco

California, United States.

Send Your Mail At:

tianyingkejishe@sina.cn

Working Hours

Mon-Sat: 9.30am To 7.00pm

分类标题

Autem vel eum iriure dolor in hendrerit in vulputate velit esse molestie consequat, vel illum dolore eu feugiat nulla facilisis at vero eros et dolore feugait.

分类归档 操作系统

【Openwrt】lua的cgi响应 lua中获取GET/POST数据

一、lua的cgi响应 lua中获取GET/POST数据:

  1. 安装uhttpd包(https需要加装“uhttpd-mod-tls”和“px5g”);
  2. 修改uhttpd配置文件“/etc/config/uhttpd”,将Lua作为“interpreter”;
  3. Lua脚本写到“/www/cgi-bin/”目录下,但是不带扩展名,且可执行;
  4. Fast-CGI要求Lua脚本必须首先使用“io.write()”输出“Content-type: text/html\n\n”
  5. “/www/cgi-bin/”目录下的脚本可以调用“/usr/lib/lua/”目录下的自定义模块;
  6. Lua环境已经就绪。

二、以“读取GET和POST数据”为例,全部使用默认值的情况下,如何具体实现:

第一步:使用“opkg update”更新“.ipk”包的源,然后使用“opkg install uhttpd”安装;

第二步:使用“vi /etc/config/uhttpd”,在“config uhttpd main”下添加一行

list interpreter '.lua=/usr/bin/lua'

第三步:建立目录“/www/cgi-bin”,并增加“+x”属性;

root@OpenWrt:~# mkdir -p /www/cgi-bin/
root@OpenWrt:~# chmod +x /www/cgi-bin/

建立响应文件,并增加“+x”属性;

root@OpenWrt:~# touch /www/cgi-bin/webservice
root@OpenWrt:~# chmod +x /www/cgi-bin/webservice

将文件“/www/cgi-bin/webservice”内容修改为:

#!/usr/bin/lua
local WebService = require 'WebService'
WebService.Run()

第四步:建立Lua模块文件(不再要求“+x”属性),并读取参数,返回响应:

root@OpenWrt:~# touch /usr/lib/lua/WebService.lua

将其内容修改为如下内容:

local WebService = {}
 
function WebService.Run()
    local client = os.getenv("REMOTE_ADDR")
    local GET = os.getenv("QUERY_STRING")
    local POST = nil
    local POSTLength = tonumber(os.getenv("CONTENT_LENGTH")) or 0
    if (POSTLength > 0) then
        POST = io.read(POSTLength)
        --POST = io.read("*a")
    end
 
    -- Fast-CGI+HTTP require HEADER
    -- enable cache
    --io.write("Content-type: text/html\n\n")
    -- disable cache, especially for Internet Explorer
    io.write("Content-type: text/html\nPragma: no-cache\n\n")
 
    local reply = string.format("Client %s said: url: [%s], data: [%s]\n", client or '-', GET or '-', POST or '-')
    io.write(reply)
end
 
return WebService

第五步:重启“uhttpd”服务(为了让更改的/etc/config/uhttpd生效):

root@OpenWrt:~# /etc/init.d/uhttpd restart

第六步:使用浏览器测试:

使用浏览器访问如下地址:

http://<openwrt_ipaddr>/cgi-bin/webservice?author=qige

这里假设OpenWrt开发板的IP为192.168.1.24:

http://192.168.1.1/cgi-bin/webservice?author=qige

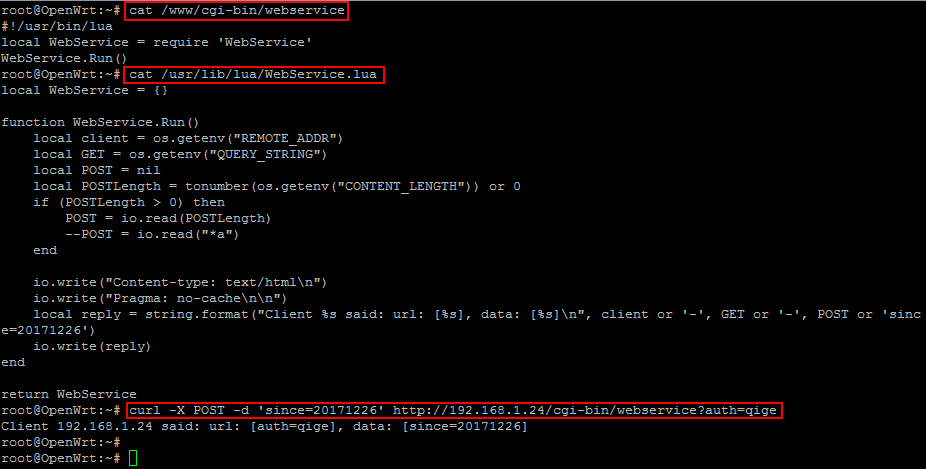
最终效果如下图:

通过cUrl模拟POST提交

通过form表单POST提交的浏览器结果

注意:

  1. POST数据可以由curl、Python requests等进行模拟提交,也可以自制如:<form action=”/cgi-bin/webservice” method=”POST”>提交;
  2. 根据Fast-CGI要求,必须要先使用“io.write()”输出http协议头部;再根据http协议的要求,头部和内容之间必须使用“\n\n”来隔开。因此Lua脚本必须先输出头部“Content-type: text/html\n\n”,再输出其它内容;
  3. 如果“不需要缓存”,输出立即过期,则修改头部内容为“Content-type: text/html\nPragma: no-cache\n\n”;
  4. 让uhttpd开机自动启动,需要执行“/etc/init.d/uhttpd enable”;
  5. 需要将接收到的数据输出到串口,可以再安装一个“coreutils-stty”包用于控制串口波特率
root@OpenWrt:~# opkg install coreutils
root@OpenWrt:~# opkg install coreutils-stty

再将以下内容添加到Lua模块的适当位置,并调用此函数即可:

function WebService.uartWrite(msg)
    local uartConfig = 'stty -F /dev/ttyS0 raw speed 9600\n'
    os.execute(uartConfig)
 
    local cmd = string.format("echo '%s' > /dev/ttyS0\n", msg or '')
    os.execute(cmd)
end

【uboot】通过uboot指令实现GPIO控制

一:在uboot下的defconfig 打开如下配置

CONFIG_DM=y
CONFIG_DM_GPIO=y
CONFIG_DWAPB_GPIO=y
CONFIG_CMD_GPIO=y

二:重新编译u-boot后会生成cmd:gpio

(板子上电时连续按回车键)进入到板端uboot cmdline下执行” gpio status -a ” 查看板端对应的gpio numbe

三:利用 uboot gpio 命令操作GPIO 做测试

  • gpio c 0 ; 将第0根PIN清零(拉低)
  • gpio s 0 ; 将第0根PIN设为output同时拉高

四:gpio 操作demo

直接以下demo code添加到uboot/cmd路径下,再在uboot/cmd/Makefile中添加编译选项,编译完成后可以直接操作gpio

#include <command.h>
#include <linux/string.h>
#include <linux/kernel.h>
#include <linux/delay.h>
#include <asm/gpio.h>

int do_gpio_test(struct cmd_tbl *cmdtp, int flag, int argc, char * const argv[])
{
    if (argc < 2) {
        printf("usage: gpio_test [requ/out/on/off]\n");
        return 0;
    }

    if (strcmp("requ", argv[1]) == 0) {
        gpio_request(126, "ir_a");
        gpio_request(127, "ir_b");
        mdelay(10);
    } else if (strcmp("out", argv[1]) == 0) {
        gpio_direction_output(126, 1);
        gpio_direction_output(127, 1);
        mdelay(10);
    } else if (strcmp("on", argv[1]) == 0) {
        gpio_set_value(126, 0);
        gpio_set_value(127, 1);
        mdelay(100);
        gpio_set_value(126, 1);
        gpio_set_value(127, 1);
    } else if (strcmp("off", argv[1]) == 0) {
        gpio_set_value(126, 1);
        gpio_set_value(127, 0);
        mdelay(100);
        gpio_set_value(126, 1);
        gpio_set_value(127, 1);
    }

    return 0;
}

U_BOOT_CMD(
    gpio_test, 4, 1, do_gpio_test,
    "u-boot gpio cmd test",
    "gpio - just for test\n"
);

五、测试

编译完成升级后,进入到uboot会有gpio_test命令
gpio_test requ
初始化gpio
gpio_test out
设置gpio direction
gpio_test on
设置 ir_cur (的两根PIN) 状态

【Linux】lvgl交叉编译环境配置

CC =  arm-linux-gnueabihf-gcc#这里使用你板子编译的gcc最好指定有路径的更明确
LVGL_DIR ?= $(shell pwd)/..#创建lvgl的根目录
LVGL_DIR_NAME ?= lvgl
CFLAGS ?= -O3 -g0 -I$(LVGL_DIR)/
LDFLAGS ?= -lm -lpthread
BIN = bbu_base_func
MAINSRC = ../main.c ../tcp_server.c ../lx2160_fan.c ../lx2160_tmp.c ../lxspi_gd32.c ../clk_sync.c
include $(LVGL_DIR)/lvgl/lvgl.mk
include $(LVGL_DIR)/lv_drivers/lv_drivers.mk
OBJEXT ?= .o
AOBJS = $(ASRCS:.S=$(OBJEXT))
COBJS = $(CSRCS:.c=$(OBJEXT))
MAINOBJ = $(MAINSRC:.c=$(OBJEXT))
SRCS = $(ASRCS) $(CSRCS) $(MAINSRC)
OBJS = $(AOBJS) $(COBJS)

all: default

%.o: %.c
        @$(CC)  $(CFLAGS) -c $(INCLUDES) $< -o $@
        @echo "CC $<"

default: $(AOBJS) $(COBJS) $(MAINOBJ)
        $(CC) -static -o $(BIN) $(MAINOBJ) $(AOBJS) $(COBJS) $(LDFLAGS)
        cp $(BIN) ../
clean:
        rm -f $(BIN) $(AOBJS) $(COBJS) $(MAINOBJ)

【Linux】ncurses交叉编译

1、下载源文件

http://ftp.gnu.org/pub/gnu/ncurses/

Tags · mirror/ncurses (github.com)

Ncurses project files : Ncurses (launchpad.net)

2、加压并配置

./configure  --prefix=/usr/aarch64-linux-gnu --host=aarch64-linux  CC=aarch64-linux-gnu-gcc --without-cxx --without-cxx-binding --without-ada --without-manpages --enable-overwrite --without-debug --without-tests --with-shared --without-tests --without-progs

3、编译并安装

make&&make install

【Linux】make cfg使用

make cfg all tgt=rom ARCH=mips CROSS_COMPILE=mipsel-linux- DEBUG=-g

第一部分:ARCH=mips CROSS_COMPILE=mipsel-linux- DEBUG=-g

ARCH=mips 设置了平台是mips平台
CROSS_COMPILE=mipsel-linux-  设置交叉编译器前缀,在编译时会替换成mipsel-linux-,之所以设置环境变量,一个是方便在这儿不用输入绝对路径,当找不到交叉编译器的时候,需要输入交叉编译器的绝对路径
DEBUG=-g 设置调试信息

第二部分:make cfg all tgt=rom

make cfg 是配置
make all 
make tgt=rom 在Makefile.inc里可以看到,是生成的二进制文件