initrdRamfs资源挂载
1、system挂载
mount -t sysfs sysfs /sys
2、dev挂载
mount -t devtmpfs devtmpfs /dev
initrdRamfs资源挂载
1、system挂载
mount -t sysfs sysfs /sys
2、dev挂载
mount -t devtmpfs devtmpfs /dev
1、下载BusyBox
$ wget http://busybox.net/downloads/busybox-1.22.1.tar.bz22、配置
$ tar xf busybox-1.22.1.tar.bz2
$ cd busybox-1.22.1
$ make defconfig
$ make menuconfig
执行 make menuconfig 之后,把下面几个选项选上:
Busybox Settings:
- General Configuration -> Don't use /usr
- General Configuration -> Show verbose applet usage messages
- General Configuration -> Runtime SUID/SGID configuration via /etc/busybox.conf
- Build Options -> Build BusyBox as a static binary (no shared libs)
- Cross compi—>指定编译工具链路径,这个可选项
注解:
defconfig – set .config to largest generic configuration就是最大化选用通用的功能
3、编译及安装
$ make
$ make install
执行 make install 之后,会生成一个 _install 目录,里面就是 编译后Busybox,包含 bin 、 sbin 、 及 linuxrc 软链接。这个目 录的内容可以直接复制到下面制作initramfs的目录。
警告:
这里假设initramfs的根目录是 /tmp/initramfs/ 。
$ cp -r _install/* /tmp/initramfs/到这里,编译Busybox的工作就算是完成了。
1、文件结构
经过上面的步骤之后,现在来看看initramfs根目录( /tmp/initramfs/ )的结 构,应该是这样子的:
├── bin
├── linuxrc -> bin/busybox
└── sbin
下面我们需要创建一个可执行文件 init ,这是一个Shell脚本。
2、init文件
init 起到承上启下的作用。内核加载完成之后,就会执行这个文件,在这个 文件,可以执行相关命令,最后挂载要启动的文件系统,并切换执行目标系统的 /sbin/init 文件,开始引导真实的Linux系统。
为了简单,这里直接贴出源代码,流程也相对比较简单。
#!/bin/sh

echo "Loading, please wait..."

export PATH="/bin:/sbin"

[ -d /dev ] || mkdir -m 0755 /dev
[ -d /root ] || mkdir --mode=0700 /root
[ -d /sys ] || mkdir /sys
[ -d /proc ] || mkdir /proc
[ -d /tmp ] || mkdir /tmp
[ -d /mnt ] || mkdir /mnt

# Mount /proc and /sys:
mount -n proc /proc -t proc
mount -n sysfs /sys -t sysfs

# Note that this only becomes /dev on the real filesystem if udev's scripts
# are used; which they will be, but it's worth pointing out
#mount -t tmpfs -o mode=0755 udev /dev
[ -e /dev/console ] || mknod /dev/console c 5 1
[ -e /dev/null ] || mknod /dev/null c 1 3

echo /sbin/mdev >/proc/sys/kernel/hotplug
mdev -s

# Get real root device by LABEL or UUID
get_root() {
    if [ ! -z "$LABEL" ]; then
        ROOT=`blkid | sed -n "/$LABEL/p" | cut -d: -f 1`
    fi
    if [ ! -z "$UUID" ]; then
        ROOT=`blkid | sed -n "/$UUID/p" | cut -d: -f 1`
    fi
}

for x in $(cat /proc/cmdline); do
    case $x in
    init=*)
        init=${x#init=}
        ;;
    root=*)
        ROOT=${x#root=}
        case $ROOT in
            LABEL=*)
                LABEL=${ROOT#LABEL=}
                ;;
            UUID=*)
                UUID=${ROOT#UUID=}
                ;;
            /dev/nfs)
                [ -z "${BOOT}" ] && BOOT=nfs
                ;;
        esac
        ;;
    rootflags=*)
        ROOTFLAGS="-o ${x#rootflags=}"
        ;;
    rootfstype=*)
        ROOTFSTYPE="${x#rootfstype=}"
        ;;
    rootdelay=*)
        ROOTDELAY="${x#rootdelay=}"
        ;;
    resumedelay=*)
        RESUMEDELAY="${x#resumedelay=}"
        ;;
    loop=*)
        LOOP="${x#loop=}"
        ;;
    loopflags=*)
        LOOPFLAGS="-o ${x#loopflags=}"
        ;;
    loopfstype=*)
        LOOPFSTYPE="${x#loopfstype=}"
        ;;
    cryptopts=*)
        cryptopts="${x#cryptopts=}"
        ;;
    nfsroot=*)
        NFSROOT="${x#nfsroot=}"
        ;;
    netboot=*)
        NETBOOT="${x#netboot=}"
        ;;
    ip=*)
        IPOPTS="${x#ip=}"
        ;;
    boot=*)
        BOOT=${x#boot=}
        ;;
    resume=*)
        RESUME="${x#resume=}"
        ;;
    noresume)
        NORESUME=y
        ;;
    panic=*)
        panic="${x#panic=}"
        ;;
    quiet)
        quiet=y
        ;;
    ro)
        readonly=y
        ;;
    rw)
        readonly=n
        ;;
    debug)
        debug=y
        exec >/tmp/initramfs.debug 2>&1
        set -x
        ;;
    debug=*)
        debug=y
        set -x
        ;;
    break=*)
        break=${x#break=}
        ;;
    break)
        break=premount
        ;;
    0|1|2|3|4|5|6)
        RUNLEVEL=$x
        ;;
    esac
done

for t in 1 2 3 4 5 6 7 8 9 10 11 12 13 14 15 16;
do
    echo "Mounting the ROOT DEVICE (Time $t) ..."
    get_root $ROOT
    mount -o ro $ROOT /mnt
    mountpoint -q /mnt && break
    echo "Sleep 4s ..."
    sleep 4
done

if [ -e /mnt/sbin/init ] ;
then
    umount /proc
    umount /sys
    exec switch_root /mnt /sbin/init $RUNLEVEL
fi

/bin/sh -i
别忘记给 init 加上执行权限:
$ chmod +x init
现在文件结构应该是这样的:
├── bin
├── init
├── linuxrc -> bin/busybox
└── sbin
到这里,initramfs已经构建好了,下面进行打包及压缩。
注解
关于mdev的几点说明:
3、打包压缩
使用下面这个命令就可以完成打包压缩工作:
cd /tmp/initramfs
find * | cpio -o -H newc | gzip -9 > ../initrd.img
现在, /tmp/initrd.img 就是制作好的initramfs。
Imagesystem.dtbinitrd.img(约 16MB)# 1. 设置加载地址(按需调整,确保不与内核/DTB 冲突)
setenv loadaddr 0x80080000 # kernel
setenv fdtaddr 0x81000000 # dtb
setenv initrd_addr 0x83000000 # initrd
# 2. 加载内核、DTB、initrd
load mmc 0:1 ${loadaddr} /boot/Image
load mmc 0:1 ${fdtaddr} /boot/system.dtb
load mmc 0:1 ${initrd_addr} /boot/initrd.img
# 3. 计算 initrd 大小(U-Boot 自动填充)
setexpr initrd_size ${filesize} - 0
# 4. 构造 bootargs(关键!必须含 initrd 参数)
setenv bootargs \
"console=ttyS0,115200n8 \
root=/dev/mmcblk0p2 rw \
init=/init \
initrd=${initrd_addr},${initrd_size} \
${extra_bootargs}"
# 5. 启动(ARM64 使用 booti)
booti ${loadaddr} ${initrd_addr}:${initrd_size} ${fdtaddr}
#!/bin/bash

echo $1
echo $(stat -c%s flash-system.bin)

if [ "$1" = "Image" ];then
        rm flash-system.bin
        cp fip-all.bin flash-system.bin
        echo "Image"
        dd if=$1 of=flash-system.bin bs=1M seek=8 conv=notrunc
elif [ "$1" = "s5000c-64c.dtb" ];then
        echo "s5000c-64c.dtb"
        dd if=$1 of=flash-system.bin bs=1M seek=78 conv=notrunc
else
        echo "Input Error"
        exit 1
fi
当加载驱动的时候总是遇到跟内核系统版本不匹配问题,特别是这个+号,这儿是git自动增加的,主要原因就是本地存在未提交改动。解决方式两种:
1、git add提交
2、kernel跟目录下
echo ” > .scmversion # 清除 git 版本标记
echo ‘CONFIG_LOCALVERSION_AUTO=n’ >> .config
#!/bin/bash

echo $1

diskP1=p1
diskP2=p2

if [[ $1 = "-h" || $1 = "-H" ]]; then
	echo "===========虚拟磁盘使用说明==========="
	echo "参数一:命令字,C-创建磁盘 D-删除磁盘 F-格式化磁盘 S-烧写固件 H-帮助"
	echo "参数二:硬盘大小,单位MB,最小硬盘1MB"
	echo "参数三:硬盘名称,自定义"
	echo "======================================"
	exit 1

else
	if [[ -z "$1" || -z "$2" || -z "$3" ]]; then
        	echo "请输入有效的参数!"
        	exit 1
	elif [[ $1 = "-c" || $1 = "-C" ]]; then
		echo "开始创建虚拟磁盘!"
		dd if=/dev/zero of=$3 bs=1M count=$2
		# 非交互式执行 fdisk 命令
		# 这里的逻辑是:n(新建分区) -> p(主分区) -> 1(分区号) -> 回车(默认起始扇区) -> +10G(大小) -> w(保存)
		echo -e "n\np\n1\n\n+200M\nn\np\n\n\n\nw" | fdisk $3
		echo "创建磁盘完成!"
	elif [[ $1 = "-d" || $1 = "-D" ]]; then
		echo "开始删除虚拟磁盘!"
		sudo rm -rf $3

		echo "删除完成!"

	elif [[ $1 = "-f" || $1 = "-F" ]]; then
		echo "开始格式化虚拟磁盘!"
		sudo losetup -fP $3
		varInfo=$(losetup -l | grep $3)
		varInfo=(${varInfo//,/ })
		echo ${varInfo}

		sudo mkfs.fat ${varInfo}${diskP1}
		sudo mkfs.ext4 ${varInfo}${diskP2}

		sudo losetup -d $varInfo
		echo "格式化完成!"

	elif [[ $1 = "-s" || $1 = "-S" ]]; then
		echo "开始烧写固件!"
		sudo losetup -fP $3
		varInfo=$(losetup -l | grep $3)
                varInfo=(${varInfo//,/ })
                echo ${varInfo}
		sleep 1

		sudo mount ${varInfo}${diskP1} /mnt
		sudo cp Image s5000c-64c.dtb /mnt
		sync
		sudo umount /mnt
		sudo umount /mnt
		sleep 1

		sudo mount ${varInfo}${diskP2} /mnt
		sudo cp rootfs.tar /mnt
	        cd /mnt
		sudo tar -xvf rootfs.tar

		sleep 1

		sync

		sleep 5
		cd /
		sudo umount /mnt

		sudo umount /mnt
		sleep 1

		sudo losetup -d $varInfo
		echo "烧写完成!"

	fi


fi
你可以通过以下步骤在Linux上虚拟一个磁盘,并将其挂载到 /mnt/ 目录下:
使用 dd 命令创建一个虚拟磁盘文件(例如大小为1GB):
dd if=/dev/zero of=/root/virtual_disk.img bs=1M count=1024 这将创建一个名为 virtual_disk.img 的1GB大小的文件。
使用 mkfs.ext4 命令将虚拟磁盘文件格式化为ext4文件系统:
mkfs.ext4 /root/virtual_disk.img 创建一个挂载点,例如 /mnt/ 目录:
mkdir -p /mnt/virtual_disk 使用 mount 命令将虚拟磁盘挂载到 /mnt/virtual_disk:
mount /root/virtual_disk.img /mnt/virtual_disk 使用 df -h 命令查看挂载是否成功:
df -h 如果希望在系统重启后自动挂载该虚拟磁盘,可以编辑 /etc/fstab 文件,添加以下内容:
/root/virtual_disk.img /mnt/virtual_disk ext4 defaults 0 0 这样就成功在Linux系统上创建并挂载了一个虚拟磁盘文件。
在虚拟硬盘上创建分区并格式化后,可以单独挂载每个分区。具体步骤如下:
步骤 1: 使用 losetup 绑定虚拟硬盘到环回设备
假设你已经创建了一个虚拟硬盘文件,例如 /root/virtual_disk.img,并在其中创建了分区。首先,使用 losetup 将虚拟磁盘文件关联到一个环回设备(loop device):
losetup -fP /root/virtual_disk.img -f:自动选择一个未使用的环回设备。-P:自动解析分区信息。使用以下命令查看绑定的环回设备名(例如 /dev/loop0):
losetup -l 使用 lsblk 或 fdisk -l 查看该环回设备的分区:
lsblk /dev/loop0 或者:
fdisk -l /dev/loop0 此时,你应该可以看到类似 /dev/loop0p1、/dev/loop0p2 等分区。
假设你想挂载第一个分区 /dev/loop0p1,可以使用 mount 命令将其挂载到指定目录。例如,挂载到 /mnt/partition1:
mkdir -p /mnt/partition1
mount /dev/loop0p1 /mnt/partition1 使用 df -h 或 lsblk 检查分区是否成功挂载:
df -h
lsblk 完成操作后,可以通过以下命令解除环回设备的绑定:
losetup -d /dev/loop0 如果希望分区在系统重启后自动挂载,可以在 /etc/fstab 中添加对应分区的挂载信息。例如:
/dev/loop0p1 /mnt/partition1 ext4 defaults 0 0
/dev/loop0p2 /mnt/partition2 ext4 defaults 0 0
通过上述步骤,你可以单独挂载虚拟磁盘中的每个分区。
losetup(set up and control loop devices) 是 Linux 中用于管理环回设备(loop devices)的命令。环回设备是一个虚拟设备,它将文件当作块设备来使用,从而可以像操作硬盘一样操作一个普通的文件。losetup 指令主要用于将文件与环回设备进行绑定或解除绑定,以及查看现有环回设备的状态。
基本用法
losetup /dev/loopX /path/to/file.img 将文件 /path/to/file.img 绑定到指定的环回设备 /dev/loopX,使其成为一个可以像物理硬盘一样操作的设备。
losetup -f /path/to/file.img -f 选项会自动查找并选择一个未使用的环回设备,避免手动指定。
losetup -fP /path/to/file.img -P 选项会自动扫描并解析文件中的分区表,使文件中的各个分区都能作为 /dev/loopXpN 设备挂载,类似于实际的硬盘分区。
losetup -a 列出系统中所有已经绑定的环回设备及其关联的文件。
losetup /dev/loopX
显示特定环回设备的详细信息。
losetup -d /dev/loopX 将环回设备 /dev/loopX 解除绑定,不再将其作为块设备使用。
losetup -D 动解除所有未使用的环回设备的绑定。
常用选项
-f:自动查找一个未使用的环回设备。
-P:自动重新扫描分区表(适用于分区文件)。
-d:解除环回设备绑定。
-a:显示所有绑定的环回设备及其信息。
-l:列出系统中所有环回设备的详细信息。
-D:自动解除所有未使用的环回设备。
dd if=/dev/zero of=/root/virtual_disk.img bs=1M count=100
losetup -fP /root/virtual_disk.img
mkfs.ext4 /dev/loop0
mount /dev/loop0 /mnt 2.解除虚拟磁盘的挂载和解除环回设备绑定:
umount /mnt
losetup -d /dev/loop0 主要区别如下:
losetup 解析出每个分区,并为每个分区创建独立的环回设备。ISO 9660 或 UDF 文件系统,且是只读的。见下一个文章
【NFS】Ubuntu安装nfs服务器及使用教程 – 天英科技创新协会
1、nfs指令是否支持
可以通过编译uboot源码,menuconfig勾选来实现,具体编译方法不在此描述。
2、nfs指令使用
nfs 80800000 192.168.1.200:/home/xiaobao/workspace/nfs/rootfs/Imagenfs指令通过挂在192.168.1.200远端NFS服务器,把镜像文件Image加载到内存80800000
3、NFS版本兼容
解决方案:
【NFS】VFS: Unable to mount root fs via NFS. [ 115.256801] devtmpfs: mounted【NFS】 – 天英科技创新协会
4、加载超时一直打印TTTTTTTTTTTTTTT
解决方案:
编辑服务端 /etc/hosts 文件:
sudo vim /etc/hosts添加开发板 IP 和服务端 NFS 共享文件目录:
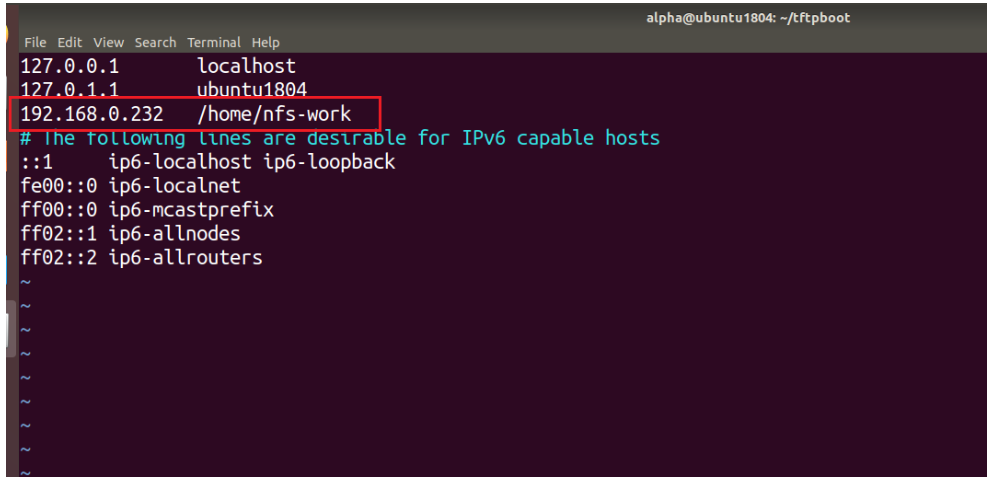
再次重启 NFS 服务:
sudo service nfs-kernel-server restart1、支持nfs客户端及网络环境
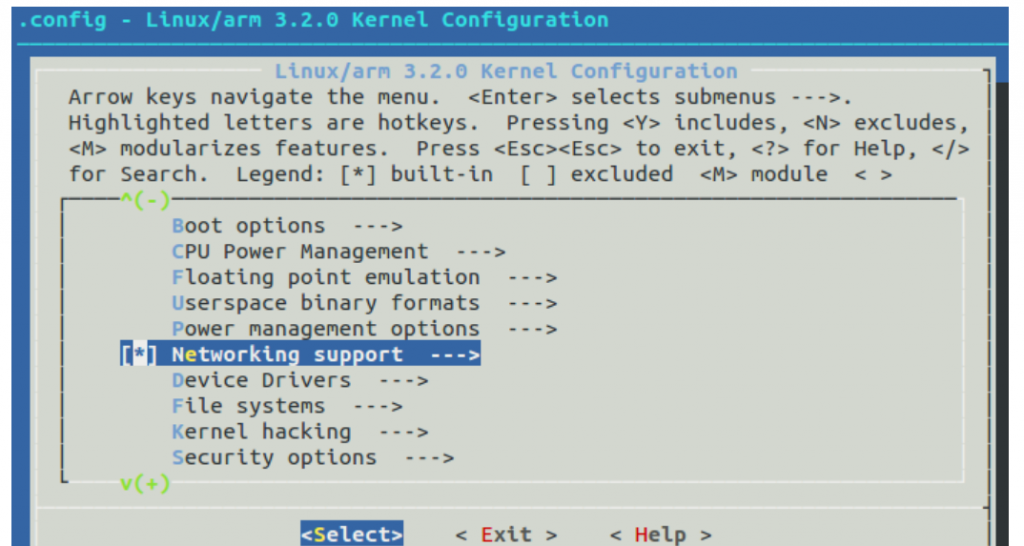
配置网络部分
	Networking support
		Networking options
			TCP/IP networking
			IP: kernel level autoconfiguration
			[*] IP: DHCP support
			[*] IP: BOOTP support

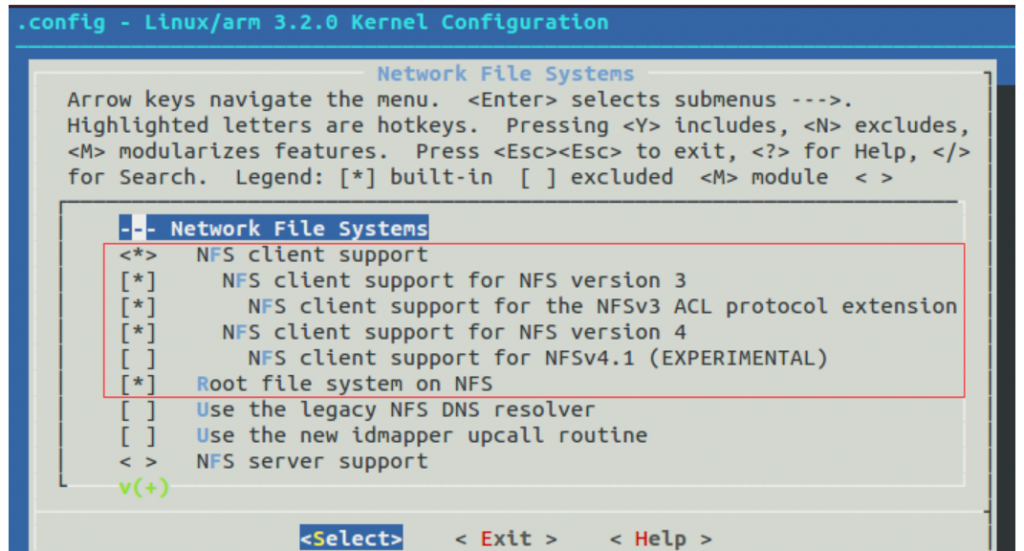
配置开启nfs服务
File systems
	Network File Systems
	<*> NFS client support
	[*] NFS client support for NFS version 3
	[*] NFS client support for the NFSv3 ACL protocol extension
	[*] NFS client support for NFS version 4
	[*] Root file system on NFS
uboot启动参数配置
setenv bootargs root=/dev/nfs nfsroot=172.16.27.200:/home/xiaobao/workspace/nfs/rootfs ip=dhcp console=ttyAMA1,115200 earlycon=pl011,0x20001000 rootdelay=10 rw启动直接挂载远端NFS
注意:如果挂载失败,可以考虑增加强制版本匹配。
setenv bootargs root=/dev/nfs nfsroot=172.16.3.200:/home/xiaobao/workspace/nfs/rootfs,vers=3 ip=dhcp console=ttyAMA1,115200 earlycon=pl011,0x20001000 rootdelay=10 rwnfs全称是network files system(网络文件系统),是FreeBSD支持的文件系统中的一种,它允许网络中的计算机之间通过TCP/IP网络共享资源。在NFS的应用中,本地NFS的客户端应用可以透明地读写位于远端NFS服务器上的文件,就像访问本地文件一样。
正是因为nfs文件系统可以使客户端像访问本地文件一样地访问nfs服务器的文件,所以在嵌入式设备开发阶段常常用来挂载到开发板,执行正在开发的程序,这样可以避免频繁地将程序烧录到嵌入式开发板,极大地节省了开发时间。
👉2.1 安装nfs服务器
在Ubuntu安装nfs服务器比较简单,只需要在命令行执行下面这个命令即可:
sudo apt install nfs-kernel-server
2.2 创建nfs服务器共享目录
创建一个目录用于nfs服务器将文件共享给客户端,这个目录将会写入到nfs配置文件中:
sudo mkdir /nfsroot
执行下面命令修改该目录的拥有者为当前用户,我的用户wkd,读者需要改为自己的用户组:用户名:
sudo chown wkd:wkd /nfsroot/
nfs服务器配置文件使用vi命令打开nfs服务器配置文件/etc/exports,
sudo vi /etc/exports
指定nfs服务器共享目录及其属性,内容如下:
/nfsroot *(rw,sync,no_root_squash)
解析:
/nfsroot:指定/nfsroot为nfs服务器的共享目录
*:允许所有的网段访问,也可以使用具体的IP
rw:挂接此目录的客户端对该共享目录具有读写权限
sync:资料同步写入内存和硬盘
no_root_squash:root用户具有对根目录的完全管理访问权限
no_subtree_check:不检查父目录的权限
2.4 重启nfs服务器
执行下面两个命令其中一个可以重启nfs服务器:
sudo service nfs-kernel-server restart
或者
sudo /etc/init.d/nfs-kernel-server restart
到此,Ubuntu安装nfs服务器的过程就完成了,可以执行下面这个命令查看nfs服务器的共享目录:
showmount -e localhost
三、客户端访问nfs服务器共享目录
这一小节使用nfs客户端是嵌入式开发板系统自带的,一般嵌入式开发板移植了Linux系统后,都自带有nfs客户端,如果确实需要在Ubuntu安装,可以执行下面的命令安装:
sudo apt install nfs-common
3.1 在nfs客户端挂载服务器共享目录
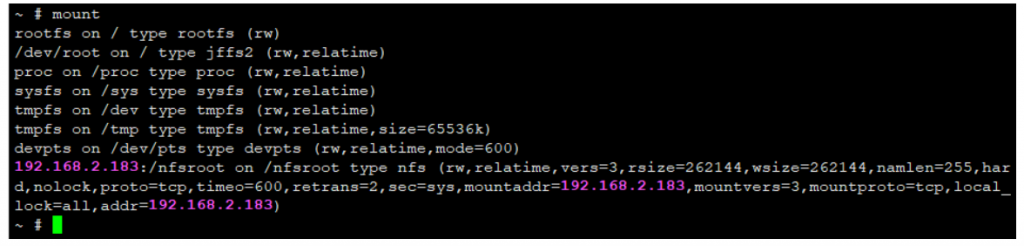
下面是在客户端挂载服务器共享目录的命令,在嵌入式开发板或者Ubuntu的nfs客户端挂载都可以使用,需要将192.168.2.183换成自己的nfs服务器ip:
mount -t nfs -o nolock 192.168.2.183:/nfsroot /nfsroot
-t:挂载的文件系统类型-o nolock:不要文件锁192.168.xxx.xxx:/nfsroot:nfs服务器ip:服务器共享目录nfsroot:客户端已存在的目录
-t:挂载的文件系统类型-o nolock:不要文件锁192.168.xxx.xxx:/nfsroot:nfs服务器ip:服务器共享目录nfsroot:客户端已存在的目录

nfs客户端卸载服务器共享目录在nfs客户端执行下面命令,可以查询挂载的·nfs·服务器目录
mount
在nfs客户端执行下面命令,可以卸载的·nfs·服务器目录
umount /nfsroot
至此,在客户端挂载、卸载服务器就演示完成。
pkg-config or pkgconf to be used when building end-user binaries against DPDK.
dnf groupinstall "Development Tools"dnf group install development-toolsapt install build-essentialapk add alpine-sdk bsd-compat-headersmeson & ninja-build packages in most Linux distributionspip3 install meson ninjapyelftools (version 0.22+)
dnf install python-pyelftoolspip3 install pyelftoolsapt install python3-pyelftoolsapk add py3-elftoolsnumactl-devel in RHEL/Fedora;libnuma-dev in Debian/Ubuntu;numactl-dev in Alpine Linux$ cd /usr/src/
$ wget https://fast.dpdk.org/rel/dpdk-21.11.tar.xz
$ tar xf dpdk-21.11.tar.xz
$ export DPDK_DIR=/usr/src/dpdk-21.11
$ cd $DPDK_DIR
$ export DPDK_BUILD=$DPDK_DIR/build
$ meson setup build-arm64
$ ninja -C build
$ sudo ninja -C build install
$ sudo ldconfig
$ pkg-config --modversion libdpdk
sudo apt install gcc-aarch64-linux-gnu g++-aarch64-linux-gnu
sudo apt install meson ninja pkg-config gcc-multilib[binaries]
# 交叉编译器路径(绝对路径/系统PATH中的别名)
c = 'aarch64-linux-gnu-gcc'
cpp = 'aarch64-linux-gnu-g++'
ar = 'aarch64-linux-gnu-ar'
strip = 'aarch64-linux-gnu-strip'
pkgconfig = 'pkg-config' # 若目标机有 pkg-config,可指定目标机路径
ninja = '/usr/bin/ninja'
[host_machine]
# 目标架构:根据实际修改(aarch64/armv7l/mips64等)
system = 'linux'
cpu_family = 'aarch64'
cpu = 'cortex-a72' # 目标CPU型号(可选,如 cortex-a53、x86_64)
endian = 'little'
[properties]
# 目标机内核头文件路径(关键!必须匹配目标机内核版本)
c_args = ['-I/path/to/target/linux-headers-5.15.0-101-arm64/include']
c_link_args = ['-L/path/to/target/lib64', '-lpthread', '-ldl']
# 禁用宿主机依赖检测,强制使用交叉编译环境
pkg_config_libdir = ['/path/to/target/usr/lib/aarch64-linux-gnu/pkgconfig']
# DPDK 特有配置:禁用不支持的驱动/功能
dpdk_cross = true
dpdk_disable_drivers = 'net/e1000,net/ixgbe' # 禁用目标机无的网卡驱动
dpdk_enable_kmods = false # 交叉编译时不编译内核模块(目标机单独编译)file -i dpdk_cross_arm64.txt
# 输出:charset=utf-8 → 正常;若为 gbk/iso-8859-1,需转换
iconv -f GBK -t UTF-8 dpdk_cross_arm64.txt -o dpdk_cross_arm64_utf8.txt1. 源码准备
# 下载 DPDK 源码(以 22.11 为例)
wget https://fast.dpdk.org/rel/dpdk-22.11.tar.xz
tar -xf dpdk-22.11.tar.xz
cd dpdk-22.11
2. 初始化 Meson 构建目录
通过 --cross-file 指定交叉配置文件,同时设置关键参数:
# 创建构建目录
meson setup build-arm64 \
  --cross-file=/path/to/dpdk_cross_arm64.txt \
  --prefix=/opt/dpdk-arm64  # 编译后安装路径
3. 编译与安装
# 编译(-j 后跟核心数,加速编译)
ninja -C build-arm64 -j$(nproc)

# 安装到指定路径
ninja -C build-arm64 install