15AH, San Francisco

California, United States.

Send Your Mail At:

tianyingkejishe@sina.cn

Working Hours

Mon-Sat: 9.30am To 7.00pm

分类标题

Autem vel eum iriure dolor in hendrerit in vulputate velit esse molestie consequat, vel illum dolore eu feugiat nulla facilisis at vero eros et dolore feugait.

分类归档 UBOOT

【NFS】VFS: Unable to mount root fs via NFS. [ 115.256801] devtmpfs: mounted【NFS】

问题:

NFS配置没问题:NFS服务开启与使用、目录挂载与卸载
使用 NFS 挂载文件系统的时候报错:

[  101.800373] VFS: Unable to mount root fs via NFS, trying floppy.
[  101.807335] VFS: Cannot open root device "nfs" or unknown-block(2,0): error -6
[  101.814718] Please append a correct "root=" boot option; here are the available partitions:
[  101.823160] 0100           65536 ram0  (driver?)
[  101.827880] 0101           65536 ram1  (driver?)
[  101.832573] 0102           65536 ram2  (driver?)
[  101.837347] 0103           65536 ram3  (driver?)
[  101.841988] 0104           65536 ram4  (driver?)
[  101.846695] 0105           65536 ram5  (driver?)
[  101.851335] 0106           65536 ram6  (driver?)
[  101.856027] 0107           65536 ram7  (driver?)
[  101.860667] 0108           65536 ram8  (driver?)
[  101.865333] 0109           65536 ram9  (driver?)
[  101.869974] 010a           65536 ram10  (driver?)
[  101.874720] 010b           65536 ram11  (driver?)
[  101.879446] 010c           65536 ram12  (driver?)
[  101.884194] 010d           65536 ram13  (driver?)
[  101.888922] 010e           65536 ram14  (driver?)
[  101.893669] 010f           65536 ram15  (driver?)
[  101.898410] b300        15273984 mmcblk0  driver: mmcblk
[  101.903768]   b301        15269888 mmcblk0p1 9be55837-01
[  101.909104] b308         7634944 mmcblk1  driver: mmcblk
[  101.914503]   b309          131072 mmcblk1p1 5edd22ea-01
[  101.919862]   b30a         7493632 mmcblk1p2 5edd22ea-02
[  101.925247] b320             512 mmcblk1rpmb  (driver?)
[  101.930494] b318            4096 mmcblk1boot1  (driver?)
[  101.935857] b310            4096 mmcblk1boot0  (driver?)
[  101.941192] Kernel panic - not syncing: VFS: Unable to mount root fs on unknown-block(2,0)
[  101.949470] ---[ end Kernel panic - not syncing: VFS: Unable to mount root fs on unknown-block(2,0)
[  112.942790] random: nonblocking pool is initialized

原因:
以前使用的16.04版本的ubuntu没问题,现在更换了18.04.4版本,开始报错。
从Ubuntu17.04开始,nfs默认只支持协议3和协议4,而kernel中默认支持协议2。

  1. 修改 NFS 配置文件:
sudo vim /etc/default/nfs-kernel-server

2.在末尾添加:

RPCNFSDOPTS="--nfs-version 2,3,4 --debug --syslog"
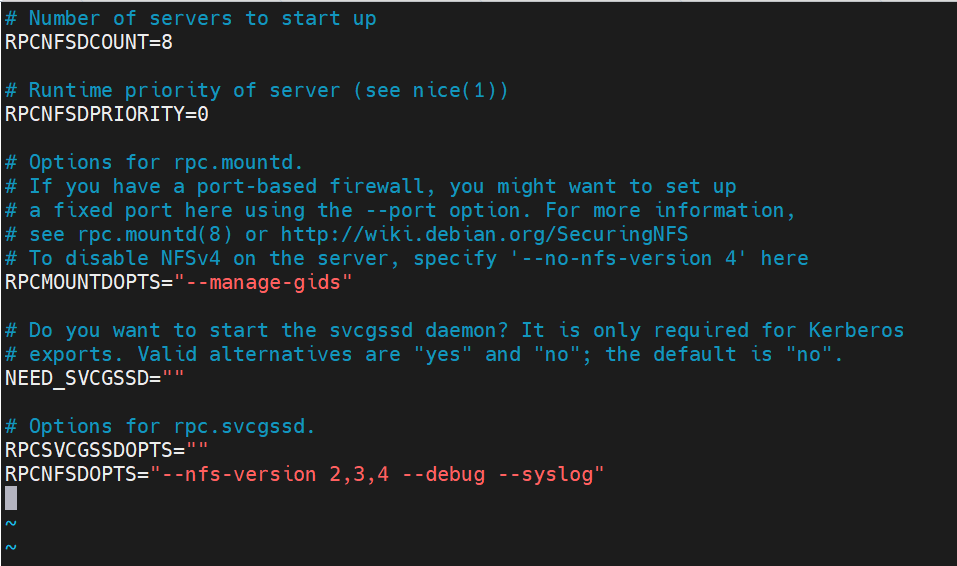
3.重启 NFS 服务:

sudo /etc/init.d/nfs-kernel-server restart

注:如果kernel版本较高支持nfs协议3的话,可以在Uboot传到Kernel的bootargs参数中加入’nfsvers=3’,使kernel使用nfs协议3。

【uboot】飞腾s5000的uboot环境变量

Environment size: 1420/4092 bytes
S5000C#
arch=arm
baudrate=115200
board=s5000c
board_name=s5000c
boot_fdt=booti 0x90000000 - 0x95000000
boot_usb_fdt=booti 0x90000000 - 0x95000000
bootargs=console=ttyAMA1,115200 earlycon=pl011,0x20001000 root=/dev/sda2 rootdelay=10 rw
bootcmd=run distro_bootcmd
bootdelay=3
cpu=armv8
distro_bootcmd=run load_kernel; run load_fdt; run boot_fdt
ethaddr=11:22:33:44:55:66
ext4_read_check=ext4load scsi 0:1 0x92000000 file_bake.txt
ext4_read_test=ext4load scsi 0:1 0x90000000 dtb/ft2004.dtb
ext4_write_test=ext4write scsi 0:1 0x90000000 /file_bake.txt 0x2DA8
fat_read_check=fatload usb 0:1 0x92000000 file_bake.txt
fat_read_test=fatload usb 0:1 0x90000000 md5sum.txt
fat_write_test=fatwrite usb 0:1 0x90000000 /file_bake.txt 0x5D4A
fdtcontroladdr=f9b40a70
fileaddr=95000000
filesize=87b7
gatewayip=192.168.1.1
ipaddr=192.168.1.250
load_fdt=ext4load scsi 0:1 0x95000000 s5000c-64c.dtb
load_kernel=ext4load scsi 0:1 0x90000000 Image
load_usb_fdt=fatload usb 0:1 0x95000000 s5000c-64c.dtb
load_usb_kernel=fatload usb 0:1 0x90000000 Image
loadaddr=0x90000000
netmask=255.255.255.0
serverip=192.168.1.110
soc=s5000c
start_autoscript=if usb start; then run start_usb_autoscript; fi; if scsi info; then run start_ssd_autoscript; fi;
start_ssd_autoscript=run load_kernel; run load_fdt; run boot_fdt
start_usb_autoscript=run load_usb_kernel; run load_usb_fdt; run boot_usb_fdt
stderr=serial
stdin=serial,usbkbd
stdout=serial
vendor=phytium

【buildroot】增加local.mk编译自定义kernel,uboot

1.make menuconfig

添加local选择local.mk文件

前提:已经打开linux 和 uboot 编译,但是寻找资源文件夹的时候优先找local.mk

添加内核编译:
注意:添加deconfigs的时候,文件名字最后的_defconfig去掉

Kernel->Linux Kernel 并且在linux目录下arch/arm/configs将自己的配置文件名字添加到下方

Bootloaders->U-Boot

错误信息:是因为没有添加配置文件 配置文件是在uboot文件夹下configs

boot/uboot/uboot.mk:416: *** No board defconfig name specified, check your BR2_TARGET_UBOOT_BOARD_DEFCONFIG setting. Stop.
Makefile:84: recipe for target ‘_all’ failed
make: *** [_all] Error 2

BR2_TARGET_UBOOT_BOARD_DEFCONFIG

2.buildroot目录下创建local.mk文件

local.mk文件内容添加编译文件夹路径

其中宏BASE_DIR是buildroot/output 输出的目录,

    添加uboot文件夹:

    UBOOT_OVERRIDE_SRCDIR =

    添加linux文件夹

    LINUX_OVERRIDE_SRCDIR=

    添加busybox文件夹:

    BUSYBOX_OVERRIDE_SRCDIR  =

【uboot】去掉启动logo显示

一、确定logo存放位置

这里面都是各种芯片厂家的logo图片,如果想显示logo,最简单的方案就是同名替换。

二、确定logo显示函数

既然我们知道了logo存放位置,那是否可以直接删除可以不,答案是可以的,但是比较麻烦,因为代码设计的不完善性导致模块化失调,没法直接关闭logo文件检测的逻辑。需要修改地方比较多。退而求其次,干脆干掉显示函数。

三、去掉版本显示信息

去掉logo后,你会发现还有一行小的字,那就是版本显示信息,同样的方案干掉函数。可以直接顶一个宏定义CONFIG_HIDE_LOGO_VERSION

【uboot】通过uboot指令实现GPIO控制

一:在uboot下的defconfig 打开如下配置

CONFIG_DM=y
CONFIG_DM_GPIO=y
CONFIG_DWAPB_GPIO=y
CONFIG_CMD_GPIO=y

二:重新编译u-boot后会生成cmd:gpio

(板子上电时连续按回车键)进入到板端uboot cmdline下执行” gpio status -a ” 查看板端对应的gpio numbe

三:利用 uboot gpio 命令操作GPIO 做测试

  • gpio c 0 ; 将第0根PIN清零(拉低)
  • gpio s 0 ; 将第0根PIN设为output同时拉高

四:gpio 操作demo

直接以下demo code添加到uboot/cmd路径下,再在uboot/cmd/Makefile中添加编译选项,编译完成后可以直接操作gpio

#include <command.h>
#include <linux/string.h>
#include <linux/kernel.h>
#include <linux/delay.h>
#include <asm/gpio.h>

int do_gpio_test(struct cmd_tbl *cmdtp, int flag, int argc, char * const argv[])
{
    if (argc < 2) {
        printf("usage: gpio_test [requ/out/on/off]\n");
        return 0;
    }

    if (strcmp("requ", argv[1]) == 0) {
        gpio_request(126, "ir_a");
        gpio_request(127, "ir_b");
        mdelay(10);
    } else if (strcmp("out", argv[1]) == 0) {
        gpio_direction_output(126, 1);
        gpio_direction_output(127, 1);
        mdelay(10);
    } else if (strcmp("on", argv[1]) == 0) {
        gpio_set_value(126, 0);
        gpio_set_value(127, 1);
        mdelay(100);
        gpio_set_value(126, 1);
        gpio_set_value(127, 1);
    } else if (strcmp("off", argv[1]) == 0) {
        gpio_set_value(126, 1);
        gpio_set_value(127, 0);
        mdelay(100);
        gpio_set_value(126, 1);
        gpio_set_value(127, 1);
    }

    return 0;
}

U_BOOT_CMD(
    gpio_test, 4, 1, do_gpio_test,
    "u-boot gpio cmd test",
    "gpio - just for test\n"
);

五、测试

编译完成升级后,进入到uboot会有gpio_test命令
gpio_test requ
初始化gpio
gpio_test out
设置gpio direction
gpio_test on
设置 ir_cur (的两根PIN) 状态