15AH, San Francisco

California, United States.

Send Your Mail At:

tianyingkejishe@sina.cn

Working Hours

Mon-Sat: 9.30am To 7.00pm

归档标题

Autem vel eum iriure dolor in hendrerit in vulputate velit esse molestie consequat, vel illum dolore eu feugiat nulla facilisis at vero eros et dolore feugait.

月度归档 8月 25, 2022

【NXP】codeWarrior DDR参数说明


/* DDR model number: MT40A1G16KNR-062E:E */
#ifdef CONFIG_SYS_DDR_RAW_TIMING
dimm_params_t ddr_raw_timing = {
     .n_ranks = 1, /* Number of ranks/ chip selects of DDR */
     .rank_density = 8589934592u, /* this is size in one rank, here 8GB */
     .capacity = 8589934592u, /* this is the total size, here 8GB */
     .primary_sdram_width = 64, /* this is the data bus width */
     .ec_sdram_width = 8, /* this is the ECC data width */
     .die_density = 0x5, /* this is each DRAM die density, here twin 8Gbit die density. 0x44Gbit, 0x58Gbit, 0x616Gbit*/
     .registered_dimm = 0, /* if register chip is used similar to an RDIMM = 1, otherwise = 0 */
     .mirrored_dimm = 0, /* =1 if C/A bus mirroring is used, all UDIMMs with two ranks are mirrored */
     .n_row_addr = 16, /* number of rows from dram datasheet */
     .n_col_addr = 10, /* number of columns from dram datasheet */
     .bank_addr_bits = 0, /* for DDR4 this is always = 0 defining two bits bank address in DRAM */
     .bank_group_bits = 2, /* for x16 dram = 1, 1-bit BG, for x8 dram = 2, 2-bits for BG */
     .edc_config = 2, /* leave as is, does not change. 0no ECC, 2 ECC*/
     .burst_lengths_bitmask = 0x0c, /* leave as is, this is needed for uboot masking, does not change */
     .tckmin_x_ps = 625, /* tck min = 625ps from DRAM datasheet */
     .tckmax_ps = 1500, /* tck max = 1500ps from DRAM datasheet */
     .caslat_x = 0x00FFFA00, /* leave as is, this is needed for uboot masking, does not change */
     .taa_ps = 13750, /* tAA from DRAM datasheet (ps)*/
     .trcd_ps = 13750, /* tRCD from DRAM datasheet (ps) */
     .trp_ps = 13750, /* tRP from DRAM datasheet (ps)*/
     .tras_ps = 32000, /* tRAS from DRAM datasheet (ps) */
     .trc_ps = 45750, /* tRC = tRP+tRCD or from DRAM datasheet (ps)*/
     .trfc1_ps = 350000, /* tRFC1 from DRAM datasheet (ps)*/
     .trfc2_ps = 260000, /* tRFC2 from DRAM datasheet (ps)*/
     .trfc4_ps = 160000, /* tRFC4 from DRAM datasheet (ps)*/
     .tfaw_ps = 21000, /* tFAW from DRAM datasheet (ps)*/
     .trrds_ps = 2500, /* tRRD_S from DRAM datasheet (ps)*/
     .trrdl_ps = 4900, /* tRRD_L from DRAM datasheet (ps)*/
     .tccdl_ps = 5000, /* tCCD_L from DRAM datasheet (ps)*/
     .refresh_rate_ps = 7800000, /* tREFI from DRAM datasheet (ps)*/

};

【NXP】1588_dts_setting

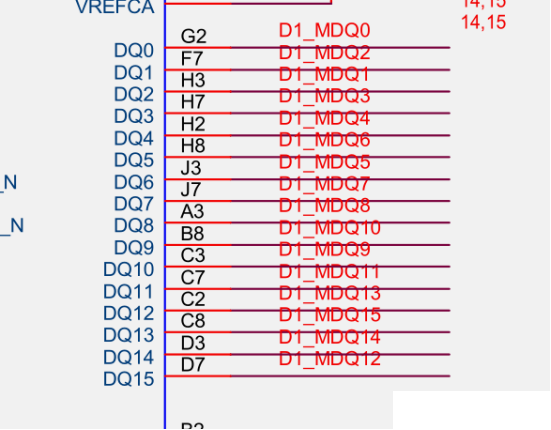
1588 setting following information:
*******************************************
1) For the constant pulse width of the PPS signal, you must set the Fiper value that satisfies the equation given in LS1046ADPAARM (page 1254).
2) To get a pulse at every 1 second, the value written in Fiper register + TMR_CTRL[TCLK_PERIOD] must equal 1000,000,000.
e.g. given the two examples of different pulse width:

Case 1:
    -Clock_IN = 125MHz
    -Nominal_clock = 100MHz
    -Frequency Div Ratio = Clock_IN/Nominal_clock = 125/100 = 1.25
    -Addenden = (2^32)/1.25 = 3,435,973,836 = 0xCCCCCCCC
    -TCLK_PERIOD should be equal to reciprocal of frequency of “nominal clock” and is recommended to have TCLK_PERIOD as integral factor of 10^9 = 10^9 / Nominal clock = 10^9 / 100*10^6 = 10 = 0xA
    -Prescalar = 1000
    -Output_Clock = 100MHz/1000 = 0.1MHz = 100KHz
    -Fiper value = tmr_prsc * tclk_period * N - tclk_period, where N is an integer more than 2
                 = 1000 * 10 * 100000 - 10
                 = 999,999,990
                 = 0x3B9AC9F6
                
    In this case, you will see pulse with width of 1/100KHz = 0.01 ms every 1 second
   
Case 2:
    -Clock_IN = 125MHz
    -Nominal_clock = 100MHz
    -Frequency Div Ratio = Clock_IN/Nominal_clock = 125/100 = 1.25
    -Addenden = (2^32)/1.25 = 3,435,973,836 = 0xCCCCCCCC
    -TCLK_PERIOD should be equal to reciprocal of frequency of “nominal clock” and is recommended to have TCLK_PERIOD as integral factor of 10^9 = 10^9 / Nominal clock = 10^9 / 100*10^6 = 10 = 0xA
    -Prescalar = 10000
    -Output_Clock = 100MHz/10000 = 0.01MHz = 10KHz
    -Fiper value = tmr_prsc * tclk_period * N - tclk_period, where N is an integer more than 2
                 = 10000 * 10 * 10000 - 10
                 = 999,999,990
                 = 0x3B9AC9F6
                
    In this case, you will see pulse with width of 1/10KHz = 0.1 ms every 1 second


-examples: dpaa2 

TimerOsc     = 125 MHz
tclk_period  = 10 nanoseconds
NominalFreq  = 1000 / 10 = 100 MHz
FreqDivRatio = TimerOsc / NominalFreq = 125 / 100 = 1.25    (must be greater that 1.0)
tmr_add      = ceil(2^32 / FreqDivRatio) = ceil(2^32 / 1.25) = 3,435,973,837 = 0xcccccccd
OutputClock  = NominalFreq / tmr_prsc = 100 / 10000 = 0.01 MHz
PulseWidth   = 1 / OutputClock = 1 / 0.01= 100 microseconds  (attention:The 1pps pulse width is related to the 1588 output clock frequency.)
FiperFreq1   = desired frequency in Hz = 1 Hz
FiperDiv1    = 1000000 * OutputClock / FiperFreq1 = 1000000 * 0.01 / 1 = 10000
(1) tmr_fiper1   = tmr_prsc * tclk_period * FiperDiv1 - tclk_period = 10000 * 10 * 10000 - 10 = 999,999,990
FiperFreq2   = desired frequency in Hz = 100 Hz
FiperDiv2    = 1000000 * OutputClock / FiperFreq2 = 1000000 * 0.01 / 100 = 100
tmr_fiper2   = tmr_prsc * tclk_period * FiperDiv2 - tclk_period = 10000 * 10 * 100 - 10 = 9,999,990
max_adj      = 1000000000 * (FreqDivRatio - 1.0) - 1 = 1000000000 * (1.25 - 1.0) - 1 = 249,999,999

 soc {
		    ptp-timer@8b95000 {
			compatible = "fsl,dpaa2-ptp";
			reg = <0x0 0x8b95000 0x0 0x100>;
			clocks = <&clockgen 4 1>;
			little-endian;
			fsl,extts-fifo;
			fsl,cksel       = <0>;
			fsl,tclk-period = <10>;
			fsl,tmr-prsc    = <10000>;
			fsl,tmr-add     = <0xcccccccd>;
			fsl,tmr-fiper1  = <999999990>;
			fsl,tmr-fiper2  = <9999990>;
			fsl,tmr-fiper3  = <499990>;
			fsl,max-adj     = <249999999>;
		    };
   };

more info: 8.7.7.4 PTP device tree node configuration LSDK user guide 2108 or ref dts in kernel
:vim ./Documentation/devicetree/bindings/ptp/ptp-qoriq.txt
* Freescale QorIQ 1588 timer based PTP clock

General Properties:

  - compatible   Should be "fsl,etsec-ptp" for eTSEC
                 Should be "fsl,fman-ptp-timer" for DPAA FMan
                 Should be "fsl,dpaa2-ptp" for DPAA2
                 Should be "fsl,enetc-ptp" for ENETC
  - reg          Offset and length of the register set for the device
  - interrupts   There should be at least two interrupts. Some devices
                 have as many as four PTP related interrupts.

Clock Properties:

  - fsl,cksel        Timer reference clock source.
  - fsl,tclk-period  Timer reference clock period in nanoseconds.
  - fsl,tmr-prsc     Prescaler, divides the output clock.
  - fsl,tmr-add      Frequency compensation value.
  - fsl,tmr-fiper1   Fixed interval period pulse generator.
  - fsl,tmr-fiper2   Fixed interval period pulse generator.
  - fsl,tmr-fiper3   Fixed interval period pulse generator.
                     Supported only on DPAA2 and ENETC hardware.
  - fsl,max-adj      Maximum frequency adjustment in parts per billion.
  - fsl,extts-fifo   The presence of this property indicates hardware
                     support for the external trigger stamp FIFO.
  - little-endian    The presence of this property indicates the 1588 timer
                     IP block is little-endian mode. The default endian mode
                     is big-endian.

  These properties set the operational parameters for the PTP
  clock. You must choose these carefully for the clock to work right.
  Here is how to figure good values:

  TimerOsc     = selected reference clock   MHz
  tclk_period  = desired clock period       nanoseconds
  NominalFreq  = 1000 / tclk_period         MHz
  FreqDivRatio = TimerOsc / NominalFreq     (must be greater that 1.0)
  tmr_add      = ceil(2^32 / FreqDivRatio)
  OutputClock  = NominalFreq / tmr_prsc     MHz
  PulseWidth   = 1 / OutputClock            microseconds
  FiperFreq1   = desired frequency in Hz
  FiperDiv1    = 1000000 * OutputClock / FiperFreq1
  tmr_fiper1   = tmr_prsc * tclk_period * FiperDiv1 - tclk_period
  max_adj      = 1000000000 * (FreqDivRatio - 1.0) - 1

  The calculation for tmr_fiper2 is the same as for tmr_fiper1. The
  driver expects that tmr_fiper1 will be correctly set to produce a 1
  Pulse Per Second (PPS) signal, since this will be offered to the PPS
  subsystem to synchronize the Linux clock.

  Reference clock source is determined by the value, which is holded
  in CKSEL bits in TMR_CTRL register. "fsl,cksel" property keeps the
  value, which will be directly written in those bits, that is why,
  according to reference manual, the next clock sources can be used:

  For eTSEC,
  <0> - external high precision timer reference clock (TSEC_TMR_CLK
        input is used for this purpose);
  <1> - eTSEC system clock;
  <2> - eTSEC1 transmit clock;
  <3> - RTC clock input.

  For DPAA FMan,
  <0> - external high precision timer reference clock (TMR_1588_CLK)
  <1> - MAC system clock (1/2 FMan clock)
  <2> - reserved
  <3> - RTC clock oscillator

  When this attribute is not used, the IEEE 1588 timer reference clock
  will use the eTSEC system clock (for Gianfar) or the MAC system
  clock (for DPAA).

Example:

        ptp_clock@24e00 {
                compatible = "fsl,etsec-ptp";
                reg = <0x24E00 0xB0>;
                interrupts = <12 0x8 13 0x8>;
                interrupt-parent = < &ipic >;
                fsl,cksel       = <1>;
                fsl,tclk-period = <10>;
                fsl,tmr-prsc    = <100>;
                fsl,tmr-add     = <0x999999A4>;
                fsl,tmr-fiper1  = <0x3B9AC9F6>;
                fsl,tmr-fiper2  = <0x00018696>;
                fsl,max-adj     = <659999998>;
        };

ls1046可以编辑 vim ./arch/arm64/boot/dts/freescale/qoriq-fman3-0.dtsi

 130 ptp_timer0: ptp-timer@1afe000 {
 131     compatible = "fsl,fman-ptp-timer", "fsl,fman-rtc";
 132     reg = <0x0 0x1afe000 0x0 0x1000>;
 133     interrupts = <GIC_SPI 44 IRQ_TYPE_LEVEL_HIGH>;
 134     clocks = <&clockgen 3 0>;
 135     fsl,extts-fifo;
 136 };

增加属性根据需求:
cksel           --- 时钟选择。参考上文。
tclk-period     --- 想获取周期,即一个cnt对应周期 单位ns,决定了1588的 nominalfreq,nominalfreq= 1000/tclk-period


+ fsl,cksel = <0>;               /* 125M external high precision timer reference clock,rdb board */
+ fsl,tclk-period = <10>;        /* 10 ns nominalfreq = 1000/10 = 100MHz */
+ fsl,tmr-prsc = <10000>;        /* 输入时钟100MHz 输出时钟= 100/tmr-prsc=1/100Mhz=10Khz,且决定了1pps的脉宽是1/10Khz=0.1ms. 
+ fsl,tmr-add = <0xCCCCCCCD>;    /* ceil(2^32/FreqDivRatio)=(4294967296/(125M/100M)) = 0xCCCCCCCD
+ fsl,tmr-fiper1 = <999999990>;  /* tmr_prsc * tclk_period * FiperDiv1 - tclk_period = 10000*10*(10*1000Hz/1Hz)-10 = 999,999,990 = 0x3B9AC9F6
+ fsl,tmr-fiper2 = <9999990>;    /* FiperFreq2   = desired frequency in Hz = 100 Hz;FiperDiv2 = 1000000 * OutputClock / FiperFreq2 = 1000000 * 0.01 / 100 = 100;tmr_fiper2 = tmr_prsc * tclk_period * FiperDiv2 - tclk_period = 10000 * 10 * 100 - 10 = 9,999,990
+ fsl,max-adj = <>;     /* 10^9 *(FreqDivRatio - 1.0)-1 = 1000000000 * (FreqDivRatio - 1.0) - 1 = 1000000000 * (1.25 - 1.0) - 1 = 249,999,999


-fsl,cksel定时器参考时钟源。
-fsl,tclk period Timer参考时钟周期(纳秒)。
-fsl、tmr prsc预分频器对输出时钟进行分频。
-fsl、tmr增加频率补偿值。
-fsl,tmr-fiper1固定间隔周期脉冲发生器。
-fsl,tmr-fiper2固定间隔周期脉冲发生器。
-fsl,tmr-fiper3固定间隔周期脉冲发生器。
仅在DPAA2和ENEC硬件上受支持。
-fsl,max adj最大频率调整,单位为十亿分之一。
-fsl,extts fifo此属性的存在表示硬件支持外部触发戳FIFO。
-little endian此属性的存在表示1588计时器
IP块为小端模式。默认endian模式是big endian。

【IPtables】iptables nat not work for sctp

I guess you have already installed SCTP, if so, you are probably missing the nf_conntrack_proto_sctp module. This module is required for iptables to work with SCTP. Try this:

# modprobe nf_conntrack_proto_sctp.ko
或者
insmod xt_sctp.ko

【OLED】ssd1306/ssd1307Linux驱动

一、menuconig配置

Device Drivers

----------->Graphics support

------>Frame buffer Devices
------>Support for frame buffer devices  --->    

--->Solomon SSD1306 framebuffer support

二、修改设备树

&i2c3 {
        clock-frequency = <400000>;
        pinctrl-names = "default";
        status = "okay";
        ssd1306: oled@3c {
                compatible = "solomon,ssd1306fb-i2c";
                reg = <0x3c>;
                //pwms = <&pwm 4 3000>;
                //reset-gpios = <&gpio2 7>;
                solomon,width = <128>;
                solomon,height = <64>;
                solomon,page-offset = <0>;
                //solomon,com-lrremap;
                solomon,com-invdir;
                //solomon,com-offset = <0>;
                //solomon,lookup-table = /bits/ 8 <0x3f 0x3f 0x3f 0x3f>;
        };
};

【LX2160】DDR4调试

一、硬件描述

硬件配置:5颗ddr4,其中一颗作为ecc。

1、DDR问题会导致uboot无法加载运行。所以RCW配置完后最重要的就是调试DDR。首先检查ddr硬件上的设计,DQ信号设计应该是4位交叉(swap),主要原因是CW软件DQ mapping是按照4位配置的,没有8位的swap配置,如果硬件不是按照4位swizzled的,ddr的参数校准会通不过。我们的项目第一版即使因为硬件DQ信号是按照8位设计的,DQ参数无法正确配置,从而ddr校准不过,不得已最后改版成4位swpa,才成功了。DQ mapping参数由硬件提供,然后再cw上对应填写就行。DQ_MAP原理图:

Codewarrior DQ mapping配置-4位swap,根据实际电路调整:

2、在创建ddr配置工程的时候,需要填写的clk to dqs由硬件提供,要正确填写。其他的值按照ddr手册配置好就行

二、参数介绍

1、DRAM type: 颗粒的配置成NoDimm

2、使用CW做validation参数校准,这个比较费时。

3、校准完毕后,和RCW一样,点击生成代码按钮,会生成ddr_init1.c,找到ddr_raw_timing结构体,复制到自己的ddr_init.c中替代。

struct dimm_params ddr_raw_timing = {
        .n_ranks = 1,
        .rank_density = 8589934592u,
        .capacity = 8589934592u,
        .primary_sdram_width = 64,
        .ec_sdram_width = 8,
        .device_width = 8,
        .die_density = 0x08,
        .rdimm = 0,
        .mirrored_dimm = 0,
        .n_row_addr = 16,
        .n_col_addr = 10,
        .bank_addr_bits = 0,
        .bank_group_bits = 2,
        .edc_config = 2,
        .burst_lengths_bitmask = 0x0c,
        .tckmin_x_ps = 625,
        .tckmax_ps = 1600,
        .caslat_x = 0x00FFFC00,
        .taa_ps = 18800,
        .trcd_ps = 18800,
        .trp_ps = 18800,
        .tras_ps = 43800,
        .trc_ps = 37600,
        .twr_ps = 20000,
        .trfc1_ps = 350000,
        .trfc2_ps = 260000,
        .trfc4_ps = 160000,
        .tfaw_ps = 25000,
        .trrds_ps = 25000,
        .trrdl_ps = 6200,
        .tccdl_ps = 6200,
        .refresh_rate_ps = 10237500
};

4、在packages/firmware/atf/plat/nxp/soc-lx2160/lx2160ardb/platform_def.h中定义下面的宏:

#define CONFIG_DDR_NODIMM

flex-builder -c atf -m lx2160ardb_rev2 -b xspi 生成fip.bin文件,使用codewarrior tap下载到flash。建议先下载一个官方的复合固件,然后替换自己的fip.bin和fip_uboot.bin。

三、开启DDR Log

修改文件:flexbuild_lsdk2108/components/firmware/atf$ vim Makefile

修改内容:

修改文件:flexbuild_lsdk2108/components/firmware/atf/plat/nxp/soc-lx2160a/lx2160ardb/platform.mk

修改内容:增加DDR_DEBUG := yes

【Ubuntu】Ubuntu20.04 rc-local 配置开机自启动脚本

1. rc-local服务简介

Linux中的rc-local服务是一个开机自动启动的,调用开发人员或系统管理员编写的可执行脚本或命令的,它的启动顺序是在系统所有服务加载完成之后执行。

ubuntu20.04系统已经默认安装了rc-local.service服务,但是不知什么原因系统把这个服务给“隐蔽”了,所以如果不做一番操作是无法使用的。

2. 配置

rc-local服务设置为开机自启动(本文操作都在root用户下,或使用sudo)。

首先将rc-local.service文件复制到system目录下

cp /usr/lib/systemd/system/rc-local.service /etc/systemd/system/

新建rc.local文件

大家不用奇怪,ubuntu20.04/etc/目录下是没有rc.local文件的,需要我们手动建立一个。

touch /etc/rc.local
chmod 755 /etc/rc.local
echo '''#!/bin/bash''' >> /etc/rc.local

设置开机启动rc-local

systemctl start rc-local
systemctl enable rc-local
init 6

重启系统后,通过命令systemctl status rc-local查看服务已经正常开启了。

3.在rc.local中添加你开机需要自动执行的脚本

至此,你就可以在rc.local文件中添加你想添加的开机自启动脚本了。

【文件系统】ramFs

一、简介:

     ramfs是Linux下一种基于RAM做存储的文件系统。在使用过程中你就可以把ramfs理解为在普通的HDD上建立了一个文件系统,而现在HDD被替换成了RAM,因为是RAM做存储所以会有很高的存储效率。由于ramfs的实现就相当于把RAM作为最后一层的存储,所以在ramfs中不会使用swap。你什么时候听过会把HDD上的文件swap到哪里去吗?平常说的swap都是针对内存来说的,而ramfs底层的存储是RAM,虽然不是HDD,但是在Linux看来它就跟HDD一样。但是ramfs有一个很大的缺陷就是它会吃光系统所有的内存,即使你mount的时候指定了大小,同时它也只能被root用户访问。测试方法很简单:

sudo mount -t ramfs -o size=10M ramfs ./ramfs/

sudo dd if=/dev/zero of=./ramfs/test.file bs=1M count=20

测试时你会发现上面这个操作是能成功的,或者你再自己虚拟机上干脆做狠点,直接写一个比内存更大的文件,你会发现瞬间系统就卡主了。另外在dd命令如果不以root用户执行就会权限不够:

dd: opening `./ramfs/test.file’: Permission denied

二、测试:

    使用工具

    (1)  树莓派 官方镜像 

  (2)putty 进行 登录, 并操作

    Note: 本实验直接采用的是 root 用户进行登录实验
  1. 登录 Linux 系统;
  2. 准备 一个10M的文件;

3. 创建一个测试目录并将测试目录挂载到虚拟内存

  1. 将10M的文件多次传入, 观察内存变化

(1) 未操作前的内存 free 的大小、buff/cache 的大小

(2) 三次拷贝10M的文件进挂载的目录时 free 的大小变化,buff/cache 的大小变化

(3) 删除掉之前拷贝的三个10M文件之后 free 的大小变化, buff/cache 的大小变化

三、综上:

 ramfs 使用时, 无论设置的大小为多大, 在内存充足的情况下, 是可以无限放置文件的, 本例中设置大小为1M, 放置文件总大小为30M, 以此可见, 使用大小的管理需要自行控制...

Note:

 另外本人还试过

  (1)  输入大于内存的文件, 结果系统无响应了, 但是IP还是能够扫描到

  (2) 当使用过程中 available 还可以被 应用程序 使用的物理内存大小 一直没变化过, 当free降为0时available开始发生变化, 并且逐步降为0时系统无响应