15AH, San Francisco

California, United States.

Send Your Mail At:

tianyingkejishe@sina.cn

Working Hours

Mon-Sat: 9.30am To 7.00pm

归档标题

Autem vel eum iriure dolor in hendrerit in vulputate velit esse molestie consequat, vel illum dolore eu feugiat nulla facilisis at vero eros et dolore feugait.

月度归档 2月 29, 2024

【Linux】Linux获取CPU处理器温度

1、通过读取系统文件节点获取相应CPU温度

cpu0:
cat /sys/class/thermal/thermal_zone0/temp
 
cpu1:
cat /sys/class/thermal/thermal_zone1/temp

2、读取cpu温度失败问题

RK3288使用TSADC(Temperature-Sensor ADC)来测量CPU温度,支持两种模式:
用户自定义模式: 主动控制读取温度.
自动模式: 自动检测温度,达到阀值就自动报告.

dts配置如下:

&tsadc {
rockchip,hw-tshut-mode = <0>; /* tshut mode 0:CRU 1:GPIO */
rockchip,hw-tshut-polarity = <0>; /* tshut polarity 0:LOW 1:HIGH */
status = "okay";
};

tsadc: tsadc@ff280000 {
compatible = "rockchip,rk3288-tsadc";
reg = <0x0 0xff280000 0x0 0x100>;
interrupts = <GIC_SPI 37 IRQ_TYPE_LEVEL_HIGH>;
clocks = <&cru SCLK_TSADC>, <&cru PCLK_TSADC>;
clock-names = "tsadc", "apb_pclk";
assigned-clocks = <&cru SCLK_TSADC>;
assigned-clock-rates = <5000>;
resets = <&cru SRST_TSADC>;
reset-names = "tsadc-apb";
pinctrl-names = "init", "default", "sleep";
pinctrl-0 = <&otp_gpio>;
pinctrl-1 = <&otp_out>;
pinctrl-2 = <&otp_gpio>;
#thermal-sensor-cells = <1>;
rockchip,hw-tshut-temp = <95000>;
status = "disabled";
};

用指令读取CPU温度:cat sys/class/thermal/thermal_zone0/temp,会报错/system/bin/sh: cat: temp: Invalid argumen。

看开机log,发现有如下报错:

clk: couldn’t get clock 0 for /tsadc@ff280000

说明tsadc缺少clock,查看dts,确实是少了这块。

xin32k: xin32k {
    compatible = "fixed-clock";
    clock-frequency = <32768>;
    clock-output-names = "xin32k";
    #clock-cells = <0>;
};

以为这个时钟加上就好了,令人抓狂的是,就加了这么几行代码,机器竟然一直重启开不起机了。

加的这个地方是跟温度是相关的,那就从这个方面入手去思考找问题。会不会是检测到温度的过温阀值,导致重启的呢?

看硬件的连接上:

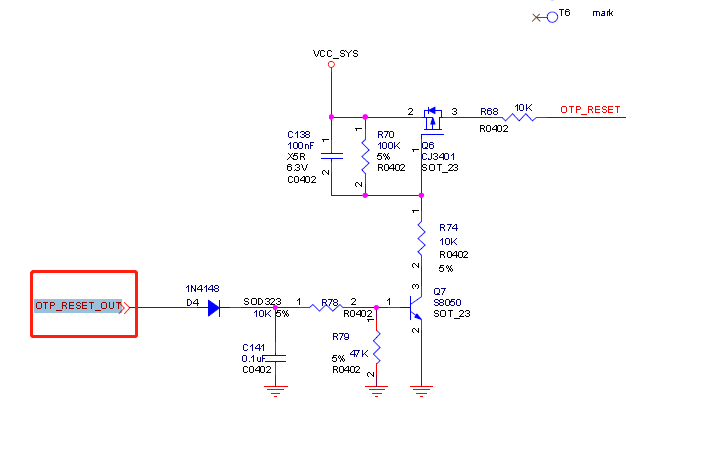
主控的OTP 引脚是有连接出来到pmic rk808的,如果这个阀值到了reset脚就会动作,然后重启。

由于没有硬性需求一定要这个温度到了阀值就重启的需求,这个时候可以把硬件上的连接电阻去掉,或者软件上把reset的io屏蔽掉。实际起作用的是:pinctrl-1 = <&otp_out>;
屏蔽掉,这时候机器就可以正常开机了。

再查看温度值:cat sys/class/thermal/thermal_zone0/temp
54111

就能正常读到温度值了。

不过不太能理解的是,配置里 rockchip,hw-tshut-temp = <95000>;是超过95度才重启,一开机应该也不会超过阀值才对,开机后读取的温度也就50°C。

【Ubuntu】dockers搭建编译环境

一、创建镜像

1、编写dockers配置文件

使用 dockerfile 创建容器,在容器中进行编译,完美解决编译环境问题,并且与主机环境隔离,互不影响。

首先在主机中安装 docker,请参考:安装教程

创建一个目录作为 docker 工作目录,例如~/docker/,在其中创建文件dockerfile,内容如下:

FROM ubuntu:18.04
MAINTAINER firefly "service@t-firefly.com"

ENV DEBIAN_FRONTEND=noninteractive

RUN cp -a /etc/apt/sources.list /etc/apt/sources.list.bak
RUN sed -i 's@http://.*ubuntu.com@http://repo.huaweicloud.com@g' /etc/apt/sources.list

RUN apt update

RUN apt install -y build-essential crossbuild-essential-arm64 \
	bash-completion vim sudo locales time rsync bc python

RUN apt install -y repo git ssh libssl-dev liblz4-tool lib32stdc++6 \
	expect patchelf chrpath gawk texinfo diffstat binfmt-support \
	qemu-user-static live-build bison flex fakeroot cmake \
	unzip device-tree-compiler python-pip ncurses-dev python-pyelftools \
	subversion asciidoc w3m dblatex graphviz python-matplotlib cpio \
	libparse-yapp-perl default-jre patchutils swig expect-dev u-boot-tools

RUN apt update && apt install -y -f

# language support
RUN locale-gen en_US.UTF-8
ENV LANG en_US.UTF-8

# switch to a no-root user
RUN useradd -c 'firefly user' -m -d /home/firefly -s /bin/bash firefly
RUN sed -i -e '/\%sudo/ c \%sudo ALL=(ALL) NOPASSWD: ALL' /etc/sudoers
RUN usermod -a -G sudo firefly

USER firefly
WORKDIR /home/firefly

2、创建镜像

cd ~/docker
docker build -t sdkcompiler .
# sdkcompiler 是镜像名称,可随意更改,注意命令最后有一个‘.’
# 此过程需要一段时间,请耐心等待

二、创建容器

# 此处将主机内 SDK 所在文件夹挂载到容器内,这样容器内就能访问主机中的 SDK 了
# source= 填 SDK 所在目录;target= 填容器内的一个目录,必须是空目录
# ubuntu18 是容器名,firefly 是容器 hostname,均可随意更改
# sdkcompiler 是上一步的镜像名
docker run --privileged --mount type=bind,source=/home/fierfly/proj,target=/home/firefly/proj --name="ubuntu18" -h firefly -it sdkcompiler

三、退出容器、重启容器的方法

# 在容器内输入 exit 即可退出

# 查看所有容器(包括已退出的)
docker ps -a

# 重启一个退出的容器并连接
docker start ubuntu18 # 容器名
docker attach ubuntu18

【QEMU】x86运行arm系统

一、Ubuntu安装qemu

1、安装编译器

sudo apt install gcc-aarch64-linux-gnu -y

2、安装qemu虚拟器

sudo apt install qemu-system-arm -y

二、部署arm系统

下载上面自动化部署脚本

1、扩展虚拟硬盘

fallocate -l 16G vdb.img

【nodejs】如何在 Ubuntu 22.04 LTS 上安装 Node.js【nodejs】

Node.JS 是一个基于 Google V8 引擎构建的开源后端 Javascript 运行时环境。它允许开发人员利用 JavaScript 创建命令行工具和服务器端脚本,包括在将页面发送到用户浏览器之前在服务器上运行脚本。Node.js 适用于大多数现代操作系统,包括 Ubuntu Linux。

步骤 1. 首先,通过在终端中运行以下命令,确保所有系统包都是最新的。

sudo apt update
sudo apt upgrade
sudo apt install build-essential curl

步骤 2. 在 Ubuntu 22.04 上安装 Node.js。

1、从 NodeSource 存储库安装 Node.js。

默认情况下,Node.js 在 Ubuntu 22.04 基础存储库中不可用。现在运行以下命令将 NodeSource 存储库添加到您的 Ubuntu 系统:

wget -qO- https://deb.nodesource.com/setup_16.x | sudo -E bash

将 NodeSource 存储库添加到系统后,使用 Apt 包管理器安装 Node.js:

sudo apt install nodejs

2、使用 NVM 安装 Node.js。

现在使用 bash 脚本在你的 Ubuntu 系统上安装 NVM:

wget -qO- https://raw.githubusercontent.com/nvm-sh/nvm/v0.39.1/install.sh | bash

接下来,关闭并重新打开终端或运行以下命令将 nvm 加载到当前会话:

source $HOME/.bashrc

使用 NVM,您可以检查当前可用的 Node.js 版本:

nvm install --lts
nvm install node

确认已安装最新的 LTS 版本,运行命令:

node -v

此外,您可以使用以下命令检查 NPM 的版本:

npm -v

【Ubuntu】Ubuntu22.04安装VMware

一、软件下载

二、安装依赖库

sudo apt-get install gcc
sudo apt-get install make
sudo apt-get install libaio1 libglib2.0-dev
sudo apt-get install git
sudo apt install -y gcc build-essential

git clone https://github.com/mkubecek/vmware-host-modules.git

cd vmware-host-modules

git checkout workstation-16.2.3(切到需要的分支)

make

sudo make install

三、安装软件

$ chmod +x VMware-Workstation-Full-17.5.0-22583795.x86_64.bundle
$ sudo ./VMware-Workstation-Full-17.5.0-22583795.x86_64.bundle

四、执行软件

sudo vmware

五、卸载VMware

vmware-installer -l
Product Name | Product Version
vmware-player | 3.0.0.203739


sudo vmware-installer -u vmware-player