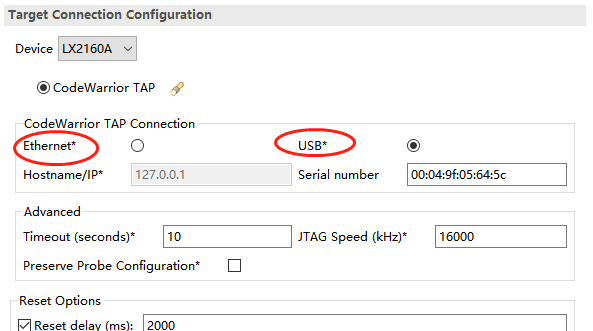
15AH, San Francisco

California, United States.

Send Your Mail At:

tianyingkejishe@sina.cn

Working Hours

Mon-Sat: 9.30am To 7.00pm

分类标题

Autem vel eum iriure dolor in hendrerit in vulputate velit esse molestie consequat, vel illum dolore eu feugiat nulla facilisis at vero eros et dolore feugait.

分类归档 NXP-LX2160/LS1046

【NXP】NXP(Freescale) QorIQ CodeWarrior TAP使用

通讯方式有两种:

一、USB通讯

这个相对简单,但速率低。配置流程如下,配置完保存即可。
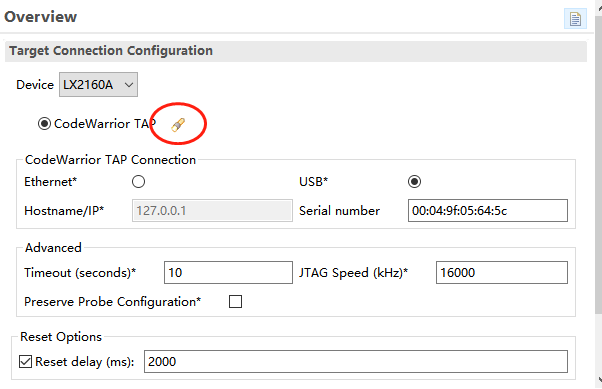
二、网口通讯

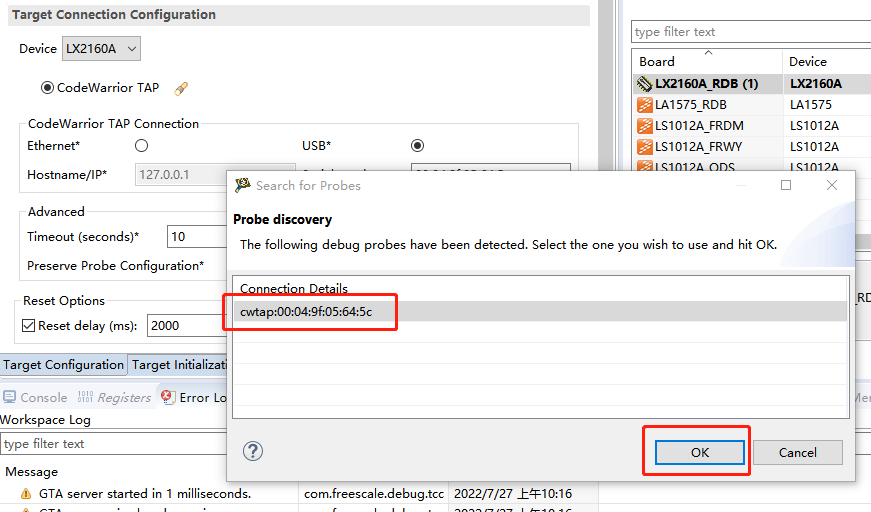
配置复杂,速率高。先连上USB,配置流程如下:
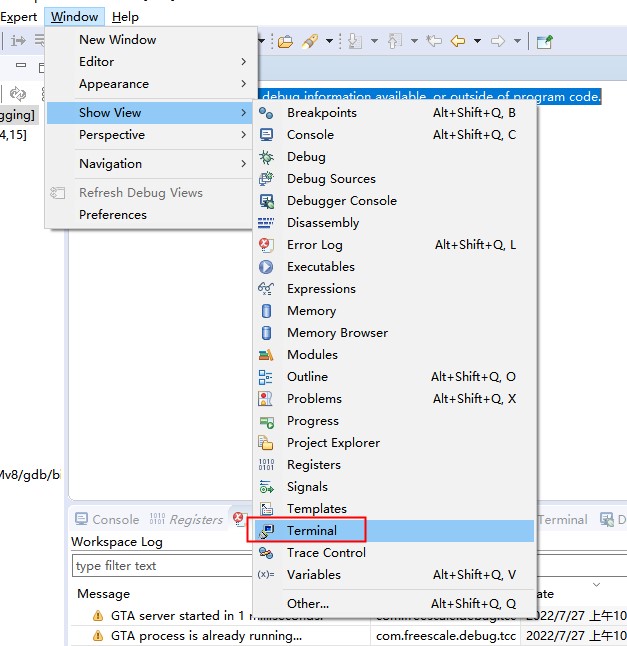
连接后,配置IP

Push enter to start console.

                  ####
               ##########
            ##########  ....          Freescale Semiconductor Inc.
               ####  ..........       Copyright (c) 2015
                  ..........  ####    All Rights Reserved
                     ....  ##########
                        ##########    Codewarrior TAP Firmware
                    ....   ####       Boot Loader Version 1.0.1
                 ..........             built Mon Aug 26 18:55:20 UTC 2013
              ..........  ####        OS Version 1.0.4
          ####   ....  ##########       built Thu Apr 23 22:28:59 UTC 2015
       ##########   ##########
    ##########  ....   ####           Main Board: CodeWarrior TAP (3.3V)
       ####  ..........               Probe Tip:  Power Architecture JTAG/COP
          ..........
      ####   ....
   ##########                         Note: This product uses open-source
##########                            components.  See "help license"
   ####                               for details.

Network not configured - defaulting to DHCP
core> help
Help is available for these commands:
  arp           ARP table commands.
  ccs           Display/manage CCS firmware
  gdbproxy      Display/manage gdbproxy firmware
  help          Get help on commands
  host          Host table commands
  license       Displays open-source license details
  netparam      Show/set nonvolatile networking parameters.
  netstat       Display network protocol statistics.
  ping          Test if host is alive.
  reset         Reboot this device.
  route         Route table commands.
  tgreset       Reset target
  tgtty         Get/set tty settings for target serial
  who           List any open connections.
core> help netparam
Usage: netparam [subcommand <subcommand options>]

This command displays or sets nonvolatile networking
parameters. If called with no subcommand, it displays all
parameters.  When called with one of the subcommands listed
below, it changes the parameters associated with that command.
Note that when changed, some parameters will not be activated
until the unit is rebooted.
Use "netparam <subcommand> --help" for help on a specific 
subcommand.

Netparam recognizes the following subcommands:
         add_host               Add static host
         add_route              Add static route
         bootconfig             Boot method selection
         delete_host            Delete static host
         delete_route           Delete static route
         static_ip_address      Specify static IP address
         static_dns_server      Specify DNS server address

设置静态IP,命令会阻塞10s,这个时候CodeWarrior TAP的RX/TX灯变为绿色,

core> netparam static_ip_address 192.168.6.223 # wait for 10s
core> netparam add_route 192.168.6.254 gateway_ip 1 # hop_cnt=1
core> netparam bootconfig static:cw-tap0
Netmask defaults to 255.255.255.0
Using dynamic IP address 192.168.6.223                                          
core> ping 192.168.6.6
PING 192.168.6.6 (192.168.6.6): 56 data bytes
64 bytes from 192.168.6.6: seq=0 ttl=128 time=0.917 ms
64 bytes from 192.168.6.6: seq=1 ttl=128 time=0.640 ms

--- 192.168.6.6 ping statistics ---
2 packets transmitted, 2 packets received, 0% packet loss
round-trip min/avg/max = 0.640/0.778/0.917 ms

跨网段设置路由,有警告但是设置成功。

core> netparam add_route 192.168.12.0 192.168.6.254 1
Netmask defaults to 255.255.255.0
gateway_ip: Unknown host
route: netmask doesn't match route address
Usage: route [-nNvee] [-FC] [<AF>]           List kernel routing tables
       route [-v] [-FC] {add|del|flush} ...  Modify routing table for AF.

       route {-h|--help} [<AF>]              Detailed usage syntax for specified AF.
       route {-V|--version}                  Display version/author and exit.

        -v, --verbose            be verbose
        -n, --numeric            don't resolve names
        -e, --extend             display other/more information
        -F, --fib                display Forwarding Information Base (default)
        -C, --cache              display routing cache instead of FIB

  <AF>=Use '-A <af>' or '--<af>'; default: inet
  List of possible address families (which support routing):
    inet (DARPA Internet) ax25 (AMPR AX.25) netrom (AMPR NET/ROM) 
    ipx (Novell IPX) ddp (Appletalk DDP) x25 (CCITT X.25) 
SIOCADDRT: File exists
core> ping 192.168.12.16
PING 192.168.12.16 (192.168.12.16): 56 data bytes
64 bytes from 192.168.12.16: seq=0 ttl=127 time=2.608 ms
64 bytes from 192.168.12.16: seq=1 ttl=127 time=0.526 ms
64 bytes from 192.168.12.16: seq=2 ttl=127 time=0.585 ms

--- 192.168.12.16 ping statistics ---
3 packets transmitted, 3 packets received, 0% packet loss
round-trip min/avg/max = 0.526/1.239/2.608 ms

查看路由表

core> netparam add_route 192.168.16.0 192.168.6.254 1
Netmask defaults to 255.255.255.0
gateway_ip: Unknown host
route: netmask doesn't match route address
Usage: route [-nNvee] [-FC] [<AF>]           List kernel routing tables
       route [-v] [-FC] {add|del|flush} ...  Modify routing table for AF.

       route {-h|--help} [<AF>]              Detailed usage syntax for specified AF.
       route {-V|--version}                  Display version/author and exit.

        -v, --verbose            be verbose
        -n, --numeric            don't resolve names
        -e, --extend             display other/more information
        -F, --fib                display Forwarding Information Base (default)
        -C, --cache              display routing cache instead of FIB

  <AF>=Use '-A <af>' or '--<af>'; default: inet
  List of possible address families (which support routing):
    inet (DARPA Internet) ax25 (AMPR AX.25) netrom (AMPR NET/ROM) 
    ipx (Novell IPX) ddp (Appletalk DDP) x25 (CCITT X.25) 
SIOCADDRT: File exists
core> netstat -r
Kernel IP routing table
Destination     Gateway         Genmask         Flags   MSS Window  irtt Iface
127.0.0.0       *               255.0.0.0       U         0 0          0 lo
169.254.0.0     *               255.255.0.0     U         0 0          0 usb0
192.168.6.0     *               255.255.255.0   U         0 0          0 eth0
192.168.6.0     192.168.6.254   255.255.255.0   UG        0 0          0 eth0
192.168.12.0    192.168.6.254   255.255.255.0   UG        0 0          0 eth0
192.168.16.0    192.168.6.254   255.255.255.0   UG        0 0          0 eth0

重启,需要把secureCRT的串口disconnect

core> reset
Close this configuration console to reboot...
(hit Ctrl+c to abort)

再重新打开,输入回车,和之前显示不一样了

Push enter to start console.

                  ####
               ##########
            ##########  ....          Freescale Semiconductor Inc.
               ####  ..........       Copyright (c) 2015
                  ..........  ####    All Rights Reserved
                     ....  ##########
                        ##########    Codewarrior TAP Firmware
                    ....   ####       Boot Loader Version 1.0.1
                 ..........             built Mon Aug 26 18:55:20 UTC 2013
              ..........  ####        OS Version 1.0.4
          ####   ....  ##########       built Thu Apr 23 22:28:59 UTC 2015
       ##########   ##########
    ##########  ....   ####           Main Board: CodeWarrior TAP (3.3V)
       ####  ..........               Probe Tip:  Power Architecture JTAG/COP
          ..........
      ####   ....
   ##########                         Note: This product uses open-source
##########                            components.  See "help license"
   ####                               for details.

Network configuration is static:cw-tap0
Using static IP address 192.168.6.223

这个时候,断开USB,采用USB供电,方可使用网络来连接,下载器自带了一个串口,设置串口参数,查看串口设置

core> help tgtty
Usage: tgtty [<options>]

Use this command to get and set target serial settings.  Without
options, this command displays current settings.  The following
options are accepted:
[reset]                                       -- terminates any open connections
[default]                                     -- set default settings
[<9600 | 19200 | 38400 | 57600 | 115200>]     -- baud rate
[<data5 | data6 | data7 | data8>]             -- data bits
[<stop1 | stop2>]                             -- stop bits
[<noparity | oddparity | evenparity>]         -- parity
[<rtscts | nortscts | rxtx>]                  -- hardware flow control
[<noxon | xon>]                               -- XON/XOFF flow control
[<echo | noecho>]                             -- whether the target echos

The default settings are:
9600 data8 stop1 noparity nortscts noxon echo
core> tgtty
115200 data8 stop1 noparity nortscts noxon echo

设置参数,会自动保存

core> tgtty 115200 data8 stop1 noparity nortscts noxon echo

恢复默认

core> tgtty default

使用这个串口,telnet登录下载器的1082端口。

【NXP】Lx2160的uart1口不好使

查看板卡设备存在

root@localhost:~# ls /dev/ttyAMA*
ttyAMA0  ttyAMA1 。

官方哪里又要了一个内和设备树补丁。这个补丁很重要,应该是更改了pl011的驱动匹配。

diff --git a/arch/arm64/boot/dts/freescale/fsl-lx2160a.dtsi b/arch/arm64/boot/dts/freescale/fsl-lx2160a.dtsi
index 2fe86aca32da..e316bb09f7a1 100644
--- a/arch/arm64/boot/dts/freescale/fsl-lx2160a.dtsi
+++ b/arch/arm64/boot/dts/freescale/fsl-lx2160a.dtsi
@@ -894,26 +894,29 @@
 		};
 
 		uart1: serial@21d0000 {
-			compatible = "arm,sbsa-uart","arm,pl011";
+			compatible = "arm,pl011", "arm,primecell";
 			reg = <0x0 0x21d0000 0x0 0x1000>;
 			interrupts = <GIC_SPI 33 IRQ_TYPE_LEVEL_HIGH>;
-			current-speed = <115200>;
+			clocks = <&clockgen 4 7>, <&clockgen 4 7>;
+			clock-names = "uart", "apb_pclk";
 			status = "disabled";
 		};
 
 		uart2: serial@21e0000 {
-			compatible = "arm,sbsa-uart","arm,pl011";
+			compatible = "arm,pl011", "arm,primecell";
 			reg = <0x0 0x21e0000 0x0 0x1000>;
 			interrupts = <GIC_SPI 72 IRQ_TYPE_LEVEL_HIGH>;
-			current-speed = <115200>;
+			clocks = <&clockgen 4 7>, <&clockgen 4 7>;
+			clock-names = "uart", "apb_pclk";
 			status = "disabled";
 		};
 
 		uart3: serial@21f0000 {
-			compatible = "arm,sbsa-uart","arm,pl011";
+			compatible = "arm,pl011", "arm,primecell";
 			reg = <0x0 0x21f0000 0x0 0x1000>;
 			interrupts = <GIC_SPI 73 IRQ_TYPE_LEVEL_HIGH>;
-			current-speed = <115200>;
+			clocks = <&clockgen 4 7>, <&clockgen 4 7>;
+			clock-names = "uart", "apb_pclk";
 			status = "disabled";
 		};
 
-- 

【Nxp】flexbuild_lsdk2108固件编译方法

一、通用指令

一、SD卡分区格式化
flex-installer -i pf -p 5P=200M:1536M:6G:-1 -d /dev/sdx

二、需要的下载包
firmware_ls1046afrwy_uboot_sdboot.img already exists ...
bootpartition_LS_arm64_lts_4.19.tgz already exists ...
rootfs_lsdk1909_LS_arm64_main.tgz already exists ...

三、下载包清楚指令
 flex-builder clean                          # clean all obsolete firmware/linux/apps image except distro rootfs
 flex-builder clean-rfs                      # clean distro rootfs, '-r ubuntu:main -a arm64' by default
 flex-builder clean-firmware                 # clean obsolete firmware image
 flex-builder clean-apps                     # clean obsolete apps component binary image
 flex-builder clean-linux 

二、ls1046 系统定制

1、下载包生成指令

$ flex-builder -i mkfw -m ls1046afrwy -b sd

$ flex-builder -i mkrfs -r ubuntu:main -m ls1046afrwy
$ flex-builder -c apps -r ubuntu:main -m ls1046afrwy

$ flex-builder -i mkboot -m ls1046afrwy -b sd

$ flex-builder -i merge-component -r ubuntu:main -m ls1046afrwy
$ flex-builder -i packrfs -r ubuntu:main -m ls1046afrwy

$ cd build/images
$ flex-installer -r rootfs_<sdk_version>_ubuntu_desktop_arm64.tgz -b boot_LS_arm64_lts_5.10.tgz -d /dev/sdx


$ flex-installer -i pf -d /dev/sdx   (partition and format the target storage device)
$ flex-installer -b boot_LS_arm64_lts_5.10.tgz -r rootfs_lsdk2108_ubuntu_main_arm64.tgz -f firmware_ls1046ardb_sdboot.img -d /dev/sdx

2、定制内核

 flex-builder -c linux:custom -a arm64  -m ls1046afrwy -b sd
 flex-builder -c linux -a arm64 -m ls1046afrwy -b sd

 flex-builder -i mkbootpartition -a arm64 -m ls1046afrwy -b sd

3、网络配置

auto fm1-mac1
iface fm1-mac1 inet dhcp

auto fm1-mac5
iface fm1-mac5 inet dhcp

auto fm1-mac6
iface fm1-mac6 inet dhcp

auto fm1-mac10
iface fm1-mac10 inet dhcp

4、SCTP协议栈支持

需要在内核选择确定。

三、LX2160 系统定制

1、编译内核

 flex-builder -c linux:custom -a arm64  -m lx2160ardb -b sd
 flex-builder -c linux -a arm64 -m lx2160ardb -b sd

 flex-builder -i mkbootpartition -a arm64 -m lx2160ardb -b sd

2、编译文件系统

 flex-builder -i mkrfs -r ubuntu:main -m lx2160ardb
 flex-builder -i packrfs -r ubuntu:main -m lx2160ardb

3、构建BOOTLOADER

 flex-builder -c atf -m lx2160ardb -b sd
 flex-builder -i mkfw -m lx2160ardb -b sd

 flex-builder -i mkfw -m lx2160ardb_rev2 -b sd

4、下载更新

 cd build/images
 flex-installer -r rootfs_<sdk_version>_ubuntu_desktop_arm64.tgz -b boot_LS_arm64_lts_5.10.tgz -d /dev/sdx

5、网络配置

dhclient 是网卡获取IP,可以上网。
安装network-manager

四、LX2160 REV2系统定制

1、编译内核

flex-builder -c linux:custom -a arm64 -m lx2160ardb_rev2 -b sd
flex-builder -c linux -a arm64 -m lx2160ardb_rev2 -b sd
flex-builder -i mkbootpartition -a arm64 -m lx2160ardb_rev2 -b sd

2、编译文件系统

flex-builder -i mkrfs -r ubuntu:main -m lx2160ardb_rev2
flex-builder -i packrfs -r ubuntu:main -m lx2160ardb_rev2

3、构建BOOTLOADER

flex-builder -c atf -m lx2160ardb_rev2 -b sd
flex-builder -i mkfw -m lx2160ardb_rev2 -b sd

flex-builder -c atf -m lx2160ardb_rev2 -b emmc
flex-builder -i mkfw -m lx2160ardb_rev2 -b emmc

4、下载更新

cd build/images
flex-installer -r rootfs__ubuntu_desktop_arm64.tgz -b boot_LS_arm64_lts_5.10.tgz -d /dev/sdx

5、网络配置

dhclient 是网卡获取IP,可以上网。
安装network-manager

6、实时补丁

 flex-builder -c linux:custom -a arm64  -m lx2160ardb_rev2 -b sd
 flex-builder -c linux:linux:LSDK-21.08-RT -a arm64 -m  lx2160ardb_rev2 -b sd
 flex-builder -i mkbootpartition -a arm64 -m lx2160ardb_rev2 -b sd

五、ARM DPDK Kmods编译

#KSRC ?= ./../../../flexbuild_lsdk2108/components/linux/linux/
KSRC ?= ./../../../flexbuild_lsdk2108/build/linux/linux/arm64/LS/output/LSDK-21.08/
ENV:=ARCH=arm64 CROSS_COMPILE=aarch64-linux-gnu-

all:
	        make $(ENV) -C $(KSRC)/ M=$(PWD)

clean:
	        make $(ENV) -C $(KSRC)/ M=$(PWD) clean

六、ARM DPDK 编译

flex-builder -c openssl -a arm64 # to resolve the dependency on OpenSSL package
flex-builder -c linux -a arm64 # to resolve the dependency of KNI module
flex-builder -c dpdk -a arm64 # build dpdk application
flex-builder -c pktgen_dpdk -a arm64 # to generate dpdk pktgen application
flex-builder -c ovs_dpdk # to generate ovs-dpdk binaries
flex-builder -i merge-component -a arm64 # merge app components into target rootfs

七、启动IEEE1588

1、IEEE1588开关配置

由于硬件设置问题,需要增加启动变量bootcmd。

修改RCW,增加如下代码:
EC2_PMUX=2

获取EC2状态(最高位有效):
i2cget -y 0 0x66 0x54

设置EC2状态(最高位有效):
i2cset -y 0 0x66 0x54 0xA0

Boot获取EC2状态(最高位有效):
i2c md.0 66 54

Boot设置EC2状态(最高位有效):
i2c mw.0 66 54 a0

2、寄存器配置1pps

tmr-ctl		        devmem2 0x8b95080 w 0xA0004	
tmr-add		        devmem2 0x8b950a0 w 0xcccccccd
tmr-prsc		devmem2 0x8b950a8 w 50000
tmr-fiper1		devmem2 0x8b950d0 w 0x3B9AC9F6
tmr-fiper2		devmem2 0x8b950d4 w 0x989676
tmr-fiper3		devmem2 0x8b950d8 w 0x7A116

八、FLASH更新固件

把固件从SD卡导入内存:
load mmc $load_addr firmware_lx2160ardb_rev2_xspiboot.img
load mmc 0:4 $load_addr firmware_lx2160ardb_xspiboot.img

格式化flash:
sf probe 0:0

写入FLASH:
sf erase 0 +$filesize && sf write $load_addr 0 $filesize

复位重启:
reset
qixis_reset
qixis_reset altbank

九、ARM OpenSSL

1、编译:

$ cd flexbuild
$ source setup.env
Build cryptodev-linux:
$ flex-builder -c cryptodev_linux -a arm64 # automatically setup cross-toolchain and fetch 
cryptodev-linux repository to build
Build OpenSSL:
$ flex-builder -c openssl -a arm64
Merge OpenSSL and cryptodev-linux components into target rootfs:
$ flex-builder -i merge-component -a arm64
Generate bootpartition tarball:
$ flex-builder -i mkbootpartition -a arm64
   flex-builder -i mkbootpartition -a arm64 -m lx2160ardb_rev2 -b sd

2、配置:

cat /etc/ld.so.conf
include /etc/ld.so.conf.d/*.conf
修改为:
#include /etc/ld.so.conf.d/*.conf
# libc default configuration
/usr/local/lib
# Multiarch support
/usr/local/lib/aarch64-linux-gnu
/lib/aarch64-linux-gnu
/usr/lib/aarch64-linux-gnu
/usr/lib/aarch64-linux-gnu/libfakeroot

ldconfig

3、加载模块


modprobe caamalg_desc
modprobe caamhash_desc
modprobe dpaa2_caam
modprobe cryptodev
modprobe caamalg_qi
sudo modprobe caam
user@localhost:~$ sudo modprobe cryptodev
[sudo] password for user:

user@localhost:~$ ls /dev/crypto
/dev/crypto

user@localhost:~$ openssl engine
(devcrypto) /dev/crypto engine
(dynamic) Dynamic engine loading support

4、Verify the CAAM offloading

Hardware operations can be monitored with the interrupt counters for CAAM JR and QI (DPAA1 and DPAA2) interfaces.

user@localhost:~$ cat /proc/interrupts | grep jr
78: 20 0 0 0 GICv2 103 Level 1710000.jr
79: 0 0 0 0 GICv2 104 Level 1720000.jr
80: 0 0 0 0 GICv2 105 Level fsl-jr0

user@localhost:~$ openssl enc -aes-256-cfb -k secret -P -md sha1
*** WARNING : deprecated key derivation used.
Using -iter or -pbkdf2 would be better.
salt=233157F098D1B0E8
key=D2B0C0C088AA7DAA6CF37CC856E283E3B0C3DD2BE155688DE18593EB3F997776
iv =A4E2C86E0DBA1211B5A4B02EBEFF6DC4

user@localhost:~$ cat /proc/interrupts | grep jr
78: 54 0 0 0 GICv2 103 Level 1710000.jr
79: 69 0 0 0 GICv2 104 Level 1720000.jr
80: 0 0 0 0 GICv2 105 Level fsl-jr0